This page, as it stood in October 17, is available, translated by a human, into French by Avice.
Feel free to skip over them... especially if you've seen them before... and go straight to the main body of this page, the Table of Contents (links to material from one author) for my Arduino 'How To's site!
I hope that the help here, and the pages the "menu bar" at the top lead to, will encourage and enable parents, teachers and youth leaders to get their kids using Arduinos. It is NOT rocket science. Nor expensive. Nor dangerous. And it gives users (any age!) a chance to develop and enjoy using whatever talent they have for CREATIVITY, problem-solving, and doing something less passive (Of course... kids are welcome to use the pages directly, if that's who you are, Gentle Reader!)
- - - - - -
I've done a page for you about the merits of Arduino, Pi and BBC:Microbit. Or, if you're thinking "Arduino", but you've barely started, there's my basic bits you need to get started with Arduino. ("Headline" number: $10. That's almost fair. More fair: $50... including bits you'll use for other things if Arduino is not a success with you.)
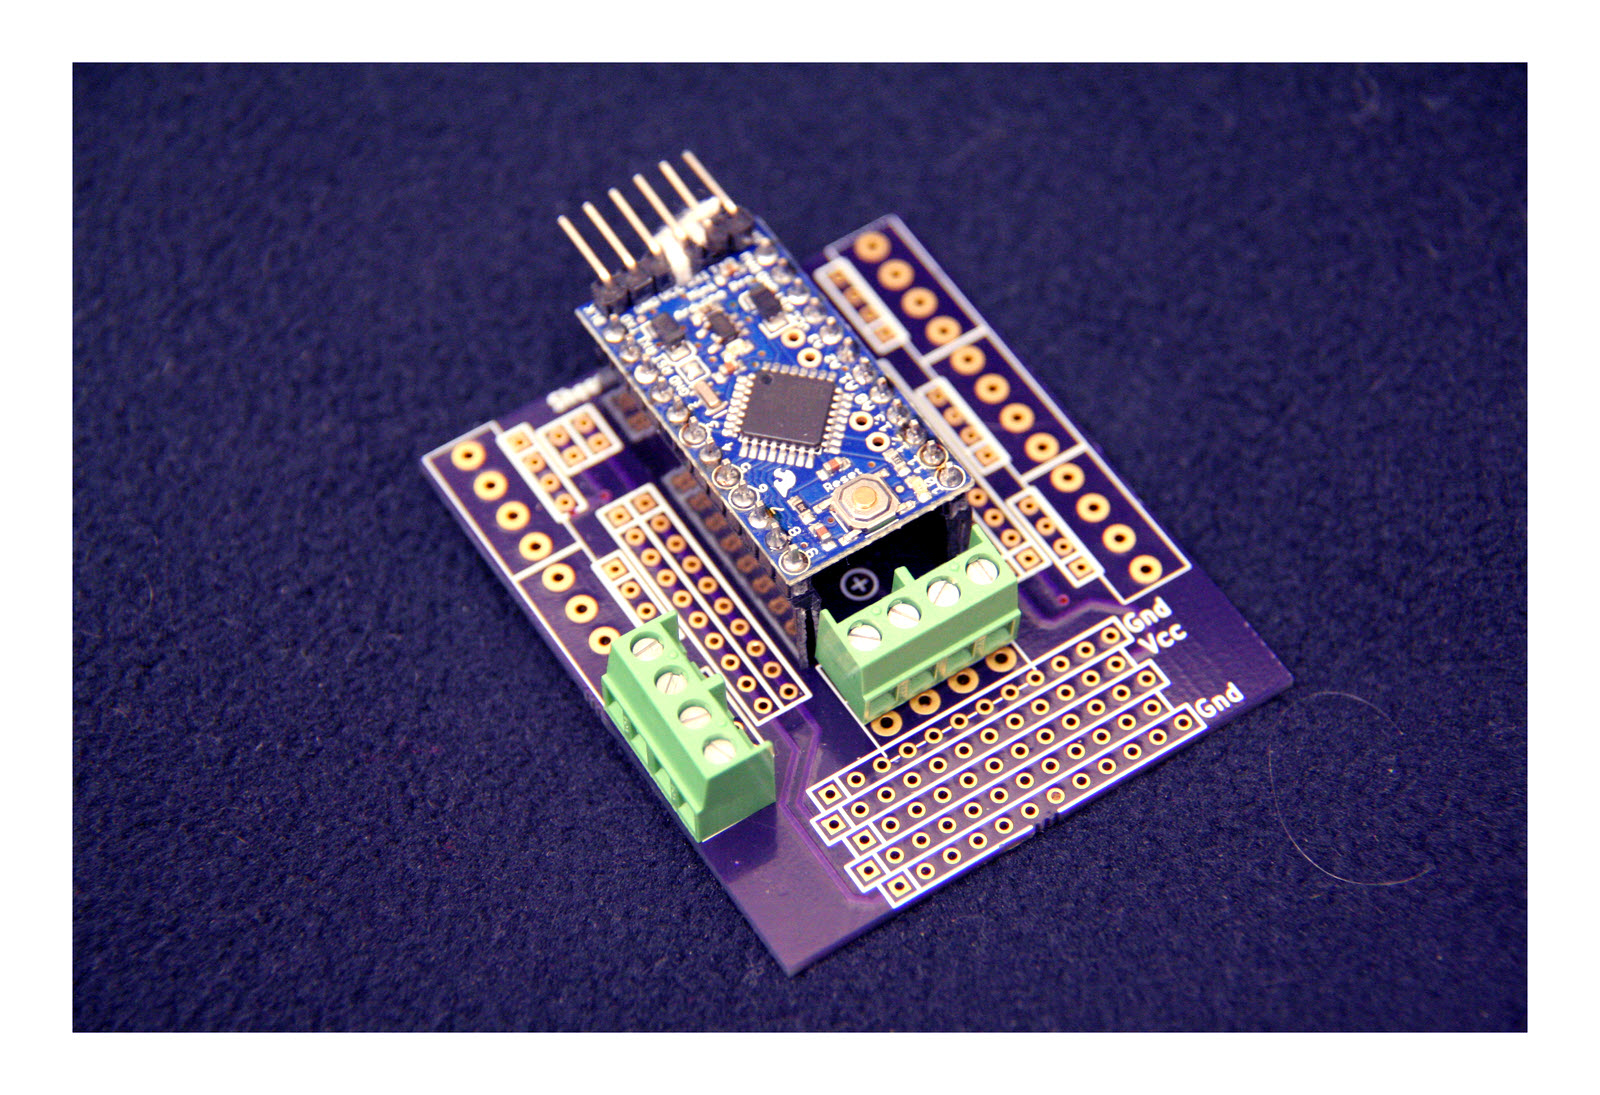
New!... (well, it was in Nov 2015. Page edited March 2017): Breadboards are great. PCBs have their place. Here's a middle ground: A "breakout board", if you like, for Arduino Pro Mini. You plug the Arduino into a socket, and all the pins become available to solder pads and, if you chose to install them, screw terminals. And there is a generous supply of pads for ancillary components, including many connected to Vcc and Gnd. What do you think of it, please?? Minimum order is $8 (incl p&p worldwide)... but you get three boards for that. You buy direct from OSH Park, I make nothing. Ordering details on the page the link above takes you to.
The splendid Practical Electronics (that link will take you to a PocketMags.com website. They handle PE subscriptions. And no, I don't get paid for the "advertising".) ran a series called "Arduino Bootcamp" at the end of 2022 and into 2023. Highly recommended if you can get ahold of a copy... be you new to electronics or intermediate. Always good to review the basics, and a few clever tricks that hadn't occurred to me are illustrated. The writing style is entertaining and engaging... Clive Maxfield, "Max" has his own website, "Coolbeans ("https://www.clivemaxfield.com/coolbeans/") which is full of goodies for geeks. (Search on Arduino, once you are there, if you want to concentrate on that in particular.)
---
I'm in love! An "Arduino" with built-in WiFi (that Just Works... no rocket science degree needed), at $15. Sparkfun ESP8266 "Thing". The ESP8266 has been around for a while... has a strong user community. Yes- you can get them cheaper. But the Sparkfun unit makes getting started SO EASY. Adafruit offer something very similar as the Feather Huzzah 8266.
There's more here that just how to do things. It also commends some good add-ons for your Arduino. The "How To's" section of this page is divided into levels according to complexity. Pages in the first (lower level) sections should be easy to read and involve little effort or expertise. Topics which are more complex and/ or require more Arduino fluency are relegated to the higher levels. If something may only interest a small part of the general readership, that too may find itself in one of the higher levels.
It has to be admitted that my placement of "stuff" in "the right section" is somewhat hit and miss. I recommend using Google or your browser's "Find on this page" when you know what you are looking for. Consider this page a bit like a restaurant menu, where you can browse and be tempted?
This material assumes you have a working Arduino playing nicely with the big computer you're using to program the Arduino. If you are still getting set up, be sure to see the excellent help and troubleshooting material provided at the official Arduino site. AFTER you've looked there, you can also access the helpful forums. Alternatively, I've done a guide to setting up an Arduino. (I wrote that while I was still a raw Arduino novice, so maybe I've managed to mention some of the things that more experienced Arduino hands didn't realize weren't "obvious".) I also have an extended course in Arduino programming for you, if that's what you want.
"You light up my life...": Well... maybe a few LEDs anyway. Basic information about connecting LEDs to an Arduino.
"Thank you for your input...": An introduction to connecting switches and push-buttons to an Arduino. The basics.... but they'll stand you in good stead for much work.
The Big Three: Voltage/ Resistance/ Current. You can go a long way with ad hoc answers to things, but you owe it to yourself to someday master the underlying fundamentals. This page is my introduction to those basic concepts.
Switch contact bounce: A nuisance for which we sometimes have to make allowance.
Pins of the Arduino: Some reference notes about special properties, roles, of some pins you might have thought were entirely general purpose.
Rough notes, FTDI drivers: March 2018, I wanted to set up a Windows XP machine with FTDI drivers, for a USB to serial adapter cables. Microsoft: Not helpful. FTDI: Brilliant. Install of a "new" Arduino IDE on an "old" OS also went well, thank you, Arduino team.
Someone Else's guide Almost all of the links to tutorials from this "table of contents" page in front of you go to more pages written by me. (And as such, they usually open in the same window.) I'm including this link to one of YourDuino's tutorials, though, as he has taken a fresh approach, which may appeal to some readers. (The link opens in a new window or tab... please come back here after going there!)
A basic command skeleton: Sometimes, you've set up your Arduino to respond to some sort of input which makes a selection. Depending on the selection, the Arduino does one "trick" or another. Even with a few LEDs and push buttons, you can make the Arduino flash different patterns on the LEDs depending on what buttons are pressed. This tutorial talks some about the underlying control structure you need for this sort of program.
LCD panel: How, easily, without spending a lot of money, to connect a simple liquid crystal display panel to your Arduino, and thus provide for text or numerical output. This solution is easier to use than the "usual", "do it with software" answer. Besides saving you programming work, it also means that fewer Arduino pins are used for the display. No, you won't be able to drive a laptop screen or monitor... but you can have several lines of characters or simple graphics, easily, and cheaply.
Serial Monitor: A way to obtain text and numbers from an Arduino program, on your PC screen, without buying anything beyond the basic Arduino and installing the basic, free, Arduino development environment software. (See also the tutorial on using the serial monitor to send data to the Arduino, in the Level 2 tutorials.)
Analog distance sensor: Interfacing an Arduino to an analog sensor. The sensor used ($26.. but see next tutorial for an alternative) measures distances (0 - 254 inches) ultrasonically. This "How To" also has general points relevant to reading any analog signal. The "How To" includes a way to make the Arduino display the analog reading on a "bar graph" of Arduino- driven LEDs.
Another analog distance sensor: An infrared sensor, less expensive, which would just "plug in" in place of the ultrasonic sensor used in the more fully explained "how to" above. Uses an IR beam, and is good for distances from about 5cm to 90cm. Will detect things from 0-5cm, but be "fooled" as to how far away they are.
Eight LEDs, eight digital inputs: Sometimes Simple is Good. If you want a well made, neat "answer" to hooking up 8 LEDs and 8 digital inputs, see my notes about adapting the ArduCapSense shield. You'll pay a little for the luxury of doing it the easy way... but how much is your time worth? Kit: only $15 including p&p (USA) at 3/11.
Beginner's challenges: A page with things a beginner can get his/ her teeth into. None require fancy add-ons or advanced skills, knowledge.
5v? 3.3v? Both?: Dealing with the two supply voltages used in many hobbyist electronic systems. Dealing with "mixing" them in one project.
Serial Monitor: A way to send text to an Arduino, from your PCs keyboard, without buying anything beyond the basic Arduino and installing the basic, free, Arduino development environment software. (See also the tutorial on using the serial monitor to receive data from the Arduino and display it on your computer's screen. That tutorial is in the Level 1 tutorials.)
Dealing with individual "bits" (binary digits): A more elegant way to do something which crops up in several of my tutorials.
The little matter of "power": Not "vital", early on, for cautious beginners... but something you should look at someday. What voltages can be "pushed in"/ "drawn out" of Arduinos? Where? How much "power" is safe, where? How to work with more power than you can work with simply. (And a little bit about what "power" means!)
Control VGA display with single serial line: Inexpensive (£25 @11/14, incl p&p in UK) small board which can generate an image on a VGA display. Character based, 50 lines of 100 characters. You only use a single I/O bit of the device controlling the display, e.g. Arduino, to "say" what you want shown on the display. It can have multiple windows, and each scrolls and line-wraps automatically. In multiple colors.
Seven segment LED display: Four characters. Inexpensive ($13 @8/10, + p&p) module from Sparkfun (COM-09764)... Controlled over a simple serial link. One one digital I/O line is used. (The 09765, 09766 and 09767 are similar devices in other colors.)
Simple pulse counter... and lessons in "good programming": At least read through this, even if you don't try to get it running. If you need to count pulses, it may be a useful starting place for you, but even if you don't... note the advice on programming, not least the material on using sub-routines to "hive off" details, and tabs to store sub-routine code. As written, the app uses a seven-segment LED display, subject of the previous tutorial... but that display isn't "necessary", and is easily written out of the exercise.
Simple time-of-day clock: This follows on from the previous tutorial, and discusses how you could make a simple clock to display the time of day to passing humans. It counts the swings of a pendulum, and turns that into an hours : minutes display. (Ways to "know" the time of day inside an app is a different issue.)
Door monitor... and so much more: Ostensibly, this is about making a monitor to see that something stays in one place, be it a door, a valuable small sculpture, a child. However, the "how to" essay delivers a major, stand alone, tutorial about "top down design/ bottom up development", using sub-routines, something approximating a state diagram, and doing switch de-bounce in software. Highly recommended, if you want some lessons on how to work more productively.
(For other thoughts on working as if programming is the making of "state machines", see my long Lazarus tutorial about using the "state machine" idea to convert a BASIC program to Lazarus. Fear not, even if you don't care about Lazarus or BASIC... or the fun "Hunt the Wumpus" game... there is Good Stuff about "state machines"/ "state diagrams" in that.
Overloading: You don't "need" this... but a quick note to explain it, in case you come across someone using it, and could be puzzled. (This talks about overloading in the sense that the same subroutine name can cause different things to happen. If you want to learn how to avoid overloading a power supply, how to keep the voltage in your project okay, that's different.
Sending floating point numbers to the serial stream, and a quirk of Serial.print: How to "print" a type-double value. The "quirk" is actually a helpful feature... but it is also a trap for the unwary. Overloading. Does "Serial.print(65)" give you 65 or A? Depends on how you pass the 65 to Serial.print! But you can have the behavior you want!
Working with Binary Numbers Mostly the general theory. "Boring", but you could find concepts in the essay useful!
Radio control hobbyist servos: Useful! Fun and easy to use. My How To Use A Servo page gives you the basics, and a bit about using them with an ESP8266, too. (The difference is only in a detail.) Affordable servos aren't very strong, but are capable of lots of things. With the usually-present "Servo" library, programming is very, very easy. You don't have to master "PWM"... the library takes care of that detail. You won't be using a radio link, just driving them directly over wires. Two small servos can "hang" directly off your Arduino, if you aren't putting a lot of other power demands on it. The servo will turn to (and stay at) whatever position you require over a 180° arc. (It can't "turn all the way... think of how your head works on your neck. Servos are like that, not like the mythical owl who can twist and twist.) I was tempted into buying a cheap, toy, pan & tilt head, and it is what I paid for... but still "works" enough to have fun with! Sun trackers, movable CCTV... here I come! I wish I hadn't put it off so long! See the main Arduino "Servo Library" pages and GeekLord's Instructable for more information.
Voice synthesis: Tremendous fun! Easy. Inexpensive ($25 @8/10, + p&p)... Control a speech synthesis chip over a simple serial link. Phoneme based: "say" whatever you want to... over a speaker, or down a phone line... etc! Lots of fun possibilities. It can either be a "printer" (outputting speech) connected to your Arduino, or filled with phrases and then operated independently.Non-blocking way to monitor the state of an input: If you don't already know about switch "bounce", or "chatter", see the simpler tutorial explaining How to read a switch, even if it "bounces".
Playing with WS2812 smart LEDs: In some ways, this isn't a "level 2" tutorial... but if you can get past the installing of a library, you will find that you can have a lot of fun with a pretty, not expensive, module with 16 very bright LED modules... and each module has a red and a green and a blue LED, and you can turn each fully on or fully off, or any of 253 brightness levels in between. And because of the way the modules work, it is all much easier than it sounds!
The visitor globe/ map(s) above... depending on your browser and settings... is, I hope, a bit of fun for you? If there's no globe, click on the link above ("Globe (scroll down...") and, if necessary, ask for "3D globe"... Lots of fun! They help me see if doing these pages is worth the time it takes. You may see none or several. Some are interactive; play with them, if you wish. (You may need to use your browser's "back" button to get back here after doing so.) The only information the system records is when visitors access the site, and where their ISP connected them to the internet. (In my case, that is 60 miles from where I live, at the moment.)
This comes to me as a free service from Revolvermaps.com. If you know how to insert HTML into your own web pages, it is easily added.
Some of the essays in this section "merely" tell you how to hook up some device which is commercially available. These are flagged in the list by the word "peripheral". Some contain tutorials on general skills, but that material is generally limited and incidental in "peripheral" essays. Some which involve a peripheral are not flagged as that sort of essay because they also explore more general topics.
(Peripheral) Simple device ($10) to read barometric pressure and temperature. A crude tutorial at this point, but the Sparkfun BMP180 is a great little device. You will need... willingness to use a library (help will be given), willingness to use I22C, a source of 3.3 volts... but a 5v Arduino is okay for the silicon brains to access this sensor. Sufficiently sensitive to notice a change in altitude of just a few feet! Simply from the difference in air pressure.
So many, in fact, that I decided to.... move towards a separate "table of contents" page for alphanumeric displays. Some allow graphics. Some have "extra features", like buttons for users to use to input their wants. The link opens in a new tab or window... just close that to return here. (If you don't have your browser set up to take you to the new tab, remember to do it by hand!)
Arduino IDE's Serial Plotter (link takes you to an Instructables.com page): I haven't tried it yet, but I suspect it will be a lot of fun, and useful: If your Arduino IDE is version 1.6.7 or higher, have you noticed the new entry in "tools"? There's now a "serial plotter". A bit like the serial monitor, but this draws graphs.
$18 and one pin for very accurate time, with date. And, oh yes, location etc. (Peripheral): Who knew GPS was this easy? Only one I/O pin taken, and less than $20, and (with a half decent view of the sky) you can easily have the date and time... and where the device is. Courtesy of the taxpayer paid-for GPS system. "GPS not for you"? Have a look at the essay? Please! (AND, I think that if the device is moving, it also gives you speed. All the heavy lifting of "X seconds ago we were at Y and now we are at Z, so we are moving at..." done for you inside the peripheral. It also, I think, gives you the direction you were going. (If you try this, and get an answer on the "speed? direction?" question, please let me know?)
1.8" TFT display- text and color graphics (Peripheral): Inexpensive ($20) backlit display, easily driven.
the Big Buddy Talker. (Peripherals): Make it talk! There are several things you can put between an Arduino (or Pi, etc) and simple powered speakers (of the sort you probably already have for hearing the audio from a YouTube, for instance.) New, 5/18, a great little "simple" answer. "Limited" to "just" a little more than one thousand words... but inexpensive (about $30, May 18) and it is very simple to get it to say things. Each word it knows has a number. Send numbers, it says words! Then there's the more elderly Speakjet from Sparkfun. This is a "sounds" based speech chip. Speakjet+ About $25 + p&p 8/10... and still that price 5/18... thank you Sparkfun!) More "words", but lots more work. And lastly, though I haven't tried it, I'm told the $60 (May 18) Emic from Sparkfun is pretty cool... send it "I can't do that Hal", as serial ASCII, and (I'm told) it will try to create the audio for you.
Fun idea(?) Talking Morse reader? Just take a Big Buddy Talker (see previous) and a Bonet Morse Reader... both cheap and simple... Hook them up via an Arduino... a Pro Mini will do... and what you TAP on a Morse key will SAID by the Talker! (Ummm... that is, if you tap . . . / _ _ _ /. . . the Talker will say "Ess", "Ohh", "Ess". Tap _ / ..../ . and it will say "T", "H", "E"... not "the". Sigh. At least with elementary programming. It COULD say "the", with more clever programming, the words it could say are limited.)
The Atmega's built-in counter Want to count the number of "ons" (positive edges) in a stream of pulses? Even an erratic stream. (Or is the number of offs? Almost the same thing.) Without tedious polling- by- software? Use the built-in counter! Here's how... and no, you don't need to use an interrupt, or do anything "weird" or potentially system "breaking".
5v? 3.3v? Both?: Dealing with the two supply voltages used in many hobbyist electronic systems. Dealing with "mixing" them in one project.
Level shifting (Electronics) : Using a transistor to "connect" an Arduino (or other microprocessor) to a 12v (DC) input. "Connecting" an Arduino to something that runs on 12v to turn that thing on and off. All without frying your Arduino.
More Level shiftingIf you need to use a 5v Arduino with 3v3 peripherals, or vice versa: In SOME cases you can. If you are SURE you know what you are doing. If you don't, then $3 for a simple board, the "Bi-Directional Logic Level Converter" (Stock BOB-12009) from Sparkfun seems little to pay. (I have used one once, in a very small way... but it seems almost idiot proof and simple. I have a small page summarizing connecting one of these 5v to 3v3 (and vice versa) interfaces into a project.)
Opto-couplers / opto-isolators Speaking of "connecting things" (as we were in the previous items about level shifting), another useful component is the opto-coupler.
Roll over Something that happens... and can cause you to tear your hair. And in related news, how to do a non-blocking delay. (And what that is, and why you would want one!)
Heartbeat/ heart rate or Blood oxygen level sensor (Peripheral): Inexpensive ($20) device, easily driven.
Way to... easily... *** write data to an SD card (Or read from one) *** (Peripherals/ Storage devices): One wire, in addition to power and ground, and if you can send data to the Arduino IDE's serial monitor, you can send data to files in an SD card. Sparkfun OpenLog. That only scratches the surface, but still could be useful in dozens of applications. It is NOT HARD or expensive. (If you can't send data to the IDE's serial monitor, learn how... it is very useful! and also easy.) The essay also mentions some simpler (less expensive, though the loggers aren't what I'd call "expensive") devices for using SD cards. (I've marked this one with the stars because the units discussed could be useful in so many applications.)
Read from SD card / Write to SD card...... for less than you would spend for the previous solution. And with more control over the details. In general, and with some ESP8266-specific "secrets", too.
Read lines from a text file: Who knew it could be so hard? All I wanted to do was to fetch two lines of text from a simple text file. The page this takes you to doesn't have that answer, but it defines the question... a big part of reaching a good answer.
LCD with Input buttons (Peripheral): Details of a nice little module which lets you easily add a small LCD screen (pretty, and backlit) and 5 input buttons to any project. (US and UK suppliers. $12, December 2014.) (Ties up 7 digital lines, one analog input. Easy programming.)
Servos (Peripheral): Servos are neither remarkable or complex. Useful, though! This essay is mostly just YAServo Tutorial... but a nice "demo" pprogram is provided, and some small (but deal breaking) "secrets" about using them with an ESP8266 are provided.
$5 Liquid Crystal Display, four lines, 16 characters (Peripheral): Get one (or two!) while they are cheap! (They were at https://moderndevice.com/product/4x16-lcd-character-display whereModernDevice were selling them for $5, excl p&p, (August 2015)) I said: These are some little LCDs which Just Work, without any special adaptations, with the instructions at the Arduino.cc Guide to LCDs. While they weren't available from Modern Device 3/19, the page was still there, with information you might find useful. You can probably find similar information from the usual places. Pinout/ hookup was the same, for the displays from ModernDevice. The software didn't need any tweaks. The $5 modules had no backlight. What do you want for $5?! They were "DataVision 16400"s. That probably isn't the only model number that would work. Read the page this links to gives help with this sort of display.
Reading an IR remote control / "Beam broken" intruder, etc, detectors: Use an ordinary remote control as a keyboard for all your Arduino projects. In some digressions at the end of the tutorial, I present some project ideas. Have fun! (If you use the library recommended, you can also send IR remote control signals from an Arduino.) The "beam broken" detector does not need a remote control handset, but if you read the tutorial, you'll see how the topics are related.
RFID reader (Peripheral): A simple guide to connecting an RFID reader to your Arduino. It is specific to the Innovations ID-20 ($35, 2/11) from Sparkfun.com, but should also be almost everything you need for the slightly less expensive ($30, 2/11) ID-12.
Drive a four coil stepper motor. These little motors are easy to obtain... I got one for 5v, with a driver board, for about $5, from an established US distributor. There's a one minute YouTube video showing my four coil stepper motor in action, if you want that. It is running the program discussed here, through the driver board discussed here.
Know the date and time of day (Peripheral): Using a DS1302 RTC chip. This "tutorial" is not yet polished, but has useful information. I bought the hardware for $2 (+ the price of a "button cell". Does NOT require you to put something on the I2C channel.
Sense humidity and temperature Using DHT22, SHT11, RHT02, and similar chips. I bought the hardware for about $10 + p&p from a "mainstream", US based supplier. This tutorial is in my NoviceGuard daughter boards series, but you don't need NoviceGuard or the NovGrdCore library to use it. You make just two minor changes to the software to adapt for general use.
Scrolling display (or simpler display) on multiple 8x8 LED matrices (Peripheral): Using MAX7219 modules. (2/19: an assembled four module (256 LEDs in total) cost less than $10 at Amazon.) Full software, in sourcecode form. Somewhat limited "tutorial".
Eight capacitive input pads, eight LEDs... plus audio! (Peripheral): The ArduCapSense shield gives you eight "pads" on a nicely made shield... which can also be used with Arduino clones which do not accept shields directly, due to their footprint. As a bonus, it also carries 8 LEDs, and a simple circuit to interface a digital output to an audio amplifier and speaker. Only $15 as kit with parts, 3/11.
Fingerprint reader (Peripheral): I had fun with this. Mostly, I really liked it. Not a trivial device to interface, as far as software is concerned, but the developer's guide well written; the device "powerful". You don't get simple power, usually. The hardware side of the interfacing couldn't be simpler. The bad news: with my fingers, on the two specific readers I tried, the basic "read" of the fingerprints was unreliable. But I was using an old model of a line which has since released newer models, which may do the fingerprint capture better. I wouldn't ask for "improvements" to the software... it was great as it was. (I believe the new models are software compatible with the old.) All other aspects of the device, and online comments, were just too promising for my problems to make me abandon "playing" with the readers, anyway.
Subroutine to measure frequency This slightly atypical tutorial presents a subroutine which will look at an input, and tell you if a pulse train is present, i.e. a signal going "on"/ "off"/ "on"/ "off"/ "on"/ "off... fairly steadily... or not. It doesn't use interrupts. It will return, even if there is no pulse train. Actually, it returns the length of a full cycle, but that's inversely proportional to the frequency, isn't it? Developed in connection with the DirtCheapDumbWireless project.
nuElectronics Datalogging Shield... (Peripheral): How to use the £11, c. $16 (7/10), shield for data logging from www.nuelectronics.com... and why you would want to! (Sadly, they seem to have Gone Away... but their products may be available in the second-hand market... and numerous general points are addressed.)
Maxim (was Dallas) 1-Wire (MicroLan) chips: A huge topic. I have an overview of using 1-Wire chips, and a "Getting started, 1-Wire with Arduino" page. (That page seems to be about using an ESP8266 (an Arduino IDE programmable device)... and it is. But most of what it says about 1-Wire on Arduino is equally applicable to any Arduino.) (Those pages have more links, taking you to a vast untidy collection of old pages by me about working with these fun chips.)
Maxim (was Dallas) 1-Wire (MicroLan) chips: Using MicroLans with an Arduino There are many splendid pages about using one 1-Wire chip per Arduino pin... which is fine for a small project. But 1-Wire chips can do so much more as part of aMicroLan (Dallas (tm))... and the good people at Last Minute Engineers have done a splendid tutorial about using MicroLans to attach multiple Dallas/Maxim 1-Wire chips to a single Arduino pin. It is very polished tutorial, by the way.
Maxim 1-Wire continued... Sadly no longer available: 1-Wire interface... How to use a $8 pre-programmed microcontroller to greatly simplify communications with the wonderful 1-Wire family of sensors and actuators. The product at the heart of this page is no longer available. My page about the interface was heavily re-written in the first part of April 2008. Not only could it be of interest for the stated topic, but also it exemplifies communicating between and Arduino and serial devices in general. The Dallas 1-Wire family of chips open up all sorts of possibilities, including MicroLans. Read about connecting them. (The discussion also speaks of the Arduino's 1-Wire Library... a different way to connect to 1-Wire devices,"SPI", which is not covered here.)
Maxim 1-Wire continued... There is a product on the market... and it has been there for a while, it will have had many bugs squashed, long ago. It allows you to "talk" with a string of 1-Wire devices with just four lines (plus ground). You do have to master the "joys" of working with RS-232, but those skills could be of general use, and it's not Rocket Science or expensive. The product is the HA7E, from EdsProducts.com ($40+ p&p at 10/17). You send Ascii commands, and it sends back what you needed. Takes care of sundry clever things. I nearly quoted big chunks of their excellent product description... but this is just an aside!! (Read the short description, and you can learn a lot about the 1-Wire world.)
I have a number of pages which talk about connecting Arduinos to other instances of silicon intelligence. The first link takes you to a sub-menu of "illustrative" programs, demonstrating general principles. The other links (more to come) are to pages which discuss specific, "worthwhile in their own right" projects.
Using the If This Then That service for the first time The free service at ifttt.com is way too cool. Also one of those things with so many possibilities that it is hard to know where to start. This tutorial shows you how, from scratch, to use a web-enabled Arduino (an ESP8266 works especially well) to cause an email (or SMS) to be sent to whomever you wish when something happens at the Arduino. For the demo, you simply pull D4 to ground to trigger the sending of the email... but changing the "something" would be child's play. The Really Useful Stuff in the tutorial is how to get started with IfThisThenThat.
Good news! If you've done the tutorial above, you get a double reward. The bad news is that the tutorial this takes you to really needs for you to do the previous one first. This tutorial tells you how to send a "do it" command to an internet-connected device as the "That" of a "If this then that" recipe. And it is EASY... after you've done what's in the tutorial above with its "getting started with IfTTT" exercises.
Linking Arduinos to things with serial ports A sub menu setting the stage for several tutorials, including How to speak to PC from Arduino, and How to speak to Arduino from PC.
One device which use a serial connection, but which is a simpler instance of that kind of thing is...
Connect a USB device (keyboard, memory stick, MIDI keyboard, etc...) to a microprocessor: Inexpensive (£18 @8/20 plus reasonable p&p) small board to take a USB keyboard and convert keypresses to a stream of serial data for, say, and Arduino, Teensy, Pi or other microprocessor. Ties up just one pin of the microprocessor and very limited memory, etc, resources. (One board... but it can be loaded with various firmware packages, to do various jobs.
Linking multiple devices Arduino "master/slave" setup: With a program running in a "master" PC, an Arduino "slave", with an LED and "doorbell" switch can be "driven" / monitored. The window on the PC's screen tells you from moment to moment whether the "doorbell" connected to the Arduino is pressed, and there are two buttons: "Turn LED On", "Turn LED Off". With a click of the mouse on the master, the PC, the LED on the Arduino can be turned on or off. The two are connected by a simple serial link. You don't NEED Delphi to benefit from the material in the tutorial, even though the PC part of it is couched in Delphi terms.
Linking multiple devices Arduino "client/server" setups. Using a serial link to another device.
Web server 2 A guide to connecting your Arduino as a web server to the world! with a Wiznet W5100 interface... the widely supported one. There are links from there to Arduino servers which you can play with across the net. (To set up your own, you do not need a "static IP address", if you know what that is, and it is worrying you.) With the web server described, you used to be able to supply an Xively (previously Pachube) data stream source, but now (4/20) Xively.com seems gone as well. Although at Apr 2020 I haven't tried it for a while, as far as I knowm, you can still use a ThingSpeak data stream source. (This is covered in the ArduServer.com top level page. (I haven't "played with" this since before Pachube was absorbed into Xively.))
Environmental monitor webserver A guide to setting an ESP8266 ($16) up as a web server connected to sensors, and reporting, in a simple way, readings from them. (The sensor used can easily be substituted. It was a Sensirion SHT-15) Once that webserver is in place, simply providing readings when asked, a separate machine can harvest, log, plot readings... from the one monitor or many. The "tutorial" element is weak, but the code WORKS, and, as usual, can be downloaded.
ArduWatcher Once you have an Arduserver with sensors on your LAN, or the internet, if it creates a specific line in the page of HTML it returns, then you can set one of my FarWatchWatcher programs to "watch" the values being returned by the sensors. FarWatchWatchers (once called "ArduWatchers") run in a Windows PC somewhere... elsewhere on LAN, or, if Arduserver is visible to the internet, anywhere on the internet, and (automatically) periodically visit the Arduserver, harvest the current sensor readings, and save them in a CSV file for use anywhere you want to use them. Some of the fancier FarWatchWathers will plot the data on a graph.
Web server.. the original Another guide to connecting your Arduino as a web server, similar to the one above. This uses an ENC28J60 interface... the old, inexpensive, less widely supported one. Cost of project: About $40, including an Arduino clone to be dedicated as the server. ($40 on top of things which I imagine you already have.) This can also serve Pachube or ThingSpeak. (This is covered in the ArduServer.com top level page.)
PCSensor.com TEMPerLAN This "tutorial/ how to" is very atypical. At the moment, the link takes you to something which at first doesn't seem to have anything to do with Arduino work, and in fact the first part of the page doesn't have anything to do with the thing related to Arduino work! But if you scroll down, you will find anguished rambles regarding my experiences with the TEMPerLAN... a neat little device, which does seem to work(!), but which at 9/11 is, my view, let down by limited documentation and software.
But! Follow the links, and my software for the TEMPerLAN will also allow you to access my ArduSimpLan, subject of the next tutorial. So... if you are interested in the programming of a client, to run on a PC, to talk to an Arduino simple (not html) server, you may still find it worth reading through the TEMPerLAN material! (TEMPerLAN is not covered in the ArduServer.com top level page.)
ArduSimpSrv A simple Arduino Server. Not all servers are web servers! This tutorial explores an alternative. The good news: Your Arduino won't have to dish up HTML, so the complexities of that are avoided... leaving room for doing more.
The bad news? You'll need a dedicated client program to read what the server makes available. One is provided for Windows users, and instructions for writing your own, too.
An ArduSimpLan can be accessed from anywhere on the internet if you configure your LAN as needed. (The configuration for that is a general matter of LAN admin, regardless of whether it is an ArduSimpSrv you are making available, or something else. The details are covered at my FarWatch pages... but you don't have to set up the Apache server, or have an always-on PC... the ArduSimpSrv will be the always-on server. (Oh! You will need an always-on PC to take care of keeping your DynamicDNS service informed of your changing IP address, unless, as may well be the case, your router or an IPCam on your network can take care of that. Sigh.) (ArduSimpSrv is covered in the ArduServer.com top level page.)
An exercise bike (or treadmill) with active Google Streetview- complete "how to". Imagine a Streetview "journey unfolding in front of you as you slog away on the stationary bike or treadmill! And not hard or expensive to implement. Nor expensive.
COMPETITION... Cash prizes Can you make an Arduino "understand" Morse code? (modest prize for the best job) Can you do it in an ATTiny? (At least $40, maybe $60 for the best entry.) All entrants will be reimbursed for the cost of materials and p&p. See page for how to contact me, to see whether there's a deadline for finishing yet. (The clocks will start ticking when the first successful entry is received. (One clock for "in Arduino" version, a separate one for "in ATtiny".) (Further to competition: A "finished Morse Reader" has been created. Available in kit form. (You simply do a bit of simple soldering, etc. No SMT components). But the competitions remain in operation... unless I've forgotten to modify this link! (The competitions' main page is the definitive source of information.))
A QUESTION, this one... best way to use solar power? A discussion of some of the design issues, if you, like me, would like to have an Arduino running on solar power, with something... LiPo? Super-cap?... to carry it through the nights. Your thoughts welcome! Some aspects would carry over to having an Arduino which normally runs on household electricity, but has provision for surviving power failures.
Perpetual Motion: Use an Arduino, a magnet, an electromagnet and two switches to create a pendulum which never stops gently swinging. Count the swings if you want to know the time of day, but created for the fun and aesthetics of it. (Comes with complete program code.)
Burglar Alarm: At the moment, that link takes you just to some Arduino sourcecode. I will write one of my tutorials for you in due course. (A draft is well along.)
Access Control: A simple little thing. But completely secure and useable... just not very big! It might be worth looking at, just for general ideas in it, even if you don't need an electronic lock. Easily adapted to add features.
Access Control: A huge essay, lots of tutorial material, fancy "electronic lock", driven by an Arduino. (A case study from my Arduino Course).
Light to lighten... the hallway: There's nothing particularly difficult in this project. At it's heart: A simple system to turn on a light in a dark hallway when appropriate. It turns itself off after a suitable period... and lots of other things happen. I was inspired by the UK's Computer Shopper. It isn't particularly well polished, but even if you don't want a hallway light, I think it has some useful guidance on good programming and project development. I hope you will at least scan it, for those elements.
Software to run a loom: Ironic, really. Any computer studies course claims that a loom was the first programmable device. (It was "programmed" with punched cards. Change the cards, and you would weave a different fabric. Now, 2015, we come full circle: A program to control a loom. This was the fruits of an actual "job" to create a real program for a real loom. The write up has rough edges, but it takes you through what the program does, and how it might be adapted for different requirements. The program is in good shape, and illustrates some Best Practice ways of doing things. What this does not have is a lot of tutorial material.
The "BreakWire LAN": This essay doesn't tell you "all about how to do it", but it does present some of the basics for creating a little LAN that would allow you to connect Arduinos together, to "talk" on a LAN. A "big" PC could be on the LAN, too.
Lidar scanner: Have you heard about lidar scanners? Quite cool, not too expensive. My introduction to lidar scanners page doesn't go into detail, but may whet your appetite to spend $90 to try one. You can map your vicinity with one, or "see" changes in a vicinity, if you've taken a baseline. You could also use the device to "capture" 3D surfaces.
Color-aware line follower: Ever been in a huge public building, say a hospital, where the administration has put colored lines on the wall to help you navigate? "Follow the red line for emergency exit", "follow the green line for cafeteria", "blue line for billing", etc? Someone must have thought of the following project already, but I haven't seen it elsewhere before 2 May 2011, and still not at 15 September 2011. But it would be a fun project for you. (I haven't built one, just dreamed it up.) For many years, "line following" robots have been around. This idea extends that a little. The robot would operate in an arena with a white floor and SEVERAL lines on it... in different colors. Near the edge of the arena, a black line all around it, like a "fence". The robot would follow the line of the color you tell it to. If you tell it to change to a different color, it should be able to seek the line out, turning back whenever it reaches the "fence", rather than going off the edge of "the world." The Sparkfun Color Light Sensor - Avago ADJD-S311-CR999 ($5 at 5/11) is a very clever sensor for this. BEWARE, however... It is a 3.3v device. The programming to read from it is not trivial. And this thing is TINY, and you'll need some very tricky soldering, and a PCB, if you buy just the sensor. Happily, Sparkfun offers one on a breakout board! ($15 at 9/11 + p&p). (One of you, Gentle Readers, should make a present of one to me, and remove the temptation I am feeling. Until just now, this paragraph talked about "it would be nice if Sparkfun put the sensor on a breakout board". I only went off to the site, and into temptation's way, to keep this page current for you!!). If you can't face the fancy programming, or the 3V3 requirement, how about interfacing your Arduino to three AmbiLight sensors, with color filters, anyone? Or one plus a filter changer? (If you undertake this with a mere phototransistor, be sure to use one with a good response to a wide band of frequencies. Many are almost color blind, "seeing" just one color.) (Of course, the Arduino Uno has a 3V3 output, and you'll need another Arduino to drive the sensor, anyway, so what better excuse to buy an Uno, in the same order as the sensor on the board?? (Uno: $30, including onboard serial-to-USB i/f.)
Wio Terminal from Seeed: Brilliant little package for not very much money ($40, 12/21) Arduino or Micro-Python programmable. Lipo-friendly. 2.4" LCD Screen, I2C, 4-way-and-press "joystick"/"joyswitch", three other momentary switches, microSD card slot. My early enthusiasm faltered when I came to the conclusion that while it sometimes served webpages, THAT software was not yet working proplery. That doesn't mean that there are many other apps it would handle well. (aka "WioTerm", "Wio-Term"
Power for Arduino, etc: Not actually an alternate form of Arduino... but related! A PCB to supply power to low demand project, e.g. something in an Arduino, or ATtiny, from solar panels (or other) with supercap backup to carry the system across failures of the main supply. It also has a watchdog circuit to guard against lockups arising from slow recovery of voltage. Along the way we meet the marvelous, and "do-able"ATtiny.
Bean+: ("Bean Plus"), from PunchThrough.com A physically small, lipo powered, Bluetooth equipped Arduino clone with some further extra bits. Nice little beast. Sadly, no longer supported, Apr 2020. If you want to buy my barely used old one, get in touch?
Qduino: A physically small, breadboard friendly Arduino clone with special features making it lipo battery friendly.
ATtiny: Once you've done a bit with Arduinos, you will be ready to start using ATtinys. These cost about $3, and are "Arduinos-on-a-chip" which need no support circuitry. Some need only 8 pins, and cost about $3! For $4, you can buy a 14 pin version... the extra pins being extra general-purpose input/ output lines. Way too cool. And NOT hard, I promise!
Adafruit Trinket: The original was ATtiny85 based, but easier to program than a "naked" ATtiny. However, it is probably best to "go for" the more modern Trinket M0 (Cost, 1/19: about $8.95 plus p&p. At that price, how hard do you need to think about it?)
RockBlock from rock7.com: I "need" (want!) one of these!! Just the site name is reason enough? Sadly, one would cost $160 +tax, etc... but running costs done very sensibly and not bad!) lets you (or your device) send short messages to a central server from ANYPLACE ON EARTH! Via satellite technology. (And receive them.) And you can "drive" one with an Arduino! I haven't played with one. But I couldn't resist mentioning it.
The Particle.io Photon: (Mixed review)... For $23, incl p&p, I fell to temptation. Not for the faint-hearted! But oh, so cool, if you like what it has. Sort of an Arduino. (You can program in "Arduino", but not by the normal Arduino IDE. You program online... yes, your code is in the cloud. Wireless connectivity. Really. Though it may not seem like it at first. IoT... it comes with some awesome Internet of Things possibilities. I finally had mine working. All I needed, I think, was my trusty (old) Android, and "home" WiFi system. A Windows XP box on the same LAN, with Firefox, was helpful. Didn't NEED more, on the XP. Resist using the "set up via USB". It is a lot of work, a lot of "stuff" you (really) may not need. Fight on with doing it wirelessly. Green flashing LED? Photon is "working"... it "just" can't connect to your WiFi. A password or permissions thing in the way. Which can be fixed via wireless, using a tablet. Probably.
Stan Simmons' free simulator of Arduino Uno for Windows works! Hurrah! Great for getting a taste, great for demos in schools.
PCB Design for Arduinos: I like KiCad for PCB design. This link will take you to some .lib and .mod files for putting Arduinos on PCBs.
My tutorials about programming for the Dallas Semiconductor 1-Wire (tm) chips, as used on a MicroLan (tm), have been moved to here.. Those tutorials are written for Delphi (language) programmers, but they contain much information that would apply to other language environments. I also maintain pages which introduce MicroLans and explain the hardware.
Photos of Sargent Model 81 Mortice Lock internal mechanism. No! Nothing to do with Arduino! Sorry! But useful if you are trying to repair one of these locks!
Further to the Arduino ideas the page you are reading now will take you to, I have posted a series of essays which try to help you become a better Arduino programmer and engineer... but, for the best result, you will have to buckle down and work your way through them in sequence. The "How To's" here can be accessed in whatever order you like.
My experience is with the Arduino Diecimila and two clones, the The Bare-Bones Board ("BBB") from ModernDevice.com and the Boarduino from AdaFruit. I've been using the Arduino Development Tool (IDE- Integrated Development Environment), on a Windows XP box since version 0010. (I'm using 0014 for some work at the moment.) Having said all that, I have confidence that the product works well across various platforms. I am beginning to use Linux, although so far I've only done a little Arduino work there (using Ubuntu).
Feel free to use this information in programming courses, etc, but a credit of the source would be appreciated. If you simply copy the pages to other web pages you will do your readers a disservice: Your copies won't stay current. Far better to link to these pages, and then your readers see up-to-date versions. For those who care- thank you- I have posted a page with more information on what copyright waivers I extend, and suggestions for those who wish to put this material on CDs, etc.
There are many! That is part of the reason I am so enthusiastic about the device.
Suppliers: I like Sparkfun, ModernDevice and Wulfden, all in the US. There are other good ones, they're just the one I happen to use. (I came across Emartee in September 2011. While I haven't used them yet, they seemed to have some good stuff. There are other people who sell primarily via eBay. You have to remember that there are many Arduino-friendly devices which are not only good with Arduinos.
Sparkfun, in particular, has both a good user forum and a means of adding comments and discussion to each product's page. Of course, as Arduino is such a good fit with 1-Wire, my preferred 1-Wire suppliers are also, by association, "Arduino suppliers".
If you like the sort of little "How To's" this page is the index to, or if you want to buy some useful kits of things that interface with Arduinos, you could do worse than to visit Peter Anderson's Arduino page. He was a university lecturer whose involvement with hobbyist electronics goes back (like me) to the "parallel port is cool" age. It was an off-hand "this might be fun" remark by him about the Arduino, which he was just starting with at the time, which got me into Arduinos, for which I thank him... I think. (My Arduino play hasn't helped progress on the things I "ought" to be spending time on. Sigh.)
Sadly, Peter passed away a few years ago, and only some of his kits remain available (elsewhere), but any of his notes which you can still find are good, with notes on hardware and Arduino code for the following, and probably more. The list below was harvested and edited in September 2011. Check "the horse's mouth" for current offerings.
I wrote about the last item, the Melexis, sometime ago. It was a neat little device.. and it may be one still! It could tell the temperature of something from a distance, from the IR radiation it is giving off. Cost: About $17. (Slow scan infra-red cameras, anyone?) It might be wroth looking for similar newer devices, if interested today.
If you dig around Peter Anderson's site, you'll find other goodies too.
Moving on to other Arduino suppliers...
In October 2014, I had excellent service in the UK from Hobbytronics.co.uk, having had excellent service previously in September 2011 when I ordered an Ethernet Pro (they were out of stock at that time in several places). Hobbytronics makes online ordering painless. You can pay by credit card, debit card, PayPal. I ordered mid-morning Saturday, goods arrived Monday! (I hadn't paid for expedited shipping.)
The YourDuino shop has sundry bits and pieces, either nicely mounted on modular carrier boards, or as raw components. (They also sell Arduinos and clones. And they have some tutorials which avoid being "heavy").
In Australia... and all of these people will ship, and for electronic parts, international mail can be very good... there is http://www.freetronics.com/. I haven't (yet!) used them myself, but their site is well worth a visit, at least.
Even if you don't end up buying from them, pay a visit to the good people at Cool Components in the UK. They have outstanding product description pages.
Take a moment to visit my http://Flat-Earth-Academy.com? It aims to help kids (or adults who missed out in school!) interested in science know what the questions are, to attain a "basic framework" of knowledge on which they can build a good understanding. No "sugar coatings"... just some concentrated Good For You stuff. There must be SOME people left who aren't afraid to "work" their way to the expansion of their knowledge? Mention it in any relevant forum you visit, please? (Opens in new tab or window, so you can get back here just by closing it.))
See the discussion near the bottom of the "top level" page covering the bulk of my Arduino contributions. There is information there, too, about things like "May I copy your material?", and the system of file names I am trying to work to.
To search THIS site.... (Go to my other sites, below, and use their search buttons if you want to search them.)
|
|||
| search engine by freefind |
If you visit 1&1's site from here, it helps me. They host my website, and I wouldn't put this link up for them if I wasn't happy with their service... although I was less than pleased the other day to have what I was doing interrupted by a telephone call from their sales team, trying to get me to extend my involvement. Sigh. Hardly a rare event, but I'd thought 1&1 were a bit classier than some of the people who have my telephone number.
Click here to visit editor's Sheepdog Software freeware, shareware pages.
Click here to visit the homepage of my biggest site.
Click here to visit the homepage of Sheepdogsoftware.co.uk. Apologies if the "?FrmAht" I added to that link causes your browser problems. Please let me know, if so?
Ad from Google.. they pay me, which gives me some reward for writing these things for you to access free!
To email this page's editor, Tom Boyd.... Editor's email address. Suggestions welcomed! Please cite "ahttoc.htm".
![]() Page has been tested for compliance with INDUSTRY (not MS-only) standards, using the free, publicly accessible validator at validator.w3.org. Mostly passes. (If you access the link, check that the URL of the page you wanted to check was carried across. Some browser settings will thwart the mechanism which might carry it across for you.)
Page has been tested for compliance with INDUSTRY (not MS-only) standards, using the free, publicly accessible validator at validator.w3.org. Mostly passes. (If you access the link, check that the URL of the page you wanted to check was carried across. Some browser settings will thwart the mechanism which might carry it across for you.)
AND passes...

Why does this page cause a script to run? Because of the Google panels, and the code for the search button. Why do I mention the script? Be sure you know all you need to about spyware.
....... P a g e . . . E n d s .....