 Bookmark this on Delicious
 Recommend to StumbleUpon
"Instead of cursing the darkness, light a candle"?
Let me stress that the information here is entirely unofficial. It could be wrong; it could be out of date. If you know of a better source of information (vs marketing stuff), I would be delighted to hear from you! (Contact details at bottom.)
At the time of writing, I have a Qduino, and a lipo battery. It looks well enough made. Delivery was on time, and as promised. (I was a Kickstarter backer). I gather than on-time delivery of a Kickstarter promise was unusual, in the experience of other Qduino backers. (I should stress that no one was complaining about the Qduino campaign- just the opposite. The "problems" they'd had were with entirely unrelated Kickstarted campaigns.)
Let's get something out of the way: The "battery" used by a Qduino is more properly called a "cell". Just as the 1.5volt "things" you put in a flashlight (UK: "torch") are properly called cells. A battery is several cells working together, sometimes all "parceled up" into a single device, e.g. car battery, 9v battery.
However... I have only used my Qduino a little bit. So far!
Some good work has been done to get this hardware "out the door", in the marketplace. And techical documentation is beginning to become available.
The more I learn about the device, the more I like the provisions for it to be powered from a lipo cell ("battery").
If you go along to Sparkfun's product page for the Qduino, in the comments section, you will find answers to many questions that were raised in earlier versions of this page.... answers I have now transfered to here. Sparkfun's responsiveness much appreciated.
The page you are looking at is my main Qduino page.
I've also created...
Tour of the Pins. What's on the different pins. Which are "free", which involved in other things too.
Discussion of what the Qduino library gives you. And what's in the example programs.
Short page about the tri-color LEDs ("User" and "Stat").
Rather poor page, chronicalling the saga of a difficult setting up. I would hope that this page intersts few readers. If you've used a Teensy on your system, and set up of the Qduino drivers is not going well, in particular, you might want to try this page. It has nothing for people with a working Qduino development system up and running.
Very short, unimportant to most people, page about what you should see when you plug in a Qduino for the first time.
Make your browser window as wide as you want it. The text will flow nicely for you. It is easier to read in a narrow window. With most browsers, pressing plus, minus or zero while the control key (ctrl) is held down will change the texts size. (Enlarge, reduce, restore to default, respectively.) (This is more fully explained, and there's another tip, at my Power Browsing page.)
Page contents © TK Boyd, Sheepdog Software , 9/15.
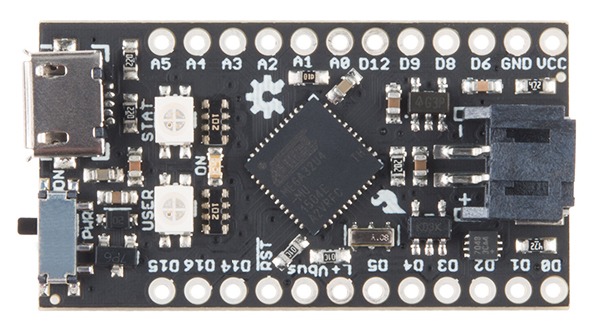
The Qduino is a Arduino clone in a 21 x 38mm package. (Everything here relates to the Kickstarter version of the Qduino (ver 1.0)) I suspect that the V2.0 Qduino will only build on the Good Stuff already present.) When it was launched as a Kickstarter product in February 2015, Sparkfun gave it some publicity. (I imagine you know Sparkfun.com? A big, and supportive, supplier to the hobbyist electronics community. Based in Colorado. Long established.)
Sparkfun handled the delivery of Qduinos to the Kickstarter backers, and the version 2 Qduino can now be pre-ordered from Sparkfun, hurrah! At 26 Sep 15, they are not taking the chance of being let down by a supplier, etc, and have not listed a date it will be back in stock. At 26 Sep 15, the price is $30 + p&p. But Sparkfun handled, very well as far as customers were concerned, by all accounts, the distribution of the Kickstarter rewards, and are old hands at getting kit to hobbyists, so why should there be a problem this time? (And no, I don't work for, or get any rewards from, Sparkfun!)
The big U(as far as I am aware)SP is the degree to which it is lipo cell friendly. The cell isn't onboard... a good decision: You choose the one that suits your needs. There's a yes/no LED to tell you if the cell is being charged, and you can access the charge level via software... the code for this is given in examples. The "charging" LED merely tells you "cell is charging" There's a charging circuit built in. There's no need to flip a manual switch to change between using the cell and charging it. No external supply? The system looks to the cell. External supply? System runs off that, and charges the cell with any spare power. Good! I think.
A major advance in the "technical documentation availablity" stakes was the release of details of the Qduino circuits. If you click that link, it should directly trigger the download of a .pdf. The diagrams are quite legible, unlike some I've downloaded from other sources, for other projects in years past.
If you have Eagle on your PC, you can also access the board's design in more detail... the Qduino schematic and PCB files are available.
Breadboard compatible, as the only pins are in two suitable parallel rows. ATmega32U4 processor. 3v3.
The Qduino's page at Hackster.io has some Good Stuff.
Sadly, at 16 Sep 15, the "Documentation" link only takes you to the http://qtechknow.com/ page, where there is Good Stuff, but not, as far as I could tell, useful stuff about the Qduino. (The "Getting started with Qduino" link there, 16 Sep 15, takes you to the Kickstarter page.)
However, at the bottom of the Hackster page, there are some large "button links". I found some Good Stuff at the QuickStart Guide you can access from one of those button links. The others may be worth a try.
In theory... and I imagine it will work just like this for most people... you...
Almost certainly through no fault of the Qduino, my experiences in getting started with the Qduino were not quite that simple. But others might be where I was, so I've written the saga up on the page the link a moment ago will take you to. It will open in a new tab or window, so you will just come back here if you close that.
In advance of fighting the software fights, I laid in a cell for my Qduino.
I couldn't find advice on what to buy, ended up getting a Sparkfun PRT-00339, Polymer Lithium Ion Battery - 1000mAh... which seems to work fine. Be careful about the charge rate if consideriong some small batteries... and I haven't checked the details of my cell and the Qduino circuits... yet...)
Sparkfun has published a list of compatible batteries. I keep banging on about Sparkfun... buy your bits anywhere YOU want. I find life short, and I am able to take the Easy Path.
Further information on charging issues: If the green part of the "Stat" tri-color LED is bright and solid when the lipo cell (battery) is charging. If it is not bright and solid then there's no cell, or it isn't charging for some reason. It goes off when the cell is fully charged.
The circuit diagrams show the green part connected only to an output of the chip at the heart of the lipo charging circuit ("stat" o/p of MCP73831), which means several good things...
So! I wish the project well... it looks like a nice Arduino clone for some wants. I haven't given it any rigorous tests, or longterm tests, yet, but look forward to doing so.
At the creator has asked interested parties to discuss issues/suggestions at the Github Repo, https://github.com/sparkfun/qduino_mini, on the issues tab. Note: This tab is for the Kickstarter version of the Qduino, "v1.0". I went to that link, found what looked like a directory listing for the files, but, not wanting yet another dedicated app on my system, just to look at stuff... we invented forums, HTML, .zip, and .txt for these things, remember, people?... I didn't get very far with reading what was there.
I went back, tried again at a later date. While I still suspect that I need "stuff" to, say, look at the "Readme.MD" file, I found that the "issues" forum was entirely straightforward to set up an account for, and use.
Because I want this board to succeed, I hope that general discussions will start to grow at the mainstream Arduino fora, e.g. the main forum at Arduino.cc, or in Sparkfun's forum. Having an out of the way forum for development issues is fine and understandable, but it won't generate much "buzz" for the product.
I have found Gihub a little quirky. It does work... in general. Just, maybe, not the way you thought it would! (See elsewhere for my experiences and thoughts on the Arduino IDE/ Github arrangements for patching the Arduino IDE to give it what it needs to program a Qduino. (When I, without hassle, changed my IDE to allow it to program Teensys, we were still using the "old" system. (On that subject: You still patch for Teensy the "old" way... download an .exe, run it. And the Teensy and Qduino will run side by side (alternately!) on one system... sort of... at least in limited preliminary tests. I still have a few driver issues to nail down.))
The Qduino I was playing with, when I wrote this was one of the Kickstarter reward units. Black. "Qduino Mini" in the silkscreen on the underside. (The side the components are not on.) If you look very carefully, at the edge of the board, on the underside, opposite the USB connector, you will find the version ID: "V10", i.e. 1.0 At at the scale of the text, printing the "." would have been silly. Hurrah! If only more people would put version numbers on their products! I trust that the Sparkfun v2.0 Qduino will be the same, just better. (!)
Solder a set of pins to it in the usual way.
When you are cleaning the flux from the pins you've soldered in, be careful not to get anything on the "lenses" of the tri-color LEDs...
... the two white squares at the left, above, labeled "User" and "Stat".
REMEMBER: This is a 3v3 device. (It runs on 3.3v). (Apologies, Gentle Reader, if you are already 3v3 sensitive. Some of us out here are dinosaurs and have only worked with 5v systems. I have to confess that I nearly fried my Qduino on my first outing with it, but just in time realized I was about to make a damaging mistake!)
If I had had a ready source of 3v3, I might have connected that up to the GND and Vcc pins (upper right, above), and looked to see what happened. At that time, I did not have as much information as I have now. But, whatever you do, do not connect 5v to those pins! The Vcc pin, by the way, is a place for you to "take" 3v3 for periferals. But you have to be careful not to create a circuit which would demand too much current. (See notes on this elsewhere on this page.)
It turns out that you can, if you wish connect 5v (if it is regulated to +/-5% of that) to the VBus pin. (And in all of these alternatives, you have to connect to GND, too, as usual.)
If you have an alternate source of a lipo- like voltage, say 3v6 to 4v0, you can feed that to the board over pin L+. Maybe, for instance, you have a lipo, but it's connector isn't what the Qduino wants, for instance. Be sure you have a lipo cell, i.e. it produces about 3v8. Lipo batteries also exist... several cells connected together and wrapped in one "package". If you've connected a lipo cell via L+, it should charge and the software for accessing charge state should work. If, on the other hand, your voltage source is not a lipo, all bets are off... and do not supply volts to the board by any of the other channels, unless what you've connected to L+ is going to respond sensibly to an attempt to charge it!
.... end "alternative power schemes" sidebar.
Going back to my first session with my Qduino....
I didn't want to do two new things at once... not a good test program! So I didn't want to just plug my Qduino into my PC's USB port.
So, instead, I used a USB cable to plug it into a USB charger which I knew had nothing on the USB data lines. The connector needed for the Qduino end was that used for early (and for all I know, current) Kobos, and by the Teensy. Sparkfun describe the correct connector as follows...
"... micro USB 5-pin. This is a new, smaller connector for USB devices. Micro USB connectors are about half the height of mini USB. Micro USB is found on newer hand held devices like cell phones and portable media devices. Works great with the Google Nexus One."
... and they have a guide to USB cable connectors. Hurrah! It is support like this which is one of the things that keep me a happy customer there. The wretched diversification of USB connectors has been driving me batty.
Yes... the USB cable will deliver 5v to the 3v3 Qduino... but to a voltage regulator on the Qduino, which will turn the 5v into 3v3 for (most of) the rest of the circuit. 3v3 will be available on the Vcc pin at the upper right. (All "directions" relative to the board positioned as in the illustration above). Don't draw too much power from that pin, though. And remember to add up ALL of your power draws from the board when asking yourself "Am I demanding more than the regulator can provide?". And, while we're covering the "everyone knows" newbie "gotchas"... remember that whatever you're giving 3v3 will also need to be connected to the GND ("ground", i.e. zero volts) pin next door.
Every question has a simple answer... and it is wrong.
You have to be careful, with ANY electrical/ electronic circuit to work within power levels that are safe. The problem is: Not many people really understand what "power" is, for a start. And things go downhill from there.
When you hook things up to a voltage, Ohms law will give you a lot of help. It won't tell you everything, but it will help. In simple cases, the resistance of what you connected, and the voltage involved, will tell you how much current will flow. (Voltage x Current is the "power".) However... if the resistance is sufficiently low, and the power supply is of one class of power supply, as the current rises, the voltage will fall. You may reach an equilibrium, a steady current flow, or you may burn something out. Power supplies tell you "I can supply XX volts." (We're talking DC electronics here. Similar considerations arise with AC, and some "bonus" issues!)
Everyone knows this, looks for the number. Not everyone looks for the second number a good power supply will give you: ".... as long as no more than YY amps flow." It is up to the designer to make sure that the circuit will not be so conductive that the power supply, if it could maintain the rated voltage, would be asked to deliver more than YY amps.
Consider the following excellent summary (edited for readablity) I had from Sparkfun on the "power" issues... even if it doesn't just give you "The Number". (No one CAN give you "the number")...
"The 3.3V regulator on the board is rated to 600mA. But! This is not all available for off-board use. The onboard hardware will use some of this current. Also, the processor has per pin limits and then per port limits, so the answer to how much power the board can supply depends on the power source and how you have your loads wired up. We recommend you stick to USB and/or a single cell LiPo supply in general. This small board isn't designed for high power."
I would add that I think there's also a "global" power limit which you might inadvertently (and potentially disasterously) exceed without violating individual pin limits... Let's say that a pin can source 10 whatsits, and the board can handle 50 whatsits. If you let 9 whatsits flow through 6 pins, you would violate the global board limit, wouldn't you?
None of this is specific to the Qduino!... The complexities of per pin and per board limits applies to any Arduino (and other systems) work, and much of the rest of it to any electronics work.
If you started your electronics career playing with dry cells and incandesent bulbs, what you were working with was robust and various factors kept you in "the safe zone".
Microelectronics are less forgiving, and you have to take some care. But, having said that, I will add that I'm not going to tell you all of the STUPID mistakes I've made... AND got away with... It would be too embarrassing. And while I have fried some things, I've been "let off" far more often than I deserve!
Do you need a degree in electronic engineering? No! But try not to connect things which will cause "large" currents to flow. And try to get yourself acquainted with "the foothills" of the "power design" mountains! What constitutes "large"? Ah! For that you need wisdom. And to get wisdom you need experience. And experience sometimes consists of frying things. Sigh. Experience is what you get on the road to having wisdom.
So! I plugged my Qduino into a USB cable which was plugged into a charger, and....
Nothing happened!!
... but nothing should have happened... until I turned the Qduino on! There's a little switch, left side of board, which has to be in the "on" position... up. Labeled, THANK YOU, Quin. (This switch is an excellent feature, my opinion. Not a "gotcha trap" nuisance.)
Then...
1) The tiny green "on" LED in the center of the board vertically, just left of center horizontally, came on, stayed on. It is a nice, simple, fool-proof LED connected directly to Vcc. It is essentially a "power avialable" indicator.
... and...
2) Both of the two tri-color LEDs did things. (Winked red, blue, green, repeatedly, to give you the general picture.) I have done a little sub-page about what the Qduino LEDs do while it is in its 'as delivered' state.
These LED modules, sadly, are not the really cool "smart LEDs" I thought they might be, when I saw them. (There's a page dedicated to a concise review of facts about the two tri-color LED modules, "User" and "Stat").
As I said above, I think: I made my first tests BEFORE I connected a lipo cell to the Qduino.
Before I start....
Lipos are dangerous. If you haven't used one before, beware of the following:
You can't get away with short circuits
When you are working with a lipo powered circuit, take care. Don't leave naked pins exposed, where a short might occur. Don't poke test leads into something, unless you are very sure there won't be a moment when adjacent pins may be shorted.
In the "good old", pre-lipo, days, you could usually get away with the odd brief short circuit. If you create a short circuit on a 5v power supply, the current rapidly rises. But with many of the power supplies the typical reader of this page will have been using, as the current rises, a point is reached when the power supply is no longer able to maintain the 5v. At that point, the current stops rising because the voltage has fallen.
A lipo cell can supply quite dangerous current flows before the voltage begins to drop and curtail and further rise in the current. Lipos often have fuses. The fuse blows, and your lipo cell or battery becomes... useless. That would be a "good" outcome. Or maybe part of your circuit becomes so hot that it melts. Say some part inside your project's processor. Or maybe the lipo becomes so hot, with all the current flowing, that it creates steam, "explodes"... spraying "stuff" that I don't want to know about all over you and your work.
If you don't have a lipo cell, or don't want to mess with it now, feel free to leave what is in this section until later.
Next I plugged in my lipo cell. I don't know what its charge state was when I bought it.
Again, at first, nothing happened. Good! (I had the Qduino's on/off switch in the off position... on purpose. I had just proved that the switch was "upstream" of the lipo cell... which I like.)
When I switched the board on, the tiny green "on" LED lit up, and the big tri-color LEDs immediately went into something very like the sequence I reported before, differing only in that when it was time for the "green" phase of the cycle, only the lower tri-color LED lit up. The top one ("Stat") was dark, apart from a very slight glow from the green element of that tri-color LED. This was possibly on continuously, but if so, impossible to see against the brightness of the red and blue when those elements were on. So the "blue" looked a little greenish. The "red" was distinctly yellow.
So... obviously my cell came with at least some charge in it.
I then plugged the Qduino, still connected to the lipo cell, into the USB charger again.
At this point, the light cycle changed again. Still about 1 second per step, but now both greens were bright and steady, when on.
Now for a few quick words about the Qduino's two tri-color LED modules. (See the page that link takes you to for more information.)
Regarding the "User" tri-color LED:
Not only can you turn a red LED, a blue LED and a green LED in the modules on or off, individually, but you can also make them bright or dim... in 256 steps.
"The system" does not use the User LED. It is only turned on if you have put things in your program to turn it on.
------------------- Regarding the "Stat" tri-color LED:
The state of the green LED in that means nothing if no lipo cell is attached. It will often flicker, or glow weakly when there is no lipo.
The green LED, if a lipo is attached, will be on if the lipo is charging, and off otherwise... including when it is not charging because it has become fully charged.
And now for the blue and red LEDs in the "Stat" module...
There's more on these elsewhere. Suffice it for our purposes here if I tell you that as of 01 Oct 15, not a lot of use is made of these LEDs. They may tell you "stuff" about the states of bits of the circuitry which gives the Qduino its USB connection to the outside world, but what they tell you is a little esoteric, and I am going to move on....
Returning to the topic of how the Qduino is powered, I believe that the Qduino has an excellent, hassle-free power design that makes it as user friendly as a mainstream battery powered device.
You leave your lipo cell connected all the time. (If you wish to.) When there is no other source of power, the device runs off the lipo. When you connect the USB cable, you may have done so to re-program the Qduino, but you may simply be connecting the USB cable to re-charge your lipo cell. And if that's what you wanted, it will do it, just fine, without any "messing about".
Very brief periods of connection to my USB charger, just enough to discover the above, put so much charge into the cell (and the Qduino draws so little current) that it subsequently ran for hours with the LEDs going red/red then blue/blue then green/off for days (with a 1000 mAHr cell), with both reds and both blues the same color. Of course, the lipo came from the supplier with some charge in it.
There is no simple way to know how much charge remains. Eventually, when the lipo is discharged, the whole thing will Just Stop. But it has run for hours and hours so far. (1000mAHr cell, running just the "as delivered" LED flashing program.)
Right. So far so good. Now time to connect to my PC, which for these tests happens to be a Windows 7 box.
That computer had not "heard about" the Qduino yet.
I plugged the Qduino in, via USB, and the tri-color lights "did their thing", as before.
The drivers should "just install", like any USB device drivers. The details of my probably unusual experiences are in the page I did with the gory details, mentioned prevously. My experiences may in part have been down to the fact that I'd used a Teensy on that computer previously.
Before long, your system should "just work". It is doesn't, Device Manager should be an early port of call. You should see, under "Ports", "Qduino Mini (COM x)", where "x" is a number. Do remember to switch the Qduino on... I gave myself a moment of anxiety just now by forgetting that.
Unplug (or turn off) the Qduino, and the new serial port goes away. Plug it in again, and it comes back. (For a brief interval, moments after being plugged in, the "user" tri-color LED is red while the "status" LED is a flickery green. This is all over well before 2 seconds have passed. Then the usual cycle kicks in. (I only mention it in case another newbie sees it, and is worried. Doesn't WORRY me... but I want to help you get past the odds and ends of getting started.))
As outlined above... you need a "modern" Arduino IDE installed. Vers 1.0.6 is not new enough. I did these tests with a recently installed vers 1.6.5.. a version I had not previously used much.
Follow the Qduino Getting Started guide. It tells you how to patch the IDE for Qduino.
The approach taken was, for me, a weird and wonderful "thing". One I'm not very happy about.
You start the IDE, go into the IDE's preferences, fill in a URL, and type "go".
SO MUCH BETTER, in my view, to split the "download the patch"/ "install the patch" steps. And so routine. Weird, I don't need or want. Oh well. When Windows came along, I said I didn't want or need to be running more than one program at once. As I write this, I have an text editor open to create what you are reading, a different text editor open with notes on what to put in it. An FTP client and Firefox open. And those are just the things I'm actively using to create this. There are at least eight other things running "on the corner of my desk." Maybe one day I'll like the new processes for managing the Arduino IDE.
Onward. Well, I would take the description onward, but what I was told to do didn't work. I copied the URL, and then tried to paste it where it was supposed to go.
As it is quite long...
https://www.hackster.io/team-qtechknow/qduino-mini-quickstart-guide
.... typing it by hand... particularly into a weird "do things" field... was not something I wanted to do.
Happily, the third way I know to paste (ctrl-V) worked after neither of two other widely supported methods didn't. This, note, is probably an Arduino IDE issue, not a Qduino problem.
Tried to follow instructions from Qduino Getting Started guide. Didn't work. I got past the fact(?) that my "Boards" screen did not show the Qduinos until I'd done the settng up under "Boards Manager". (The screenshot was probably done of a machine that had already had the install process completed.)
A second pass through the process DID give me the promised "Qtechknow Boards". Gritted my teeth, hoped for the best, and proceeded.
You have to click on the "Qtechknow Boards" box before the "install" button will appear.
And, presto... now, in the Arduino IDE, under "Tools/ Board", there is a QTechknow Boards section, and I am able to "set" my IDE to know it will be dealing with a Qduino Mini.
The Qduino Getting Started guide told me, as a Windows user, that next I needed to install some signed drivers. Having looked inside the .inf file, it does seem to be all about drivers for the USB interface. I'm not quite sure when/ where I added the Qduino libraries/ examples to my system. Maybe it was part of the "patching" for the new board type, and I forgot to restart the IDE before looking for the examples, the new library.
Using the basic, system provided, Windows Explorer (not Internet Explorer), I tried to go to the folder indicated in the Getting Started quide. It took me a little while to find the Arduino15 folder. In my case it was in C:\Users\XX\AppData\Roaming, where "XX" is my user ID on the system concerned. I also had to go into the "signed_driver" sub-folder of the 1.0.6 folder to get to the .inf file, which, in my case, was "Qtechknow.inf". But, then "all seemed well" when, following the Getting Started instructions, I finished the "driver" install. (You have to right click on the "Qtechknow.inf" to get the "install" option.)
But God knows what I'd done to my system by now. Adding a library used to be SO much more transparent, easily understood. Sigh.
But! At least! As promised, the IDE now had a few Qduino examples to try! ("File/ Examples/ Quduino...").
I give more detail in the relevant sub-page, but I have now got a Qduino working (sort of) in the same PC I program Teensies with... Well. Used to program Teensies with. So far I've made only just one almost trivial test of whether I still can.
I said I can program Qduinos "sort of". I'm still having trouble with the PC dropping the serial port. But it comes back if I switch Qduino off, and then on again. And reselect the port in the Arduino IDE tool/port entry.
Here we return to what my first experiences were.... Aplogies for the inconsistent tense in this page...
I'm pretty sure I can't get back, after trying any of the example programs, to the "as delivered" state, with little program that winked the LEDs, told me the lipo's state. I don't think that program is supplied anywhere, including among the "examples".
Before going further, I set the IDE to use the serial port the Qduino was on. (I'd set the IDE... tools/ board... to program for the Qduino Mini earlier.)
Well... that's the preparation done... I hope. Time to try putting a program in the Qduino and to run it.
As suggested in the Getting Started guide, I "went for" the "rgbLED" example program first.
(Sidebar: Snce writing what this is in the midst of, I've done a separate page about the software for the Qduino. It starts with a "blow by blow" account of rgbLED, and then goes on to consider, comprehensively, I hope, what the Qduino library gives you. Sidebar ends.)
In my first session, I had trouble keeping the USB serial port "alive". I hope you won't. Details of my travails in the sub-page mentioned before.
Click the Arduino IDE "compile and upload" button... All should go well, all should go just as it does with any other Arduino or clone.
I don't know how to get program in the device back to "as delivered".
If you know enough about programming, looking in Qduino.ccp will tell you things. It, on my system, is in...
C:\Users\XXX\AppData\Roaming\Arduino15
   \packages\Qduino Mini\hardware\avr\1.0.6
   \Qduino\Qduino.cpp
... where XXX is my user id on the system. Open the file with the text editor of your choice. I like Textpad.
I've discussed what's there, and in Qduino.h, at length in a page dedicated to that.
If you are like me, you can't half understand something without experiencing and itch.
On the underside of the board is a "thingie" marked "SJ1". I suspect that you can just leave it alone. But, if you are feeling that itch, I may be able to help a bit.
If you look at the circuit diagram of the lipo charger, you learn that SJ1, as configured when the Qduino leaves Sparkfun, takes "Prog" (pin 5) of the MCP73831 chip to ground thorough 10k. Redo the jumper, and you can change that to 2k.
So now you know. I don't know why it matters, but I appreciate that I have been given a choice in something. I suspect, from a note on the diagram, that it determines how rapidly the lipo is charged. (10k: 100mA, 2k 500mA.) (Faster is not always better, by the way, sadly. Sometimes "faster" also means things like "too much current... current which could damage things.") I believe, but am not SURE, that the power to charge the lipo does NOT flow through the 3v3 regulator on the board, so **I** am not worried about that chip's 600mA limit. (The circuit diagram says 500mA, but I've seen 600 in several other places. You'd always leave a margin for safety, anyway, wouldn't you?) But I could be wrong. We can weep over fried boards together, if you choose to trust my guess in this... or in anything else I've said on this page. I offer you indemnity... up to the lesser of $500 or what you have paid me for being allowed to read this... for the things YOU decide to try.
I hope you found this subpage of my pages about the Qduino useful? Please tell others about it, if so! Forums, Facebook, etc?
The search engine merely looks for the words you type, so....
* Spell them properly.
* Don't bother with "How do I get rich?" That will merely return pages with "how", "do", "I"....
Please also note that I have two other sites, and that this search will not include them. They have their own search buttons.
My site at Arunet.
My Sheepdog Software pages, another of this page's editor's sites.
Here is how you can contact this page's editor. This page, and the software it references, ©TK Boyd, 8/2015.
Page tested for compliance with INDUSTRY (not MS-only) standards, using the free, publicly accessible validator at validator.w3.org