 Bookmark this on Delicious
 Recommend to StumbleUpon
Let me stress that the information here is entirely unofficial. It could be wrong; it could be out of date. If you can correct any errors, I would be delighted to hear from you! (Contact details at bottom.)
At the time of writing, I have a PunchThrough Bean+, complete with 600 mA hr lipo, a "reward" arising from my backing of the Kickstarter campaign for the device. It looks well made. Delivery was later than originally projected... but backers were well supported with an interesting blog, and the features delivered were significantly better than the original design goals; in particular the device has FCC certification. I think the spec creep more than justified the delay.
However... I have only used my BeanPlus a little bit. So far! Sadly, two (and a half) "wants" have emerged which seem pretty serious to me, at least as far as my hoped-for intended usage. I'm sorry to start these notes in a negative mood... the notes become exclusively positive later!
My biggest "want" at this time... and an "answer" may be out there: I want to be able to monitor output from (and ideally send input to) a Bean+... on an Android tablet, with the data link being the Bluetooth. While I can already PROGRAM a Bean+ via a tablet, I think I've determined that you can't, say, have the Bean+ periodically send a temperature reading even to a simple terminal screen on the Android. Wired programming is not a problem, for my wants. For my Bean+ to be much use to me, I need to find a way for it to "talk" to my Android during program execution. (See "notes from friend", below, for two possible "answers" to this want. They would both, alas, require me to explore more new frontiers... not high on my "time for" list at the moment. Sigh.)
Second biggest want: I want to program my Bean down a cable, the way a basic Arduino is programmed. This is a relatively minor want, as the programming- via- Bluetooth seems to work just fine... if I do my program development on my Android. Which I don't want to do. I want to use my "proper" computer (which happens to be Windows, but Linux or Mac would also count as "proper" machines in my use of the term.) My little Android tablet is a fantastic device... but the "keyboard" and "screen", "good" though they are, are no where near as easy to use as the keyboard and screen of my big computer. And I am much more comfortable with traditional backing store, too. (By which I mean my hard drive and various backup media. I have managed to move on from punch cards and paper tape!). I think... though I haven't traversed the set-up chores... that I could do this... if my big PC had Bluetooth. Which it doesn't. Maybe, in that environment, I can program the Bean+ down a cable... but I don't think I can.
My "half want": I want to be able to compile programs without using the cloud compiler provided by PunchThrough... and this MAY be possible! Yes, it is nice not to have to update libraries as they improve... but it is not nice to know that if PunchThrough "take their ball and go home", my Bean would become useless, if I don't master "cloud- compiler- less" compling first. Another reason I don't like cloud compilers is that I don't like having some of my code going outside of my control. I call this a "half want" because I still have hopes that if I master programming the Bean from a Windows machine, even if still over a Bluetooth connection, I will no longer be using the PunchThrough cloud compiler.
While, as I hope I've made clear, I really like the Bean+, and admire the accomplishment of the good people at PunchThrough, I'm afraid my two main wants essentially say that they got my hopes backwards: I can program an Arduino clone across Bluetooth, even though I don't mind using a wired connection for programming. But I can't communicate, as a "user" with a Bean+ via Bluetooth, I have to use wires, or something on top of the built in Bluetooth.
Or maybe I just don't know enough about the Bean+ yet. Maybe I can do what I was hoping to do, when I've put in some more study.
Maybe I'm missing the point of "what it is good for". Have a look at the list of things it can do, in the column at the left side of the Bean Reference page. Be an advertising beacon? I have to admit I'm not even sure what that is... maybe I could hack that, for reading temperatures from a Bean+ weather monitor? Be an HID (Human Interface Device)?
But! Enough of my moans! Let's move on. It's still a nice little device, even if I didn't research it adequately before spending time and money on it. It can, of course, drive output devices (or read input devices) connected directly to the Bean+. Sparkfun sell a nice little modular data capture device ($15, at 9/16), which may allow some of the projects I had it mind. (It writes a stream of serial data to an SD card, or so the website says. I haven't played with one yet.)
This page is mostly guidance for the first time user, trying to get started with his/ her shiny new Bean+, just arrived in the mail.
First a few brief notes about the spec...
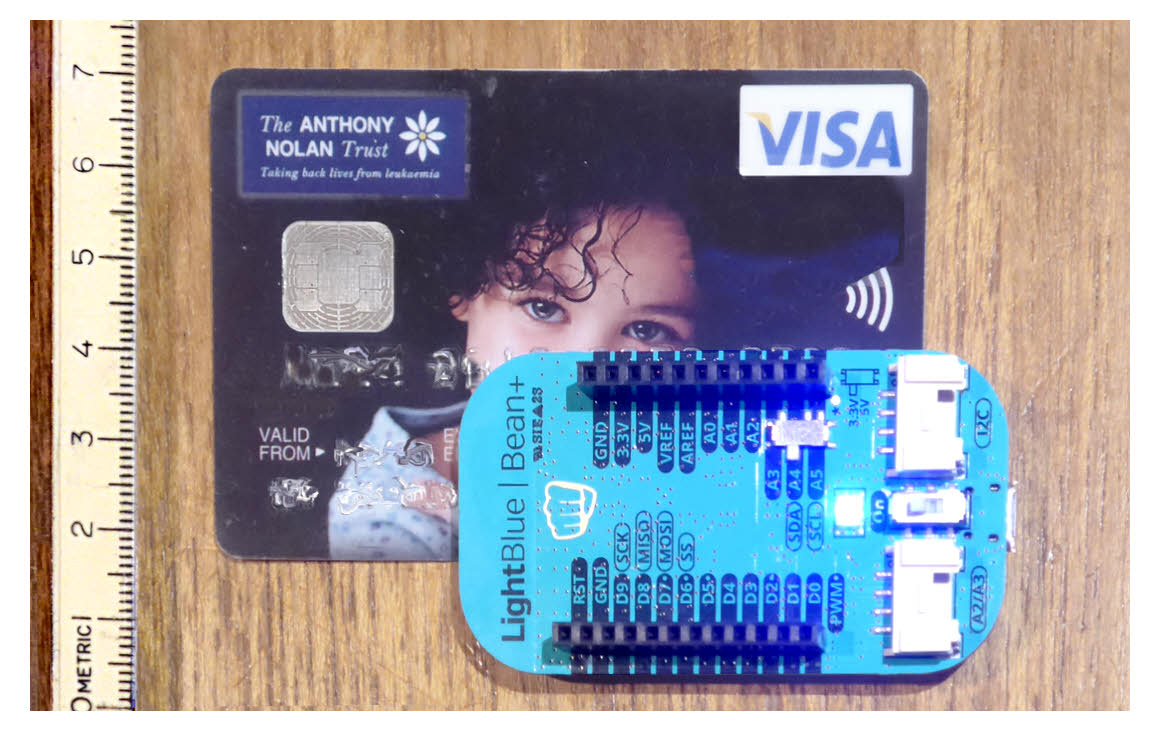
The Bean+ is a small (35 x 65mm... not as big as a credit card...) PCB, not terribly expensive ($55... including 600 mA hr lipo), Arduino clone with special features and special programming provisions.
Perhaps the "big news" is that the Bean+ supports Bluetooth. Not just "the old" Bluetooth, but also, even, Bluetooth Low Energy.
It provides for uncomplicated on-board charging of a lipo battery (cell). Just plug the device into a USB port or charger. An LED shows you when the lipo is charged. It would probably be best to unplug at this point, just on general principles... but, I think, you can leave it connected without worry. (If anyone at PunchThrough happens to read this, comments and corrections would be very welcome!)
There's a sensible "on/off" switch, to turn the device off when you aren't using it.
There's a switch to select 5v or 3v3 operation. I haven't looked into this much, yet. I presume it controls what would be suitable in any circuitry connected to the Bean+
There's a RGB LED module on the board. One LED which can go many, MANY different colors, or be a simple strong red, green, blue or white.
There's an accelerometer on the board. And a temperature sensor. I haven't found the latter yet... I am hoping that it isn't under the lipo!! That would be an "oops" mistake, limiting the usefulness of the device!
Simple sockets are provided for the pins of a daughter board PCB if you want to be fancy, or for poking wires into, for temporary arrangements. They give access to...
5v, 3v3 and Ground from the Bean+
    (I don't know how much power you can draw...
     not much, I would assume... but then again,
     many projects need little power. And others
     can be powered by external supplies!
ARef and VRef lines
Digital lines D0-D9, four of which can carry PWM signals
Analog lines A0-A5
SPI and I2C are also available- using some of the
     lines already listed as being available.
(See the Arduino reference pages for more on SPI and on I2C.)
There are ways to make the Bean+ "talk" to the Arduino's serial monitor, I think... but not(?) if you've taken the "simple route" and are "talking" to it with the basic Bean Loader and an Android. Export to a text editor the example "sketches" (programs) GetBatteryVoltage and/ or SerialPinNotifier for clues, if you want to track down the details. You could also connect any one of a number of display devices which only need a stream of serial data, via the GPIO lines which are available. For example, the c. $40 interface that needs one digital output line from the Bean+ which can display text on a standard computer monitor for you. Or, for half the money, and still needing just one digital line, use one of the lovely little OLED displays.
I don't (yet) know how to do it, but I suspect that you can also "talk to" a program running in a Bean+ over the Bluetooth link. (The output options discussed above would be to have a display which was directly, with a wire, attached to the Bean+). (There is a PunchThrough page that discusses the "virtual serial" port they have implemented... but I don't see a way to have text from the Bean appear on a connected Android. It seems to be used when programming the Bean with a "bigger" computer. Said computer would need to have Bluetooth capabilities. Can data flow via the USB cable? I don't know.)
I expect that many of the things you could do with the Bean (no "+") also apply to things you can do with the Bean+, of course. So if you don't find what you want, searching on "MyThing Bean+", try searching on "MyThing Bean". (You may want to use BeanPlus, as the "+" symbol may get special treatment from some search engines.)
"Buried" a little deeply, at least to my fumbling efforts, is a tech specs page for the Bean+. They tell us that the Bean+ runs on an ATmega328p microcontroller running at 8 MHz, equipped with 32KB of flash memory, 2KB SRAM. So... not a powerhouse, but still "bigger" than the computer that took the Apollo astronauts to the moon. Just don't imagine that you're going to do real time processing of high resolution digital images. Or drive a huge array of smart LEDs. (See the particle.io Photon for the latter. FAST!)
Let's say you have a Bean+ in front of you, and want to play with it.
Don't plug anything into it apart from a USB cable. (You will want to, later, but there are things you need to know before you can do that, which I am not covering yet. (Or later, for now!))
Plug the other end of the USB cable into a source of 5v... either a USB port on a PC, or a USB charger. It the lipo battery isn't fully charged, a small red LED next to the USB socket will come on.
The lipo charges whether the rest of the Bean+ is turned on or not. There's a switch with one end marked "On" which controls the pass-through of power when that's wanted. (The lipo will charge a little faster if the rest of the Bean+ is not turned on, of course... but probably not much faster, as it is designed to draw little power.)
The other switch, until you plug things other than the USB cable into your Bean+, is irrelevant.
There's a RGB LED module on the "top" side of the board, near the I2C and A2/A3 connectors to be found on the same side. If you have a previously unused Bean+, it may emit a single short (500ms?) green flash when you switch a charged Bean+ on.
To use a Bean+ after it has been programmed all you need is the Bean+ itself, with a lipo battery (or cell) attached... plus whatever support hardware your program depends upon.
But first you need to upload the program to the Bean+.
There are various ways to do this. As of August 2016, some users of Windows 10 were having difficulties. I'm still using Windows 7, but have not yet tried using the Arduino/ Bean+ environment for that.
Instead, my early experiments were done using an Android tablet. The process is simpler there... if, perhaps, somewhat limited by the "features" of the tablet. (If you are an enthusiastic tablet (or smartphone) user, you may not be as disinclined to do "serious" Bean+ work via your Android. I'm a bit of a dinosaur, and prefer a "proper" computer for most things.)
PunchThrough provide "Getting Started" guides for various programming environment, including a Getting Started for Android. (The chores are minimal, I cover them here... but that's an alternative, if you want to explore it.)
Fire up your Android. Establish a connection to the internet.
Go to the Google Play Store, install the "Bean Loader" app.
Bean Loader is a number of things. It has what's needed to connect your Bean+ to the Android, over a Bluetooth link. It has (or gives you access to) some sample programs, to let you "play" with your Bean+ straight away. (And to take inspiration from... the sourcecode is available to you.) And it provides the environment you need for programming the Bean+. Note: Some of the "programming" is done, the compiling of code, to be specific, by accessing a compiler out there on the internet, "in the cloud". So your sourcecode goes places where other people could look at it. And if the cloud service "goes away" one day, you are in trouble. (I believe that the Windows programming environment spares you these vulnerabilities... but I'm not certain about that.)
The good news is that you don't need the Arduino programming environment installed on your Android.
Once you have the Bean Loader app installed, leaving the Android connected to the internet, turn on the Android's Bluetooth service, if it is not already on.
I was at one point having a little trouble with the connection between my Bean+ and my Android... that ceased when I moved Bean+ and Android. I'd foolishly had them on a desk close to and on either side of not one, but two, wireless keyboards.
In the Bean Loader app, (and maybe during the activation of the Android's Bluetooth, maybe) you should now find your Bean+. (There's a Bluetooth icon at the upper right of the main screen. Tap that.)
Newbie Gotcha 1: Remember that "on/off" switch on the Bean+? It has to be "on"!
If you happen to pass through the relevant screen, which won't happen to everyone, you don't need to tell your Android's Bluetooth to open itself up to all devices, not just "paired" devices. The Bean+ will be seen, can be used, even if the Android is not showing un-paired devices.
Try renaming your Bean. In the list of available Beans, to the right of the name of each one there is the Android "menu" icon, three dots in a vertical column. Tap that to access the "rename" function.
When you attempt the "rename", you may well be told...
This Bean needs a firmware update before it can be used.
... but, if you are, you're given a button to tap to make the update begin. Note the information provided about how many bytes of code have to be transferred. And, if all goes well, the update takes less than five minutes, even on a slightly slow broadband connection. AND the Bean+ restarts itself nicely, and you are still connected to the Bean Loader, if all goes well.
Try renaming again. If you get the "... requires firmware update..." message again, don't be downhearted. I got it twice, too. The encouraging bit was that the size of the second update was very different from that of the first (10k vs 5k)... so clearly something different was happening.
I think, depending on what was in your Bean+ when you received it, you may need to go from "A" to "B", in order to be in a position to go from "B" to "C". (I don't know a quick, easy way to "ask" your Bean+ which firmware it is running on.
As I said... try changing the Bean+'s name. It is a "little" enough thing to do... but checks that several essential elements of the programming environment are in place.
If the rename is successful, try putting either AccelerationLED or BeanBlink into your Bean+.
You just tap on the name, and tap "upload". (You may be prompted to specify which Bean+ you want to upload to. Your Android needs to be connected to the internet. You should be told, first, that the "sketch" (program) is compiling, and then that it is loading. (The whole process takes less than 4 minutes.) If you get a connection error, are Bean+ and Android where they can "see" each other, without competing wireless signals ridiculously close? (I had a connection failure when the Android was sitting on the Bean+. A moment later, with the two of them 25cm apart, and the wireless keyboards I mentioned earlier just "my" side of the Android and Bean+ on the same desk, all went well.
If you uploaded AccelerationLED, here's what you should see. (The program begins running as soon as uploaded, by the way.)...
Remember your physics teacher talking about "acceleration due to gravity"?
Even with the device held "still" in my hand, acceleration was being seen... I know that, because the orientation at which I held the Bean+ changed the color of the LED....
PCB perpendicular to gravity, and not moving relative to my desk: LED blue.
PCB parallel with gravity, long edge horizontal, and not moving relative to my desk: LED blue.
PCB parallel with gravity, long edge vertical, and not moving relative to my desk: LED red.
If you loaded BeanBlink, what you should be seeing is: Red, then blue then green, then off... 1000ms each, endlessly, when the demo is running.
Once the sketch (program) has been loaded into the Bean+, the program runs just fine without Android or even USB cable. (Well... until the charge in the lipo is exhausted!)
The following, which I should edit, integrate into the above, were some thoughts from an informed friend... down to "end of informed friend's thoughts"....
It is possible to get sensor readings from the Bean to your computer! The Bluetooth is not just for programming it. See Instructable article about building an BeanPlus based "burglar defense". The project uses a Bean+ and Node-RED and Python to capture images and to connect the system to Twitter.
In the project, the Bean has a PIR motion sensor connected to it. When the Bean detects motion, it turns on the water gun, and "tells" a nearby computer to snap a picture of the victim. The computer takes a picture of the victim getting sprayed, and uploads it to twitter. The maker used Node-RED ( https://github.com/PunchThrough/node-red-contrib-bean) to communicate with the Bean.
Thus it is possible to get data from the Bean's sensors on your computer.
Remember... no device will do something just because you hope it will. It may not even do all the things the designers hoped it would. (Although I (this page's editor) think the PunchThrough team have delivered on the design goals they advertised... and even the EXTRA goals they added during development.)
No one ever suggested that the Bean+ (or Bean) would connect to the Internet all by itself.
It may be that some of the newer Internet routers (such as Google's Hub - https://on.google.com/hub/) will support BLE. If so, perhaps the Bean could connect to the Internet through one of them... an exciting prospect.
Alternatively, some computer with Bluetooth connectivity AND an internet connection could be used as a broker between the Bean+ and the internet. (If you connect the Bean+ to a way to connect directly to the internet, which could be done, you could do away with "the broker"... but I suspect that the overheads of the internet connection would degrade the usefulness of the Bean+'s main claims to fame... it is "mobile" (within the footprint of it's ability to "reach" the "broker" via Bluetooth), and runs well in its rechargeable power source.
The broker could be a spare "big" computer. (Or spare "time" on one that is running, anyway) Or a Raspberry Pi with a BLE (Bluetooth Light... (or Bluetooth "ordinary", I suspect... not sure)) dongle (not expensive)... or even (if you know me, you knew this was coming) another Arduino, with a Bluetooth dongle. The "broker" would connect to the Internet.
(A page... one of many, and not even much checked by me... about equipping an Arduino (or Pi, with a few changes) with Bluetooth.)
There's not a lot in the next section that I didn't cover more sensibly above, but, if you are curious about how my first session with a Bean+ went, then read on. Or skip down to this page's footer, for concluding remarks, my contact details, links to other Good Stuff.
10:20pm... after LONG travel day...
Opened parcel. Nice packaging... will be fine for ongoing storage.
Surprised... not unpleasantly, just surprised... by size... 6.5 x 3.5 cm... and mine came with Lipo... I'd forgotten that it had one, packed in checked bag for air flight! Tsk!! Lipo sensibly attached to back of PCB, and leads soldered in place. Good. Why would you often want to swap out? And saves board space which a connector would take. And you can use an in-line connector, if you wish.
...Photo compared with credit card... hide numbers!...
10:25- Finished first draft of above, went off to... http://punchthrough.com/bean ... (given on storage box). Did a bit of RTFM-ing. (Box also has a slip of paper with pointers to good "getting started" info.)
A little frustrated by site... more "pretty" than (to me) easily usable.
Of course, I'd looked at what the Bean+ offered before backing Kickstarter campaign... but that was a while ago.
Eventually found...
Bean and Bean+ both have built in accelerometer, temperature sensor, RGB LED... so that should be enough for a "can I make it do things" session, without digging around in my parts box for additional bits. Good!
(Inserted later: At 11:00 I found... https://punchthrough.com/bean/guides/getting-started/tech-specs/ ... which was more to my taste as a specification of what the Bean+ has)
The lipo covers up various things. A photo (easier to find, if there is one I didn't find) of what's under the lipo cell would have been welcome. I'm wondering where the temperature sensor is... I hope it isn't under the lipo.
Windows user. (Sigh)
Fluent in basic Arduino.
Very ignorant in matters Bluetooth.
(May be irrelevant!:) Years ago, I played a bit with a particle.io Photon, and it's "compilation in the cloud" model. But not much experience of such things. Have used Teensy quite a bit, so comfortable with modifying the basic Arduino IDE.
10:45: Much of the time you see "ticking by" is spent writing up my experiences... but I have been digging, mostly unsuccessfully, to figure out the BASIC FIRST STEPS! Classic case of the documentation being written by people who are a little too familiar with the product, and haven't said enough for the TOTAL beginner with their product... even a beginner with a good general background. Heaven help the person who is also new to microprocessors and programming.
There seems to be a LOT of "stuff" to install, just to get started. It seems that at SOME point, the standard Arduino IDE comes into the equation (patched with the extra software, so it will support the Bean, in a manner analogous to how Teensys are programmed)... but first... I think... other stuff must be done by other means.
Somewhere, reassurance of the "obvious" (to those who know, those who've used a Bean even a bit) would be welcome: I am GUESSING I am supposed to plug my Bean into a USB port, if only to charge the lipo cell... but... does the setting of the 3v3/ 5v switch matter at this time? The "on/off" switch? A simple statement of some simple things, to reassure the cautious would be welcome. I am going to try to give those simple instructions here, but REMEMBER: I DON'T KNOW WHAT I AM TALKING ABOUT... but I promise that anything I suggest here I will at least have tried with my own Bean.
Another "basic" question: The documentation for Windows users speaks of using the CLI (command-line-interface) Loader to "talk" to the Bean. Does this "talk" occur across the USB cable? Via Bluetooth? Wireless? (My PC doesn't have Bluetooth, and I don't want to "attach" the device to my WiFi... so I hope the USB cable is sufficient! For the moment, I've decided to avoid Windows, and try to make my start via my Android, where I know I DO have Bluetooth.)
At this stage, I am hoping a sensible "getting started" sequence consists of...
Plug in to USB port, with a cable, to bring power to the device, and start the charging of the lipo. As long as nothing else is connected to the Bean+, then for this limited exercise in first steps, I don't think that either of the switches on the device matter.
Plugged in at 11:07... and a small red LED, next to the USB cable's socket on the "back" of the board cam on. Changing switch settings made no difference to the red LED. Switching the "on/off" switch (regardless of which position the voltage- level- select switch was in) induced various momentary flashes out of the RGB LED, but always a clear, short (200ms?) pulse of a good solid green when the on/off switch went from off to on. I presume the Bean+ comes pre-loaded with some simple test program which causes this. (After a few minutes of charging the lipo, this happened even if the USB cable was not connected... as would make sense.
CAREFULLY looking at the voltage on the two wires leading to the lipo gave rise to the following discoveries. (I say "carefully", because you want to avoid having a probe tip slip, and short either of the pads for the battery wires with nearby exposed contact points.)
With the USB cable connected to my computer, I saw 3.75v on the wires... regardless of the state of either Bean+ switch. After a few minutes of charging, I saw 3.68v across those points when voltage wasn't available from the USB cable. This leads me to guess that the lipo will be charged any time the USB cable is powered. (Which makes sense... as long as, as also makes sense, the Bean+'s power circuits have a cut out to stop charging when the lipo has had adequate charging.
(Connecting the Bean+ to a Windows 7 PC did NOT give rise to a "New Hardware Found" dialog, I'm pleased to say.)
11:20, I'd got to...
https://punchthrough.com/bean/guides/getting-started/android/#introduction
.... which I liked, felt was pretty complete. The "obvious" (to some) bits which could be prefaced to that...
Plug your Bean+ into a USB cable, and plug that into a source of power... either a USB port on a PC (for now we will just draw power, not use the data lines), or a USB charging device.
As long has you haven't plugged anything other than the USB cable into the Bean+, the position of the voltage select switch doesn't yet matter. (That switch is the one that has it's "thing you push" on top of the (irrelevant- to- switch) legends "A4" and "A5". (The legend for the switch is between the switch and the I2C connector... it tells you which way to slide the "thing" to set the device for 3.3v (aka 3v3) peripherals or for 5v peripherals.)
Right.. those details out of the way, use the information on the page cited to install the Bean Loader (app) from the Google Play Store. (Your Android will have to be connected to the internet. Don't worry about the Android-Bean+ connection yet... we'll get to that.)
At this point, I disconnected my Android from my wireless (WiFi) service, and thus also from the internet, to see if the Bean Loader is a standalone app, or whether I am going to need the connection to the internet whenever I use the Android to program the Bean+. This, of course, precluded visiting the BeanTalk page at this time. I want to play!
As explained at the PunchThrough "Getting started with Android" page cited a moment ago, before we can enjoy programming our Bean+, we have to use the Android's Bluetooth to connect to the Bean+
I don't usually have my Android's Bluetooth turned on. When I turned it on, and scanned, no Bluetooth devices were shown in range. What I thought might be the first thing to overcome was that my Android was set to be visible only to paired devices. That was easily changed... although I will want to remember to turn that off. I hope that in due course, I can "pair" my Bean+ to my Android, to avoid the "open door" that I need at this time. (It turned out, shortly, that the Bean was visible to the Android regardless of the "visible to other" setting.
Still nothing showing (11:38... but remember, as I said before, that most of the time that is passing is spent on writing this account for you as I proceed.)
But I'd deliberately put a problem in the system's way, to see if it WAS a problem... I had the Bean+'s "on/off" switch in the "off" position. Switched the Bean+ on again, re-scanned, and, presto, down at the bottom, under "Available Devices": "Bean+". (And it was now that I discovered that the Android could see the Bean+ whether the "Visible to others" was ticked or not. (We may not be done with this yet!
I tapped on the only Bean+ in the list, and the list of available Beans (list of one, in my case, but if there were several in range of the Android, they would all appear in the list.
I tried using the intuitive (to me, anyway... and that gets me out of "explaining") menus etc to upload the AccelerationLED sketch. (I'm hoping that if you wiggle the Bean+, the LED will "do things".
THAT didn't succeed... I got a "This Bean needs a firmware update before it can be used" message. Sigh. It would have been nice if the first example in the list worked "out of the box". I would have liked to see it work, before starting across the "bridge that you have to burn behind you" that is a firmware update. Oh well. Knowing how to do a firmware update, and having the latest are both good things.
I reconnected my Android to my WiFi. (11:50). Tried to find the "update firmware" link... failed... so "cheated": Went back to trying to upload the AccelerometerLED sketch to my Bean+, and again got the "... requires firmware update..." message... with it's "Update"(now) button. As I now had the necessary connection to the internet, I invoked that, fingers crossed.
My somewhat erratic, not terrible quick, internet connection seemed to cope. (By the way, my Android is a Samsung tablet. Not terribly "modern" (at 9/16)... not a smartphone.
Update proceeded well. Only took a few minutes. Bean+ was restarted after the firmware update. Came out of that with an "Unfortunately, Bean Loader has stopped" message. Well, it would, wouldn't it? Said "okay", or whatever, and was back to the main Bean Loader screen. Tried again to upload the AccelerometerLED sketch. Didn't quite catch the results of the first attempt, but wiggling Bean+ didn't cause any activity on RGB LED, so tried uploading again. I was back at "... requires a firmware update..."
I'm pretty sure I'd had confirmation that all was well after the firmware update process.. So switched various things off, then on again.
Tried to rename Bean+ (tap the "menu" (three dots in vertical column) for your Bean+ in the Available Beans list.)... trying to "walk" before "running"... and also looking for firmware version ID report. Got "... requires a firmware update" (12:03) Sigh. Checked I had WiFi connection, invoked (another) firmware update.
Interesting... this time the size of the update was 10112... last time it was about 5000. So it seems that to get from "A" (where my Bean+ was) to "C" (where it needs to be), you have to go via "B". No big deal, really. YOU MAKE SOMETHING BETTER IF YOU THINK YOU CAN!!! (^_^)
The re-boot of the Bean+ following the firmware update went well... at least I think it did. I again got "Unfortunately, Bean Loader has stopped"... not a surprise, really.
Tapped "Okay" and, again, was back to Bean Loader's list of examples.
Tried to rename again... got "Connection Error: Bean Connection Failed." Well, like the "Bean Loader has stopped" message, this was no great surprise... If you rename the device the Android app was connected to, it might well think the connection "failed". I said "close", re-scanned for Bean+s in the area... and found that my Bean's name hadn't changed. Sigh. Turned Bean+ off, then on again. When I turned it off, it didn't disappear from list of local Beans on the Android until I tapped the refresh icon... but it reappeared "all by itself" when turned on again.
Tried to rename again... this time it "took", and "took" without any dropped connection along the way. It even accepted a "reckless" name... "Bean+tkb's" (without the 2s, but with the + and '. It is safer, in general, with names in computing, to stick to digits and letters.)
12:15: Tried again to upload the First there was a "compiling" stage, then an "unloading" stage.... between them they took less than two minutes. NOW the RGB LED responds to acceleration! (A swivel chair... if you don't make yourself ill spinning... makes a great device for helping you change the acceleration the device is experiencing.)
Remember your physics teacher talking about "acceleration due to gravity"?
Even with the device held "still" in my hand, acceleration was being seen... because the orientation I held it in changed the color of the LED.
PCB perpendicular to gravity, and not moving relative to my desk: LED blue.
PCB parallel with gravity, long edge horizontal, and not moving relative to my desk: LED blue.
PCB parallel with gravity, long edge vertical, and not moving relative to my desk: LED red.
So! After TWO firmware updates... not a failed attempt followed by a successful one... I've got the first example working! Hurrah!
But... I had a WiFi connection for the Android while I uploaded the first example. And it was compiled before the upload... I was not uploading a previously compiled block of code. Can my little Android do that all by itself?
So... to find out... turned the Android's connection to internet (WiFi) off. (Left Bluetooth active.)
Tried to upload "BeanBlink". Got a "Connection Failed"... not for the first time. But as TWO wireless keyboards have been between Bean+ and Android, this could be my fault. Moved Android, tried again. Got "could not connect to cloud compiler". Sigh. It appears, at least when using Android, we ARE reliant on the internet and on the cloud compiler... which I don't like (various reasons.) But, WITH an internet connection, compile and upload went fine! The Bean+ gives you red, then blue then green, then off... 1000ms each, endlessly, when this demo is running. (You can open the sketch's code in an editor easily.)
12:30... my Bean+ up and running nicely "off of" my Android, if I have a connection to the internet. Very pleased/ impressed.
Note that once the sketch (program) has been loaded into the Bean+, the program runs just fine without Android or even USB cable. (Well... until the charge in the lipo is exhausted!)
Speaking of "exhausted", that's it from me for the moment. If you tried what was here while getting started with this nice addition to the Arduino (and clones) world, and didn't find things going as described, please get in touch, quoting page's url (http://sheepdogguides.com/arduino/aht8b-BeanPlus.htm) and giving details, so the next new user doesn't have to struggle the way you and I did?
The search engine merely looks for the words you type, so....
* Spell them properly.
* Don't bother with "How do I get rich?" That will merely return pages with "how", "do", "I"....
Please also note that I have two other sites, and that this search will not include them. They have their own search buttons.
My site at Arunet.
My Sheepdog Software pages, another of this page's editor's sites.
Here is how you can contact this page's editor. This page, and the software it references, ©TK Boyd, 8/2015, 9/2016.
Page tested for compliance with INDUSTRY (not MS-only) standards, using the free, publicly accessible validator at validator.w3.org