 Bookmark this on Delicious
 Recommend to StumbleUpon
This "page" is very crude! But it may still have Good Stuff for you. I hope to "fancy it up" in due course. Worth what you paid for it.
I have... until now!... funked doing anything with a 3v3 device, i.e. a device operating on a supply of 3.3 volts.
But the Sparkfun barometric pressure board, SparkFun Barometric Pressure Sensor Breakout - BMP180 SEN-11824 was just too tempting. And anyway, it doesn't require a 3v3 Arduino.
I've had many "weather stations" over the years. Tracking barometric pressure seemed cool. You can also use the device to make an altimeter. (The library I'll recommend has worked up Arduino examples, with all of the complicated arithmetic already done for you!)
As is always the case, unless I make it very clear otherwise: I have actually hooked one of these up, seen it working. And I have no connection with Sparkfun (or anyone else involved) apart from long term happy customer.
BEWARE: This nice little board which, with help, will run in association with an 5v Arduino is not an instance of a general rule. You can sometimes do what we will do here... but not always.
I'm going to access it with a Arduino Pro Mini, I'm working with the Arduino 1.0.6 IDE, on a Windows XP machine, 15 Aug 15.
Before I get you all excited, I ought to mention that you will need to install a library. I hope you won't let that put you off, but I know I wasn't ready, in my early Arduino days. I will show you what you need to know.
Don't let me pretend that Sparkfun haven't already written a fine "getting started" tutorial for their product. Part of what you get, when you buy from them, is access to such material. Almost everything here comes from there.... but it is "my take" on "how to get started". Read that first. If it doesn't answer every question, come back here, and maybe you'll find I've filled in one of your wants.
When you have it set up, you may want to raise the device to near the ceiling, lower it to near the floor. That may be enough to measure a pressure difference! Make your hookup wires long enough!
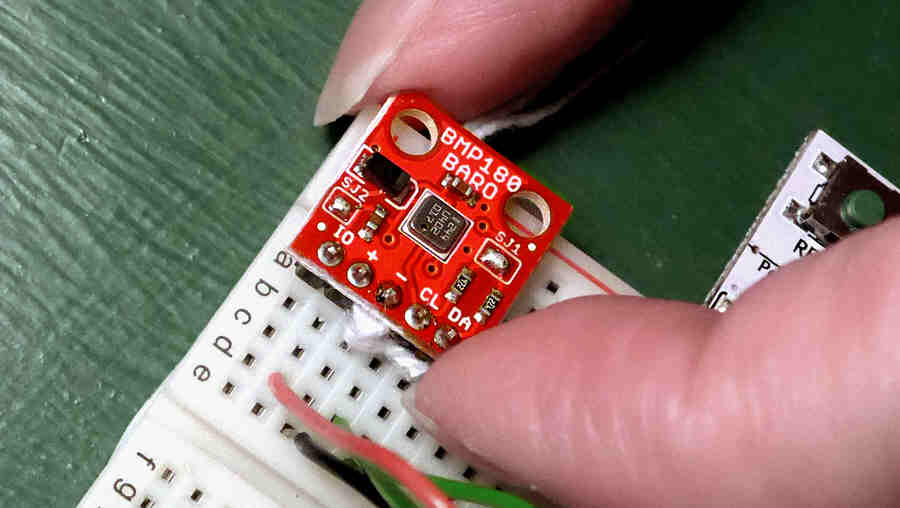
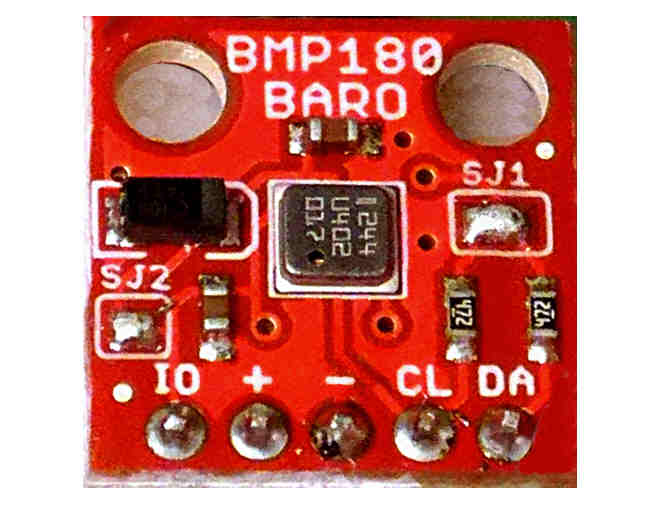
There are five pads on the breakout. We will be using 4, and leaving one unused.
(I should mention, in passing, that how I am setting it up, here, is not the only way it might be set up.)
Start by connecting the barometer board's "-" pin to your Arduino's ground. ("-" is the designation on one side of the board. On the other side of the board that is called "Gnd", which I prefer, but the "obvious" way to put pins on the board will make the "well labeled" side hard to see. Oh well. I will continue giving the names given on the side of the board with the device.)
Even though with this 3v3 board... NOT all 3v3 boards... you can connect 5v inputs, you still need to "feed" it a "Vdd" of 3v3 (3.3 volts). If that 3v3 is not coming from your Arduino, be sure to connect the grounds of your Arduino and your source of 3v3.
You need to connect 3v3 to the "+" pad on the barometer board.
With the ground and power connections set up, only two remain.
In a moment I'll tell you "what button to press", but I won't resist telling you more than you need.
The two lines are clever. One, DA (aka SDA) carries data. Sometimes it is high, standing for "1", sometimes low, "0".
"Sometimes"... so! When? If it is "1" for a bit, is that several 1s in a row, or is it the last 1 of something, and now you should be moving on to other things?
The second connection is a pain, if you want the barometer board 50 feet from the controlling computer... now you need THREE conductors in the cable, instead of the absolute minimum of two, you could get away with, if data flowed between the barometer board and the computer differently. (Don't, by the way, try for 50' anyway... other constraints would interfere.)
The second data connection, CL (aka SCL) is for the "clock". This is not a "time of day" clock. It is a "tick/ tock/ tick/ tock" clock. And the whole scheme revolves around the fact that the RIGHT voltage will be on DA each time there is a "tock".
Back to "How do I make it work"....
You need a wire from an Arduino Pro Mini's A4 to the barometer board's DA, and from A5 to CL
That's it! Pretty simple set up!
Don't lust after a way to use different pins on the Arduino. Because of the way the barometer board "talks to" the Arduino, "special" arrangements are needed. And they are done on A4 and A5... on the Pro MINI (different pins on the Pro MICRO, by the way. (2 (not "A2") and 3, respectively, I'm told.)
If you are using a different sort of Arduino, the Sparkfun page cited earlier should be consulted, to know where you need to connect DA and CL. The "way it is talking" is called the I2C protocol, by the way. (That link will open the Wikipedia page on the subject, in a new window or tab.)
The Sparkfun page gives you a fine demo.
Before I go on... when you have it working, don't blow into the sensor to see if you can see the pressure change. It is too delicate to be subjected to such brutality. It reads temperature as well as pressure... you can certainly gently put a finger on the sensor to warm it, to see if it is working. It must remain dry... don't put a something cold coated with condensation moisture on it.
Go to the Sparkfun page about their BMP180 barometric pressure board. Download. (15 Aug 15, I wasn't successful with the "button", but got it from GitHub with only the usual GitHub fuss), install the library. (There are instructions there about that.)
Actually, 15 Aug 15, a little more than the usual fuss. I took from the .zip everything in the Libraries/Arduino folder, unzipped that into a folder called "SFE_BMP180". By using that name, I didn't have to tweak the examples in the folder later. Then, from Arduino 1.0.6 IDE, used "Sketch/ Import Library/ Add Library". Navigated to folder. Clicked "Open". There was no comforting "OK" message. (The import happens in an instant), but NOW when I looked at Sketch/ Import Library, there SFE_BMP180 was, down at the bottom, in the "Contributed Libraries" section. I renamed the folder I'd used to unzip to, just to be sure that a copy of "the necessary" existed in a sensible place.
RIGHT! That tedious business done, I was rewarded. Now I could use the Arduino IDE, go File/ Examples/ SFE_BMP180, and load the SFE_BMP180_example sketch. Made sure my IDE was set for the type of Arduino I was using, and pointed at the right serial port...
Did a compile, just to be sure. All well. (Always worth going one step at a time with new stuff) Did a compile. No Joy. Ah! the Arduino wasn't PLUGGED IN to the programming PC! (And I think I'm going to get this marvelous barometer board working!
Plugged in Arduino. Made sure 3v3 supply was present. Tried compile again. All seemed well! But you don't "see anything"... until you open the serial monitor.
When I did, I was delighted to see, on the serial monitor....
REBOOT
BMP180 init success

provided altitude: 1655 meters, 5430 feet
temperature: 23.53 deg C, 74.36 deg F
absolute pressure: 1016.18 mb, 30.01 inHg
relative (sea-level) pressure: 1241.10 mb, 36.65 inHg
computed altitude: 1655 meters, 5430 feet

provided altitude: 1655 meters, 5430 feet
temperature: 23.55 deg C, 74.38 deg F
absolute pressure: 1016.15 mb, 30.01 inHg
relative (sea-level) pressure: 1241.05 mb, 36.65 inHg
computed altitude: 1655 meters, 5430 feet

provided altitude: 1655 meters, 5430 feet
temperature: 23.55 deg C, 74.38 deg F
absolute pressure: 1016.16 mb, 30.01 inHg
relative (sea-level) pressure: 1241.07 mb, 36.65 inHg
computed altitude: 1655 meters, 5430 feet
A new data block appeared about every 5 seconds.
I gently put finger on the sensor... the temperature rose from 23.69 deg C to 29.27 in the time it took me to type the first part of this paragraph. While I was typing the second part, it fell back to 26.36.
Now.... that will have upset the device's altitude calculations. Only if the sensor is at the room's temperature, and the room is at the OUTSIDE temperature will you get a good reading for the altitude, due to the basic physics behind determining altitude from pressure... which is explained well at the Sparkfun page, by the way.
The "absolute" pressure the device is giving you is the most direct pressure measurement. (The temperature reading is also a direct measurement.)
You will have to tweak the code, change the line....
#define ALTITUDE 1655.0 // Altitude of....
... to whatever the right number is for the altitude, in meters, where you are. (Just put in "100", or an approximation, if you don't know.)
The 1655.0 value that comes in the example is the altitude of SparkFun's HQ in Boulder, CO. in meters
UNTIL THE WEATHER CHANGES, you will now have a nice little altimeter. (You know that the weather man talks about "high pressure" and "low pressure" in the air around you? It changes from day to day... but fairly slowly.
The barometer based altimeter you have made assumes a constant pressure in the air, apart from the pressure differences due to the sensor changing altitude. Each time it starts, it takes an air pressure reading for THAT TIME. And it says "boss told me I am at x meters above sea level.". It then reports any change in the absolute pressure it sees as a change in the altitude it is at.
I didn't follow my own advice. I set the device up on short cables... I could only change its altitude buy about 1 meter. Although there was some noise on the readings, I could still "see" a difference... of about 0.1 mb.... between my "high" location and my "low". It wasn't enough to show up in the calculated altitude, but I could see the absolute pressure change. (The high numbers when the sensor was low were consistently more than 0.05mB below the low pressure numbers from the sensor when it was higher.)
This IS an amazing device... especially at the price, $10.
As I said at the outset, this "page" is very crude. But you read down to here! I hope it had Good Stuff for you. Worth what you paid for it, anyway. If you think it is worth more, please do a Facebook "like" for some other page from my site?. (That link will open my main page in a new tab or window.)
The search engine merely looks for the words you type, so....
* Spell them properly.
* Don't bother with "How do I get rich?" That will merely return pages with "how", "do", "I"....
Please also note that I have two other sites, and that this search will not include them. They have their own search buttons.
My site at Arunet.
My Sheepdog Software pages, another of this page's editor's sites.
Here is how you can contact this page's editor. This page, and the software it references, ©TK Boyd, 8/2015.
Page tested for compliance with INDUSTRY (not MS-only) standards, using the free, publicly accessible validator at validator.w3.org