How many times have I written tutorials on "how to use a Dallas 1-Wire Temperature sensor"? I don't know. This is Yet Another, written in January 2017, when I was getting to grips with the wonderful ESP8266. That's not "really" an Arduino... but it can be programmed with the Arduino IDE. And it is my enthusiasm of the month. A web-server, via WiFi, for $16? Fantastic! The one I played with was the ESP8266 Thing ("Dev Board" version) from Sparkfun. Nothing here is particularly specific to the ESP8266, although that is what the code here was tested on. Note: The ESP8266 is a 3V3 device... the DS18B20 works fine on it, the resistor is still 4k7, as far as I know. (At least it worked in my tests!) The code here will work on "ordinary" Arduinos, too.
If you just want the code, go to the bottom, of the page. You can download "the finished version". It should run fine on Arduino or ESP8266, as long as you have added the OneWire library to your system.
STOP PRESS... noticed 30 Oct 18...
I believe that if you just download the finished version, you will get something that Just Works. If you don't, notice the bit I changed today in the tutorial part of this page, the part where we build a working system, step by step. There's been a change in this bit, which is the second bit of code in the "Adding the sensor to the system" section. The change is that an unhelpful "return;" has been removed...
if (!ds.search(addr)) {
Serial.println("No more addresses.");
Serial.println();
ds.reset_search();
delay(250);
//Until 30 Oct 18, there was a "return;" here... IT WOULD
//cause a very hard to find bug, if you leave it in
//your code. IT MAY WELL STILL BE PRESENT IN DOWNLOADABLE
//SOURCECODE!
(end, "Stop press")
If you've already mastered the basics, and are looking for How to connect multiple 1-Wire devices to one Arduino pin, Ihave an essay on that, too. It is in an early form, but may be enough to get you where you want to go. If you aren't a glutton for punishment, be aware that you can have multiple devices on one Arduino easily, if you don't mind using one pin per device.
I've been a happy user of the Dallas 1-Wire chips, not least their temperature sensors (e.g. DS18B20) for at least 15 years. They have many virtues.
At first it seems that they are complicated to use, but that complexity is quite easily managed, and the "price of admission" is well worth it for what you get.
Traditionally, you used an "adapter" between a "big" computer (Linux/ Mac/ Windows) and a string of 1-Wire chips, the "string of chips" being a little network. It was usually called a MicroLan. Many of the non-Arduino/ Pi references to using the chips will address this implementation.
But then "those bad Arduino hobbyists" discovered the temperature sensing chips, and said, "If we only want to read one with each digital pin we give up to this, we can avoid much of the complexity." And they figured it all out, and there are many pages about using DS18B20's (and their cousins, similar numbers) with Arduinos. And they work. Well. And the Arduinoistas use the 1-Wire chips without the added expense (about $20) of the adapter people going the traditional route need. (If programming Linux/ Mac/ Windows machines is something you do, I would commend 1-Wire to you in that environment, too!). I have a more general overview of using 1-Wire chips, if you want that. It re-caps some of the points made here, and goes into some odds and ends, in general terms, and has more links.
(Putting back "the complexity" of connecting strings of sensors to a single digital pin should not be "a big deal". I believe it has been done by some intrepid pioneers. Someday I hope to go down that route myself. But for now... one pin per sensor...)
Have you worked with serial ports driven by an Arduino? Even the basic one that communicates with the serial monitor? Not a deal killer, if you haven't, but to those who have, I would say: Talking to a 1-Wire chip is done a bit like that... you "begin" a "thing", and then "talk" to the chip through the "thing."
Before we go further with the software side....
The hardware... Really simple.... The only "hard" bit: The DS1820 is happy with 5v or 3v3- connect it to whichever your microprocessor is running on. (The red wire, to the red "+")
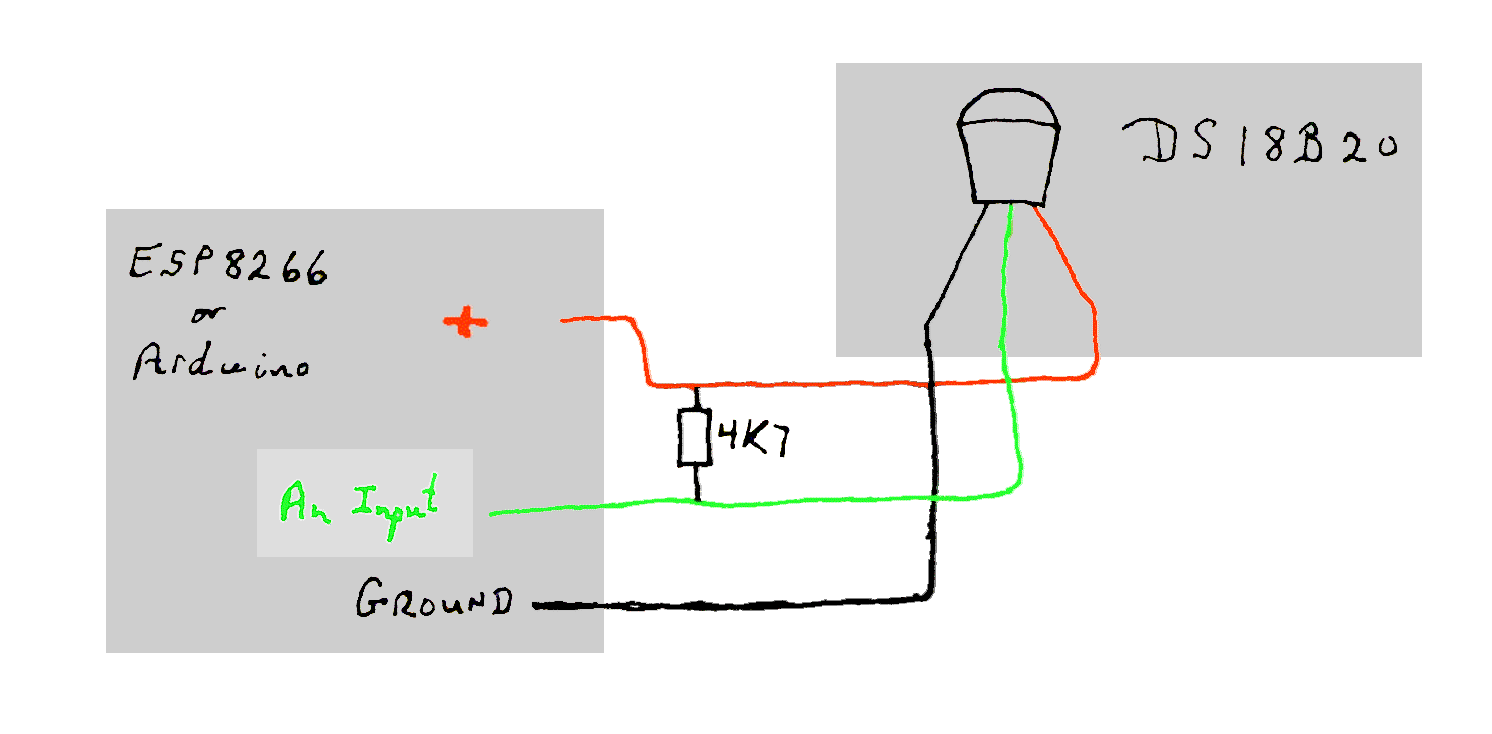
The green text in the gray box at the left says "An Input". The gray box indicates the Arduino of ESP8266 you are connecting the temperature sensor to.
Note that in your reading you will find that you can power the temperature sensor "parasitically" or directly. If you make the connections as in the diagram, you are powering the DS18B20 directly, not it parasitically. The "direct power" option requires an extra wire to the sensor. (These wires can be quite long. Start with short wires (up to 50cm), get that working, and then try longer wires, if you like. With a "proper" adapter, on a "big" computer, I've had wire runs (Cat5) of up to 15m, and I don't think that pushed my luck.) If the extra wire becomes an issue, you can try powering the sensor parasitically. To do that, the red wire,instead of going to the "top" of the 4k7 resistor, goes to the pin (of the sensor) connected to ground. Parasitic power is One More Thing To Go Wrong. A nice option when you need it, though. (It saves wire cost, when long runs are involved. See http://sheepdogsoftware.co.uk/sc3wms.htm for the same wiring issues, expressed differently.)
The the pinout for both the DS1820 and the DS18B20...
Or, rather, back... to the software issues.
As I said, I've written about this many times. The attempt you are reading now was started in January 2017, and relates to using a DS18B20 with a Sparkfun ESP8266 "Thing". It should work equally well with a 3V3 Arduino. (Or a 5v Arduino, for that matter... you still use a 4K7 resistor.)
This information is "lifted", with my own embellishments, from the sterling work of "admin" at The excellent DS18B20-on-ESP8266 tutorial from www.elec-cafe.com.
In what follows, we are only going to be using 1-Wire in a very limited way. Perfectly adequate for our needs. The obsessive among us "want it all", and you may be tempted to take a detour, get an adapter ($25 or so... the USB ones are good), use the free 1-Wire Viewer to see that all is well with the DS18B20 that you have. One day I may write that up. Or use some of my other 1-Wire pages.
But you don't have to do all that. Not just to add a temperature sensor to an ESP8266 Thing.
Nor, as you will only have one 1-Wire chip on the circuit, do you need to deal with all the "addressing" and "put other devices to sleep" stuff that you will read about on general 1-Wire pages.
The basics are simple enough. We will get to them shortly.
There's one little fly in the ointment: Getting a temperature from a DS18B20 is a two step process. And you have to wait a certain number of milliseconds between the two steps. (It doesn't matter if you wait too LONG, but you mustn't start step two too soon.)
(By the way... unless I say otherwise, always take "a DS18B20" to mean "a DS18B20 or similar"... they are a family of chips. Some are cheap, some fast, some have broad sensing ranges, some promise multiple decimal points of accuracy.)
As I was saying... two stage process, with a pause necessary between them.
If you were JUST writing a program to read the sensor, no big deal. If reading a sensor is just part of a much bigger picture, it gets messy, if you aren't careful. My "solution" probably isn't perfect, but it is the best compromise I know between flexible, robust and comprehendible.
We're NEARLY there. First step to "answer": Consider the following little Blinky. It is written for an Arduino or ESP8266 Thing with an LED (and resistor) on pin 5. For a "real" Arduino, 13 would be a better pin number to use for PIN_LED... unless you want to wire a discrete LED (and resistor) into the system.
//=========================
//Global defines, etc...

#define PIN_LED 5


//==========================
void setup()
{
  pinMode(PIN_LED, OUTPUT);
}

//==========================
void loop()
{
  digitalWrite(PIN_LED, HIGH);
  delay(500);
  digitalWrite(PIN_LED, LOW);
  delay(500);
}
There are just three parts to this...
1) The Global Defines, Etc
2) The "setup()" subroutine... every Arduino program has one.
3) The "loop()" subroutine... every Arduino program has one.
(Aside: I said "every Arduino program has one", even though this essay is aimed primarily at Sparkfun ESP8266 Thing users. A Thing is programmed with the Arduino IDE. What I'm writing here about the software side of things applies equally to Things and Arduinos. End of "Aside".)
I'm going to re-write that Blinky. At first, what I am doing will seem pointless. Bear with me... the point will emerge...
First I'm going to use the Arduino-IDE-providedserial monitor to get some "messages" out from the program while it is running.
So I add....
  Serial.begin(9600);
  Serial.println("Hello programmer person.");
  delay(2000);// Give reader a chance to see the output.
.. to the setup() subroutine.
And to give it something to report, I'm going to create a variable which will track how many times the loop() subroutine has executed. I will call it liLoopCycleCount.
To the global declarations, etc...
long int liLoopCycleCount=0;
To the top of loop() something that won't quite "work", but is a starting point...
  liLoopCycleCount++;
  Serial.println(liLoopCycleCount);
The first (++) adds one to liLoopCycleCount each time it executes. The second would try to write the value in liLoopCycleCount to the serial monitor each time the subroutine executes. But the loop executes WAY too fast for Serial.print to keep up.
There's a neat thing called "mod", expressed in Arduino programming with the % character.
If were to say....
if ((liLoopCycleCount % 2)==0)
  {Serial.println(liLoopCycleCount);};
... then when the Count was at 0, 2, 4, 6... it would sent the number to the serial monitor. The "mod" operator is connected to how we FIRST did division. Do you remember when 7 divided by 2 was "3 remainder 1"? The answer to x "mod" y answer is the remainder part of x divided by y.
(liLoopCycleCount % 100) will be 0 when liLoopCycleCount is 0, 100, 200, 300, etc. And that's about often enough to ask the program to send the value to the serial printer, so try the following. N.B.: The two Delays in loop() have been reduced to 5. You won't be able to see the LED wink on and off... but it is still happening... very, very quickly! (We'll fix that, in a moment.)
//First ESP8266 Program- 17103
//ver 3 Jan 17
//Created 3 Jan 17

//For Sparkfun ESP8266 "Thing", "Dev Brd" version. (Part WRL-13711

#define PIN_LED 5
long int liLoopCycleCount=0;

void setup()
{
  pinMode(PIN_LED, OUTPUT);

  Serial.begin(9600);
  Serial.println("Hello programmer person.");
  delay(2000);// Give reader a chance to see the output.

}

void loop()
{
  liLoopCycleCount++;
  if ((liLoopCycleCount % 100)==0)
  {Serial.println(liLoopCycleCount);};

  digitalWrite(PIN_LED, HIGH); // LED off
  delay(5);
  digitalWrite(PIN_LED, LOW); // LED on
  delay(5);
}
Remember to open the Serial Monitor window. It is best NOT to do this while the program is uploading, as the upload routines use the same pins as the Serial Monitor.
Before going further, I should add that this "solution" does not make for a system capable of reading the sensor as quickly as possible. It is more for something like a home heating controller, or a weather monitor.
We're going to build on the idea of using Mod. In addition, we're going to introduce another counter... this time a counter of the passing of (roughly) tenths of seconds. To be precise: A counter of intervals of AT LEAST a tenth of a second. This rough indication of the passing of time, measured as we do, rather than in "executions of the loop() subroutine" will be useful in dealing with the tedious need of the temperature sensor for an interval between being asked to TAKE a reading, and being asked to DELIVER that reading.
The Arduino (and ESP8266) have a useful function "millis". It returns the number of milliseconds (roughly) since the program began running. It, like most such things in computers, "goes back to zero" when it gets too big. (That takes about 50 days to arise.) Even that will be "dealt with" in due course.
We're going to add some more variables to the program. To the global declarations, etc, add...
unsigned long ulMillisAtPrevTenthsBump;
unsigned long ulTmp;
long int liTenthsPassed=0;
long int liTenthsPassedWhenConvertRequested;
To setup() add...
ulMillisAtPrevTenthsBump=millis();
Inside loop(), add to what we already had as...
  if ((liLoopCycleCount % 1000)==0)
  {Serial.println(liLoopCycleCount);};
... making it what follows. Notice that the "1000" in the first "if" has been cut down to "100", so that this fragment of code executes more often than it did before.
  if ((liLoopCycleCount % 100)==0)
  {//"Once in a while..."

   ulTmp=millis();
   if (ulTmp<ulMillisAtPrevTenthsBump)
     {ulMillisAtPrevTenthsBump=ulTmp;};
     //this handles rollover of millis.
     //this "tenth of a second" will be up
     //to 2/10th of a second long. I can live
     //with this "extra" error in 50 days!

   if (ulTmp>ulMillisAtPrevTenthsBump+100)
     { //Tenth passed
     liTenthsPassed++;
     ulMillisAtPrevTenthsBump=ulTmp;
     //I am not... yet... worring about what
     //happens when liTenthsPassed rolls over.
     //I must.. sigh... someday... maybe.
     };  //end of "Tenth passed"

   Serial.print(liLoopCycleCount);
   Serial.print("  ");
   Serial.print(ulMillisAtPrevTenthsBump);
   Serial.print("  ");
   Serial.println(liTenthsPassed);
  };//end of "Once in a while..."
What does that give us? As before, not EVERY time we execute loop(), but, once in a time as we execute loop() we report what liLoopCycleCount has reached. Along the way, we are also watching for the passing of tenths of seconds, and counting them. And reporting our count of tenths of seconds.
Since the time we changed the delay(500)s between the digitalWrite(PIN_LED.. lines, the LED has been winking on and off so rapidly that we haven't been able to see the winking.
Though it has nothing (directly) to do with writing a program to read DS18B20s, we'll use what we've learned and created to fix that.
Change what was....
  digitalWrite(PIN_LED, HIGH); // LED off
  delay(5);
  digitalWrite(PIN_LED, LOW); // LED on
  delay(5);
.... into....
  if ((liTenthsPassed % 8) < 2)
    {digitalWrite(PIN_LED, HIGH);} // LED off
    else
    {digitalWrite(PIN_LED, LOW);} // LED on
That's quite neat, really. The LED will be off for 2 tenths (or a little more than that) of a second, and then on for 6 tenths of a second, over and over again.
We can add things to what is happening within loop() (up to a point) WITHOUT CHANGING the pattern and timing of the LED winking.
Not only are the LEDs winking again, but the program isn't languishing in two otherwise-non-productive "delay" statements. If you look, you will see that then messages to the Serial Monitor are arising much more rapidly now. We could probably increase the "100" in the "if ((liLoopCycleCount % 100)==0)" and still have a "working" program... but one that "works" with less "thrashing".
We're going to be using something like this to ensure the proper length for the necessary but pesky delay between....
asking the sensor to TAKE a temperature reading
....and ...
asking it to REPORT the reading.
Not only will we get the proper delay, there, but we will also leave the processor free to do things other than sit in a non-productive "wait for time to pass" loop, be it made by "delay" or otherwise.
Review what we've done so far. One or two things are surplus to what we require, for now, but otherwise what we have should "make sense". We're just about to move on to reading the sensor.
Add a DS18B20, and the pull-up resistor to your hardware. I happened to attach mine via pin 4, but you could use a different pin. Just be sure to make the ONE change indicated below, to reflect WHERE you attached the DS18B20.
Near the top of the global declarations, etc add...
#include <OneWire.h>
For this to work, you will have had to install the OneWire library.
This is one of those "do once" tasks which extend your IDE's capabilities.
I used the built in mechanism, accessed via Sketch/ Include Library/ Manage Libraries, to install the OneWire contributed library by Jim Studt, Tom Pollard, et al. When I did that in early January 2017, the current "latest" OneWire was 2.3.2. Once installed, if you drill down again, and look closely, you will find "Installed" noted at the end of the body of the library's description.
At the bottom of the global declarations, etc, add...
//--------
//THIS BLOCK ADDED, TKB, 3 Jan 17 for read-DS18B20 tture sensor wants... based on material at...
//http://www.elec-cafe.com/temperature-sensor-on-the-web-with-esp8266-and-ds18b20/

OneWire  ds(4);  // on pin 4 (a 4.7K resistor pull up to the system's 3v3 is necessary, too)
//Change the 4 to whatever pin you choose to
//connect the DS18B20, if you choose to use
//a different pin.

byte i;
byte present = 0;
byte type_s;
byte data[12];
byte addr[8];
float celsius, fahrenheit, celsiusX10;

//(We won't be using celsiusx10 for a bit,
//nor what follows, but enter it now, and
//it shortens the tutorial! What follows
//is for "stuffing" the temperature into
//fixed with fields on a web-page...

int iTmp;
char cSTture0 ='+';
char cTturDC0Huns ='0';//Temperature, in Celcuis DECIdecgrees... i.e. 12.4 degC is 124 deg
char cTturDC0Tens ='0';
char cTturDC0Units ='0';


//END BLOCK ADDED BY TKB for read-DS18B20
//-------------------
To "setup()", after what we already have there, add...
//THIS BLOCK ADDED, TKB, 3 Jan 17 for read-DS18B20 tture sensor wants...
//The version on this web page has been tweaked since
//   being copy/ pasted from "live" work
//Another "read-DS18B20 block" gives the source of the ideas used.

//The following appeared (only) inside loop(), in
//  the material I drew upon to build this.
//For our wants, put it in the "setup()" part of
//  your code.
//(Seems to me that the following be in some sort
//  of loop, to see how many addresses can be found? At
//  present, I would guess that it merely checks that at
//  least one device can be seen. If left as is, maybe
//  change "No more addresses" to "No devices seen"?)

if (!ds.search(addr)) {
Serial.println("No more addresses.");
Serial.println();
ds.reset_search();
delay(250);
//Until 30 Oct 18, there was a "return;" here... IT WOULD
//cause a very hard to find bug, if you leave it in
//your code. IT MAY WELL STILL BE PRESENT IN DOWNLOADABLE
//SOURCECODE!
}

Serial.print("ROM =");
for ( i = 0; i < 8; i++) {
Serial.write(' ');
Serial.print(addr[i], HEX);
}

if (OneWire::crc8(addr, 7) != addr[7]) {
Serial.println("CRC is not valid!");
return;
}
Serial.println();

//See orig code for a more flexible answer. The folloing line
//"locks" this implementation to serving only
//DS16B20s.
type_s = 0;

//END BLOCK ADDED BY TKB for read-DS18B20
Do not try to RUN the code at this point... it is incomplete. However, you should try to merely "verify" what we have. (There's a button for that.) The code should be valid, i.e. should pass the verification test.
Now we're going to "get clever".
Remember: we already have a mechanism for keeping track, and counting, the passing of tenths of seconds.
We're going to wait until liTenthsPassed % 100 is 5, and at that point we will execute the "please take a reading" code.
Then we will wait until liTenthsPassed % 100 is 16... 1.1 seconds later... at least (remember that some of our "1/10s" may be long, but none will ever be short), and at that time execute the "please fetch reading" code.
And that, apart from "seeing our answers" (We'll come to that) is "it". A reading will be taken (on two stages) once every 10 seconds. The rest of the ten seconds will be available to the programmer's other wants.
Note how easy it would be to change that, so readings were taken less often, if 6 times per minute were too much... just change the % 100s to some higher number.
(An aside about an advanced matter... don't struggle too much, if it is hard just now...
The structure could also be modified to allow provision for reading other DS18B20s, on other pins...
If our initial "answer" boils down to...
if ((liTenthsPassed %100)==5) {start read 1st sensor}
if ((liTenthsPassed %100)==16) {finish read 1st sensor}
... then there'd be nothing wrong with adding...
if ((liTenthsPassed %100)==25) {start read 2nd sensor}
if ((liTenthsPassed %100)==36) {finish read 2nd sensor}
(That "trick" could be repeated several times.)
We have a marvelously flexible way to make things happen "just once in while", at the RIGHT MOMENT... with little regard for other things happening elsewhere! We just have to ensure that those "other things" don't unexpectedly "tie up" the processing of the code. Which we probably want to ensure for a bunch of other reasons, anyway.
... END of "aside about an advanced matter".))
Inside our existing loop(), we have...
   if (ulTmp>ulMillisAtPrevTenthsBump+100)
     { //Tenth passed
     liTenthsPassed++;
     ulMillisAtPrevTenthsBump=ulTmp;}
Just to create a "framework", expand that to...
   if (ulTmp>ulMillisAtPrevTenthsBump+100)
     { //Tenth passed
     liTenthsPassed++;
     ulMillisAtPrevTenthsBump=ulTmp;
     if ((liTenthsPassed %100)==5)
      {//This block of code requests tture sensor to
       //take a reading, the first of the two parts of
       //getting a reading from the sensor.

      //STUFF WILL GO HERE... explained in a moment

      }//end of block of code which requests tture sensor
       //to take a reading.

     if ((liTenthsPassed %100))==16
      {//This block of code asks tture sensor what
       //tture it "saw". Remember: It must not be executed
       //too quickly after "part one" of getting a reading
       //from the sensor.

      //STUFF WILL GO HERE... explained in a moment

      }//end of block of code which asks tture sensor what
       //tture it "saw".
Here's the first "STUFF WILL GO HERE" stuff.......
      {//This block of code requests tture sensor to
       //take a reading, the first of the two parts of
       //getting a reading from the sensor.
       //Note: You must not reset 1-Wire MicroLan, nor ask
       //the chip for the conversion too soon after asking chip
       //to DO conversion. 1 second is a reasonably safe
       //"long enough". 2 seconds would be even better, if
       //circumstances allow.

       ds.reset();
       ds.select(addr);
       ds.write(0x44, 1);  // start conversion, with parasite power on at the end

      }//end of block of code which requests tture sensor
       //to take a reading.
Who would have thought that three simple lines could need all those rems! (They're worth it, I promise.) And those "simple lines" are only "simple" because of the enormous amount of work done for us by the people who built the OneWire!
Here's the stuff for the second "STUFF WILL GO HERE" place...
     if ((liTenthsPassed %100)==16)
      {//This block of code asks tture sensor what
       //tture it "saw". Remember: It must not be executed
       //too quickly after "part one" of getting a reading
       //from the sensor.

       present = ds.reset();
       ds.select(addr);
       ds.write(0xBE);         // Read Scratchpad

       /*Scraps from original code, which may help you see what is going on here, if you re-enable...
       Serial.print("  Data = ");
       Serial.print(present, HEX);
       Serial.print(" ");
       */
       for ( i = 0; i < 9; i++) {// Yes, we need 9 bytes
          data[i] = ds.read();
          /*
          Serial.print(data[i], HEX);
          Serial.print(" ");
          */
          }//End of for i=0...
          /* Following scraps show how CRC can be CALCULATED....
          Really ought to USE it. (The calculated-from-data CRC
          should match the sent-from-chip CRC, which I pretty
          sure is what 9th sent byte was.

          Serial.print(" CRC=");
          Serial.print(OneWire::crc8(data, 8), HEX);
          Serial.println();
          */

}//end of block of code which asks tture sensor what
       //tture it "saw".
Onward! USE what we've fetched from the sensor...
       /*We now have "the temperature" in the data array... but in
       a rather arcane form. And the form varies from chip to chip.
       What follows it the part of the original code which converts
       the "arcane form" for the DS18B20 to celsius. The "if (type_s)
       is a scrap of the switching code in the original to ensure
       the right conversion formulae are used.
        */

       //Calculate ttures, retaining code necessary for other chip
       //   types (type_s hold code for chip type.)
       int16_t raw = (data[1] << 8) | data[0];
       if (type_s) {
          raw = raw >> 3; // 9 bit resolution default
          if (data[7] == 0x10) {
              // "count remain" gives full 12 bit resolution
             raw = (raw & 0xFFF0) + 12 - data[6];
             }
        }
        else
        {
          byte cfg = (data[4] & 0x60);
          // at lower res, the low bits are undefined, so let's zero them
          if (cfg == 0x00) raw = raw & ~7;  // 9 bit resolution, 93.75 ms
          else if (cfg == 0x20) raw = raw & ~3; // 10 bit res, 187.5 ms
          else if (cfg == 0x40) raw = raw & ~1; // 11 bit res, 375 ms
          // default is 12 bit resolution, 750 ms conversion time
        }

    celsius = (float)raw / 16.0;//This finishes the prime "1-Wire to "normal" units" conversion

    //Now for some "trivial" conversions to other units...

    fahrenheit = celsius * 1.8 + 32.0;
    celsiusX10=celsius*10;
    /*"CelsiusX10" allows us, if happy with values only to tenths of degree
    as "good enough" to avoid the hassles of floating point numbers. Not only
    are we going to accept 15.7 for 15.72 degrees, but we are also going to
    accept 15.7 for 15.79 degrees. In other words, the values are truncated
    to tenths of degree, not rounded.

    Here begins clumsy, messy bit.
    The following values are for "stuffing" first tture into a web page....
    There MUST be a better way!... but I wanted the value to always have
    a + or a - followed by, always, 3 digits. 2.5 degrees shown as "+025"
    ... and this "ugly" answer was the first one I could make work!

    */
    cSTture0='+';
    if (celsiusX10<0)
       {
         celsiusX10=celsiusX10*-1;
         cSTture0='-';
        }
    iTmp=celsiusX10;
    iTmp=iTmp%1000;//Just in case tture was somehow >99.9 deg, i.e. 999 deci-degrees
       //for debug Serial.println(iTmp);
    cTturDC0Huns=(iTmp/100)+48;//Hundreds(x10) character, temperature, in Celsius DECIdecgrees... i.e. 12.4 degC is 124 deg
       //for debug Serial.println(cTturDC0Huns);
    iTmp=iTmp%100;
    cTturDC0Tens=(iTmp/10)+48;
    iTmp=iTmp%10;
    cTturDC0Units=(iTmp%10)+48;

    //Here ENDS clumsy, messy bit. (The value hasn't been displayed, but
    //  the pieces for displaying the value are now in place.

    Serial.print("  Temperature = ");
    Serial.println(celsius);
    /*
    Serial.print(" Celsius, ");
    Serial.print(fahrenheit);
    Serial.println(" Fahrenheit");
    */
That will "work". It isn't "pretty", and some stuff has got "tangled"... but it "works". We're going it make it prettier and less tangled now.
Cast your mind back to our fundamental Cunning Plan: We count the number of times loop() executes, and use...
if ((liLoopCycleCount % 100)==0)
.. to do certain things only once in a while.
One of those "once in a while" things is maintaining a count of tenths of a second passed. Or, to be strictly accurate, "periods of at least a tenth of a second, usually not much more than a tenth"
And then we use...
if ((liTenthsPassed %100)==5)
... and...
if ((liTenthsPassed %100)==16)
... to do FURTHER things, just once in an even longer while, at very specific times, relative to one another.
Fine. But we've "mixed up" inside of all of that output to the serial monitor which is perhaps more frequent than is (now) necessary.
Those "Serial.print"s littered about inside...
if ((liLoopCycleCount % 100)==0)
... are, today, giving us more feedback than is useful. So much that the "good stuff" is hard to find amidst the not so useful.
Before we work on what we have built so far, here is a complete listing of how things stand at the moment. You can skip over the code, if you wish.
////ESP8266_DS1820_1703-early
//ver 4 Jan 17.. before tidyings done
//Created 3 Jan 17
//LATER VERSION NOW "current" This kept as it is
//quoted in full on webpage

#include <OneWire.h>

//For Sparkfun ESP8266 "Thing", "Dev Brd" version. (Part WRL-13711

#define PIN_LED 5
long int liLoopCycleCount=0;
unsigned long ulMillisAtPrevTenthsBump;
unsigned long ulTmp;
long int liTenthsPassed=0;
long int liTenthsPassedWhenConvertRequested;

//--------
//THIS BLOCK ADDED, TKB, 3 Jan 17 for read-DS18B20 tture sensor wants... based on material at...
//http://www.elec-cafe.com/temperature-sensor-on-the-web-with-esp8266-and-ds18b20/

OneWire  ds(4);  // on pin 4 (a 4.7K resistor pull up to the system's 3v3 is necessary, too)
//Change the 4 to whatever pin you choose to
//connect the DS18B20, if you choose to use
//a different pin.

byte i;
byte present = 0;
byte type_s;
byte data[12];
byte addr[8];
float celsius, fahrenheit, celsiusX10;

//(We won't be using celsiusx10 for a bit,
//nor what follows, but enter it now, and
//it shortens the tutorial! What follows
//is for "stuffing" the temperature into
//fixed with fields on a web-page...

int iTmp;
char cSTture0 ='+';
char cTturDC0Huns ='0';//Temperature, in Celcuis DECIdecgrees... i.e. 12.4 degC is 124 deg
char cTturDC0Tens ='0';
char cTturDC0Units ='0';

//END BLOCK ADDED BY TKB for read-DS18B20


void setup()
{
  pinMode(PIN_LED, OUTPUT);

  Serial.begin(9600);
  Serial.println("Hello programmer person.");
  delay(2000);// Give reader a chance to see the output.

  ulMillisAtPrevTenthsBump=millis();

//THIS BLOCK ADDED, TKB, 3 Jan 17 for read-DS18B20 tture sensor wants...
//Another "read-DS18B20 block" gives the source of the ideas used.

//The following was inside loop() only, in the material I drew upon
//to build this...

if ( !ds.search(addr)) {
Serial.println("No more addresses.");
Serial.println();
ds.reset_search();
delay(250);
return;
}

Serial.print("ROM =");
for ( i = 0; i < 8; i++) {
Serial.write(' ');
Serial.print(addr[i], HEX);
}

if (OneWire::crc8(addr, 7) != addr[7]) {
Serial.println("CRC is not valid!");
return;
}
Serial.println();

//See orig code for a more flexible answer. The following line
//"locks" this implementation to serving only
//DS18B20s.
type_s = 0;

//END BLOCK ADDED BY TKB for read-DS18B20
}

void loop()
{
  liLoopCycleCount++;

  if ((liLoopCycleCount % 100)==0)
  {//"Once in a while..."

   ulTmp=millis();
   if (ulTmp<ulMillisAtPrevTenthsBump)
     {ulMillisAtPrevTenthsBump=ulTmp;};
     //this handles rollover of millis.
     //this "tenth of a second" will be up
     //to 2/10th of a second long. I can live
     //with this "extra" error in 50 days!

   if (ulTmp>ulMillisAtPrevTenthsBump+100)
     { //Tenth passed
     liTenthsPassed++;
     ulMillisAtPrevTenthsBump=ulTmp;
     if ((liTenthsPassed %100)==5)
      {//This block of code requests tture sensor to
       //take a reading, the first of the two parts of
       //getting a reading from the sensor.
       //Note: You must not reset 1-Wire MicroLan, nor ask
       //the chip for the conversion too soon after asking chip
       //to DO conversion. 1 second is a reasonably safe
       //"long enough". 2 seconds would be even better, if
       //circumstances allow.

       ds.reset();
       ds.select(addr);
       ds.write(0x44, 1);  // start conversion, with parasite power on at the end

      }//end of block of code which requests tture sensor
       //to take a reading.

     //=================
     if ((liTenthsPassed %100)==16)
      {//This block of code asks tture sensor what
       //tture it "saw". Remember: It must not be executed
       //too quickly after "part one" of getting a reading
       //from the sensor.

       present = ds.reset();
       ds.select(addr);
       ds.write(0xBE);         // Read Scratchpad

       /*Scraps from original code, which may help you see what is going on here, if you re-enable...
       Serial.print("  Data = ");
       Serial.print(present, HEX);
       Serial.print(" ");
       */
       for ( i = 0; i < 9; i++) {// Yes, we need 9 bytes
          data[i] = ds.read();
          /*
          Serial.print(data[i], HEX);
          Serial.print(" ");
          */
          }//End of for i=0...
          /* Following scraps show how CRC can be CALCULATED....
          Really ought to USE it. (The calculated-from-data CRC
          should match the sent-from-chip CRC, which I pretty
          sure is what 9th sent byte was.

          Serial.print(" CRC=");
          Serial.print(OneWire::crc8(data, 8), HEX);
          Serial.println();
          */

       /*We now have "the temperature" in the data array... but in
       a rather arcane form. And the form varies from chip to chip.
       What follows it the part of the original code which converts
       the "arcane form" for the DS18B20 to celsius. The "if (type_s)
       is a scrap of the switching code in the original to ensure
       the right conversion formulae are used.
        */

       //Calculate ttures, retaining code necessary for other chip
       //   types (type_s hold code for chip type.)
       int16_t raw = (data[1] << 8) | data[0];
       if (type_s) {
          raw = raw << 3; // 9 bit resolution default
          if (data[7] == 0x10) {
              // "count remain" gives full 12 bit resolution
             raw = (raw & 0xFFF0) + 12 - data[6];
             }
        }
        else
        {
          byte cfg = (data[4] & 0x60);
          // at lower res, the low bits are undefined, so let's zero them
          if (cfg == 0x00) raw = raw & ~7;  // 9 bit resolution, 93.75 ms
          else if (cfg == 0x20) raw = raw & ~3; // 10 bit res, 187.5 ms
          else if (cfg == 0x40) raw = raw & ~1; // 11 bit res, 375 ms
          // default is 12 bit resolution, 750 ms conversion time
        }

    celsius = (float)raw / 16.0;//This finishes the prime "1-Wire to "normal" units" conversion

    //Now for some "trivial" conversions to other units...

    fahrenheit = celsius * 1.8 + 32.0;
    celsiusX10=celsius*10;
    /*"CelsiusX10" allows us, if happy with values only to tenths of degree
    as "good enough" to avoid the hassles of floating point numbers. Not only
    are we going to accept 15.7 for 15.72 degrees, but we are also going to
    accept 15.7 for 15.79 degrees. In other words, the values are truncated
    to tenths of degree, not rounded.

    Here begins clumsy, messy bit.
    The following values are for "stuffing" first tture into a web page....
    There MUST be a better way!... but I wanted the value to always have
    a + or a - followed by, always, 3 digits. 2.5 degrees shown as "+025"
    ... and this "ugly" answer was the first one I could make work!

    */
    cSTture0='+';
    if (celsiusX10<0)
       {
         celsiusX10=celsiusX10*-1;
         cSTture0='-';
        }
    iTmp=celsiusX10;
    iTmp=iTmp%1000;//Just in case tture was somehow >99.9 deg, i.e. 999 deci-degrees
       //for debug Serial.println(iTmp);
    cTturDC0Huns=(iTmp/100)+48;//Hundreds(x10) character, temperature, in Celcuis Deci-degrees... i.e. 12.4 degC is 124 deg
       //for debug Serial.println(cTturDC0Huns);
    iTmp=iTmp%100;
    cTturDC0Tens=(iTmp/10)+48;
    iTmp=iTmp%10;
    cTturDC0Units=(iTmp%10)+48;

    //Here ENDS clumsy, messy bit. (The value hasn't been displayed, but
    //  the pieces for displaying the value are now in place.

    Serial.print("  Temperature = ");
    Serial.println(celsius);
    /*
    Serial.print(" Celsius, ");
    Serial.print(fahrenheit);
    Serial.println(" Fahrenheit");
    */

}   //end of block of code which asks tture sensor what
    //    tture it "saw".


//I am not... yet... worrying about what
     //happens when liTenthsPassed rolls over.
     //I must.. sigh... someday... maybe.
     };  //end of "Tenth passed"

   Serial.print(liLoopCycleCount);
   Serial.print("  ");
   Serial.print(ulMillisAtPrevTenthsBump);
   Serial.print("  ");
   Serial.println(liTenthsPassed);
  };//end of "Once in a while..."

  if ((liTenthsPassed % 8) <2)
    {digitalWrite(PIN_LED, HIGH);} // LED off
    else
    {digitalWrite(PIN_LED, LOW);} // LED on
}//loop()
All of the above was for people who want to understand what is going on. Little messes accumulated, in going through the material in a sequence I hope was effective.
I then went through the code again, tidied things up. Most (all?) of the messages sent from inside the "guts" via the Serial monitor were removed. There was nothing "wrong" with them, but messages to the outside world being sent from "the guts" is not generally a good idea. I've "cleaned up" the guts, made them do JUST their thing, but added new material to send useful material to "the outside world" at more appropriate times.
Note that a lag is now part of the program. The program "knows" about a new temperature reading roughly every ten seconds. But it REPORTS "the latest" reading someplace else.
The "new" version is available as a download. Just click here to fetch my "Read a DS18B20 temperature sensor" code for Arduinos and ESP8266. (Ignore the "ESP8266" in the name. The code works in ESP8266s, but also other Arduino-type devices.) And, I know I've mentioned it before, but the credit for the magic at the heart of this goes to "admin" at The excellent DS18B20-on-ESP8266 tutorial from www.elec-cafe.com. I apologise for some of the crude butchery in chopping bits off to give novices less to contend with.
If you visit 1&1's site from here, it helps me. They host my website, and I wouldn't put this link up for them if I wasn't happy with their service.
Click here to visit editor's Sheepdog Software (tm) freeware, shareware pages.. Material on this page © TK Boyd 1/2017
Click here to visit the homepage of my biggest site.
Click here to visit the homepage of Sheepdogsoftware.co.uk. Apologies if the "?FrmAht" I added to that link causes your browser problems. Please let me know, if so?
![]() Page has been tested for compliance with INDUSTRY (not MS-only) standards, using the free, publicly accessible validator at validator.w3.org. Mostly passes.
Page has been tested for compliance with INDUSTRY (not MS-only) standards, using the free, publicly accessible validator at validator.w3.org. Mostly passes.
AND passes...

....... P a g e . . . E n d s .....