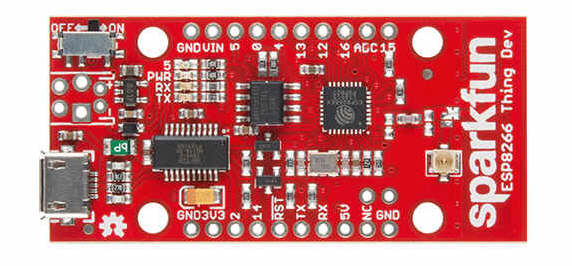
The Sparkfun ESP8266 "Thing" (link to Sparkfun product description) has been around for a while now. It is just one of many ways to enjoy the ESP8266 chip.
(This page also has a few remarks about the Adafruit Feather Huzzah 8266... and yes, you need all three parts of that!)
I was wrong to be so cynical, and lazy and not give it a try before I did... in December 2016.
There are actually two very similar products on sale from Sparkfun. The one I've played with is the ESP8266 Thing Dev Board, Sparkfun part WRL-13711. (Same price as other, the "plain" "Thing", Sparkfun part WRL-13231. ($17 at 7/21. ($16 at 12/16)))
It is a little bit like an Arduino (which I have a lot of experience with, because I think Arduinos are very capable... and fun!)
8/21: I have now played with the Adafruit Feather Huzzah with ESP8266. It Just Ran an old program I had for the Thing, first time. (That isn't, of course, to say there are no differences! The Huzzah has 8x the momeory of the Thing, but there may be less welcome differences, too. (512k bytes (the Sparkfun, at 8/21, is NOT "too little"... the app I tried that works in both runs a webserver to monitor two counters, two temperature sensors. (I haven't attached sensors, or fed inputs to the counters in the Huzzah yet, by the way... but that's trival compared to the web-serving... which I HAVE tested.)
As I said, there are two very similar products. To shamelessly and without attribution copy someone else's work, the differences are...
If you are looking at the top side of the board, at the end with the big "Sparkfun" text, if you see "ESP8266 Thing"... without "Dev"... you have a WRL-13231. If you see "ESP8266 Thing Dev", you have... (if I have to tell you, I can't help you! Other than to confirm that the number of the Thing Dev is WRL-13711). Of course, if you remember (as I did not) that one (the Dev) has a USB connector and the "plain" thing does not, then you can see what you have from that, too.
(Several paragraphs of tweaked quote begin)..."The major difference between the "plain" Thing and the Dev Thing is that the Dev has a USB-to-Serial converter on board. This means you don't need a FTDI cable or alternative USB-to-Serial converter to program the board, or otherwise communicate with a USB host.
"The chip at the heart of both Things, the ESP8266, has a reset-from-sleep pin which is neatly broken out to pads where you could connect something to connect it with the Reset signal. (The "plain" Thing (WRL-13231) needs a wire soldered from mid-board RST to XPD on the side.)"
(The person I'm quoting goes on to say...) "And it has a different circuit to auto-reset and auto-program. I haven't figured out how this works yet."(END of several paragraphs of tweaked quote.)
"An Arduino" with everything you need to connect via WiFi "built in". And it will run off of 2 AA cells, or LiPo power.
Just before I go into why I like it so much, let me mention that I've written a separate page to cover the topic of the Thing's analog input pin ("ADC").
A little "aside" before I proceed: It must be said that Sparkfun is rarely the cheapest source for anything. But in most cases, I find the premium very modest, especially when you consider the advantages of dealing with Sparkfun.
In the case of ESP8266 based systems, it is true that the Sparkfun product is "expensive"... $17! Oh dear!... and it isn't the most powerful ESP8266 out there, nor is the board particularly generously provided with memory/storage.
Humor me. Start with the device listed here. It works!. You may want to use the Sparkfun documentation.
Once you are no longer an ESP8266 newbie, if you want to play with eBay wonders, fine! By then, you'll be in a better position to decide between "Faulty module" and "Programming Error".
While revisiting this, 7/21, I came across an alternative. Also from a major supplier of Arduino-compatible kit, Adafruit. They offer...
"Feather HUZZAH WiFi Development Board", their product number 2821 for one with the headers. Built in USB and battery charging.
The Sparkfun "Thing" may match some of those specs... I haven't taken a fine-toothed comb to this! (Yet.)
Annoyingly, unless I am blind, the off critised memory/storage of the Sparkfun Thing isn't clear on it's page. On my second attempt to find it, 8/21, I tracked down confirmation that it is still only 512k BYTES. If you look at the schematic, and figure out that U3 is the memory, and track down a data sheet you may see "4M"... but note that's 4 mega BITS. Which is 512k BYTES. I still haven't tracked down the Thing's processor's clock rate.
Don't get me wrong. More is not always better. 512k is FINE for the little webservers I've created. I like the Thing. I like Sparkfun. (My first outing at the Adafuit "support" forum has been disappointing. Sparkfun support excellent.) But you should know what your choices are.
But to Sparkfun's credit, I think that they say somewhere that the Thing's (Plain and Dev) pins are happy with 5v inputs. Adafruit doesn't, that I see, address the "issue"... which may or not be an issue, in what you want to do. But you do need to pay attention to the 3v3 vs 5v question, always.
Okay... "What's it good for?" One thing you might use the "Thing" for is an Arduserver. (That link... the one in the previous sentence... takes you to an overview of the Arduserver concept. If you want sourcecode and details of an Arduserver hosted on an ESP8266, use the link in this sentence.)
The ESP8266 is "good" and "bad". "Good" in that it opens the way for some amazing projects. "Bad" in that the best of those will involve multiple technologies... "Arduino" (type) programming, WiFi, html, etc.
So maybe if you are learning "everything" at once, it won't all be "easy"... but even if you are new to some of the several threads to this story, the Thing is a good place to start. And if you "don't make it" (for now), the exercise will only cost you $17! When I first tried to connect an Arduino to a LAN, by a mere "wired" connection, the cost of entry was a lot higher. (And you'd still have a useful Arduino... you don't HAVE to use the WiFi part!)
Setting up, using a device in a LAN context will never be "simple", even a wired device, let along something WiFi.
But I can't imagine it being easier than the ESP8266 "Thing" makes it.
My Arduino IDE, on the machine I test untried devices on, was a little elderly back in February 2017, and resisted upgrade. A nuisance. And totally unrelated to the merits or weaknesses of the Thing. I only mention it, as that was by far "the low point" of my first day's play with the device. (And it limited the time I had for playing with it.)
Even with keeping my records of static IP address assignments, and port usage meticulously up to date (VITAL!), AND starting a "How To" essay, I went from the end of first running Blinky (make the LED wink) to having a web server active on my LAN in about a half hour. It ran FIRST TIME. (And every time afterwards, too.)
Be sure to try changing the upload speed used to program the board.
You do this with the IDE's Tools/ Upload Speed item. It "works" at the default speed, but you soon begin to seethe while the upload progresses. Set the speed too high, and you'll get the occasional failed upload. No big deal... just invoke "upload" again. I've been uploading at 512,000 without getting failed uploads.
The Sparkfun ESP8266 runs at EIGHTY megahertz. Be prepared to reconsider what you consider "normal" for execution speed, if, like me, you come from EIGHT megahertz Arduino Pro Minis.
It "shouldn't" happen... but if it does:
You may find that you get "initHardware not declared within this scope" (or similar) when you go to make a minor change to something that was working just fine a moment ago.
Try moving the code for your "setup()" and your "loop()" down to the bottom of you code, if you get something like the above.
-----
While I've interrupted myself already: I have used the good material at....
the excellent www.elec-cafe.com essay about using DS18B20 with ESP8266.
.... to put a DS18B20 temperature sensor on my Thing. Went well. Working fine. These Dallas 1-Wire sensors are excellent. The temperature sensors seem to be the most widely used, but there are other devices... sensors and actuators... in the 1-Wire family.
I will try to get a "how to" out for you in due course. In the meantime, the synthesis of the elec-cafe material and experience can be found in the code of my ESP8266 Arduserver. (That link was given to you already above. Don't visit twice, if you already went!)
-----
Back to our story...
Yesterday (first day) I was working only a few meters from my WiFi base station. Today, I was glad to be alone in the building, as I felt a little foolish going from distant room to distant room with my Android in one hand, and the ESP8266 in the other, seeing if it would still serve pages, "distant" from the base station.
The Android's signal strength meter was usually showing a very poor signal... but the Thing served pages from three different locations with never a fail. And I was only using the "baby" antenna etched into the tracks of the PCB. There is a connection for an external antenna if you want to extend the device's range. The sites were about 15 meters from the base station, sometimes between rooms on the same floor, sometimes between rooms AND floors. Sometimes very substantial masonry barriers... pierced by doorways... were in the way. As I say... my Samsung Android was struggling to see the signal, but it was adequate for the Thing.
---------
I prefer to put such things on a fixed IP address within the LAN. Easy! I'll explain in a moment. Also, unless you don't already have a web server on your LAN, you probably want to tell your Thing to serve on a different port.
Starting with the basic Web Server demo from the (excellent, by the way) hookup guide at the Sparkfun website, I had, as everyone will, to change the values in...
//////////////////////
// WiFi Definitions //
//////////////////////
const char WiFiSSID[] = "WiFiSSID";
const char WiFiPSK[] = "WiFiPSK";
If my Wifi's SSID were MySSID, and the password to get in were MyPassword, I would need to make the above...
//////////////////////
// WiFi Definitions //
//////////////////////
const char WiFiSSID[] = "MySSID";
const char WiFiPSK[] = "MyPassword";
Changing the port the server operates on is an even simpler matter... just change the "80" in the following to what you want used....
WiFiServer server(80);
And now, I can return to the question of making the device use a specific IP address. The demo code, as supplied, asks the LAN's DHCP server to assign an IP Address.... AND, if you look at the information coming up via the Arduino's serial monitor, it (the Thing) tells you the address it has been assigned for this session.
But as some will know, and others will learn, that really isn't a good solution for some situations. The "problems" are nothing to do with the Thing. They would arise with ANYTHING you wanted to put "on the internet". I go into them quite a bit in the Arduserver material.
So... can the Thing be made to "sit" at a programmed IP address? Yes! Easily! A "crude" version would entail even less than you see here, but, with a nod to Good Programming Practice, the bits you need to change from program (or environment) to program/ environment, are being put up at the top where they are easy to find. The values are going into well named "variables". (I put that in quotes, because the value won't change in the course of the program running.) And then, when those values are needed, they are supplied by inserting the variable where the value is needed.
So! First the variables and some hypothetical values. This block can go just after the "WiFi Definitions" block, which was comparable...
//THREE LINES ADDED BY TKB TO BASIC DEMO.... Block 1 of 2 to set static IP address
IPAddress ip(192, 168, 0, 240);
IPAddress gateway(192,168,0,1);
IPAddress subnet(255,255,255,0);
The only value you are likely to want to change is the 240... but your LAN may be unconventional, and require other tweaks.
Once those are available, you need to insert...
//ADDED TO DEMO BY TKB... 2 of 2 to set static IP address
WiFi.config(ip, gateway, subnet);
... just before the...
WiFi.mode(WIFI_STA);
.. which is part of void connectWiFi()
-----
That's it! Just get yourself a Dynamic DNS URL and take care of your router's NAT table, and your little $17 webserver can be seen by the world!
I was able to put the Thing on the worldwide internet with little hassle, but I was only adding it to some other similar things on an existing installation.. several "do once" things were already done. "Just" taking care of the two things I dismissed as little details in the previous paragraph will be a bit of work the first time you do it... but....
-- 1) They are things you have to do to connect ANYTHING on your LAN for access by the wider world.
-- 2) It costs nothing, or almost nothing. ("almost nothing" saves you minor hassles.)
-- 3) Once you've done it for one device, it is much easier to do again, for the next device.
-- 4) It isn't Rocket Science.
Anyway... have a lot of fun with the Thing INSIDE your LAN, you don't have to tackle those things. Get it working on the LAN first. Then set out to conquer the (internet) world.
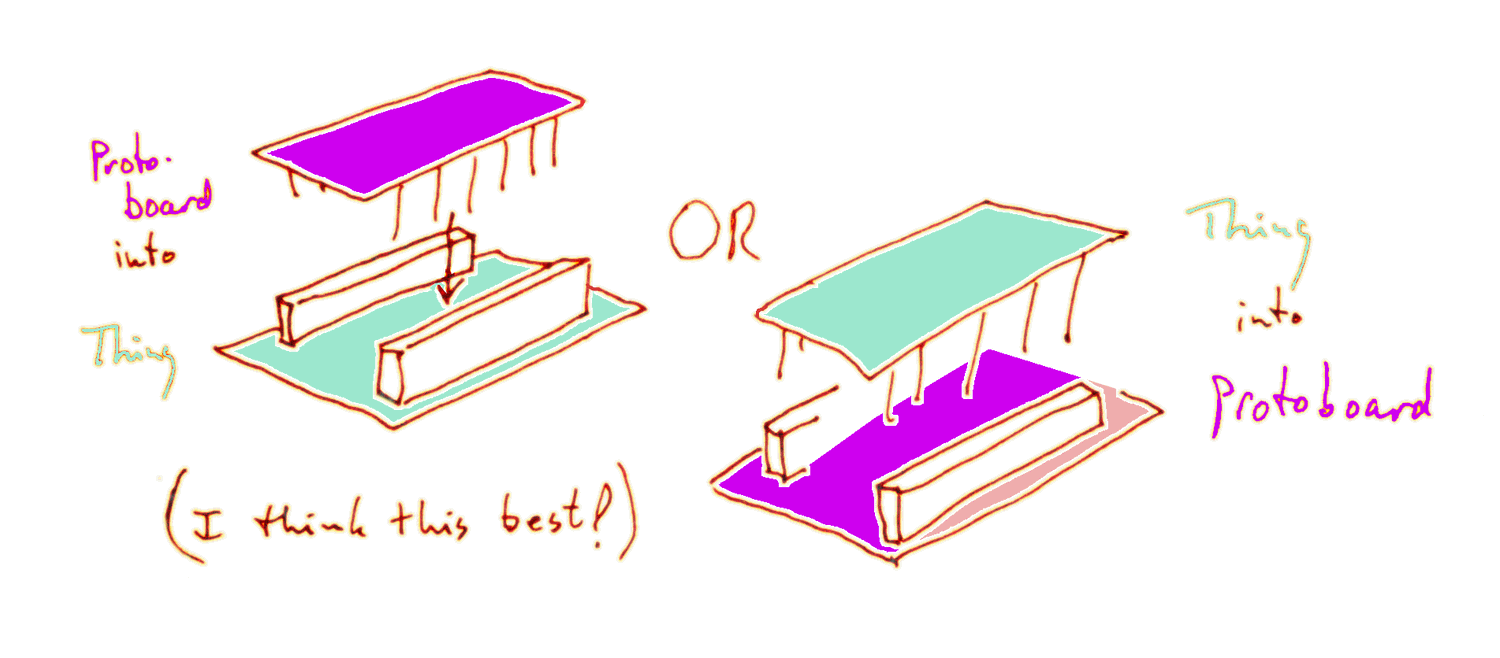
The illustration below shows two instances of essentially the same circuit... an ESP8266 with some bits and pieces (and software) making it an "Arduserver"... a "proof of concept" demonstrator for people interested in getting started with "Internet of Things" projects. Connect to the ESP8266 from anywhere on the internet, turn things on and off, see what sensors attached to the ESP8266 are "seeing".
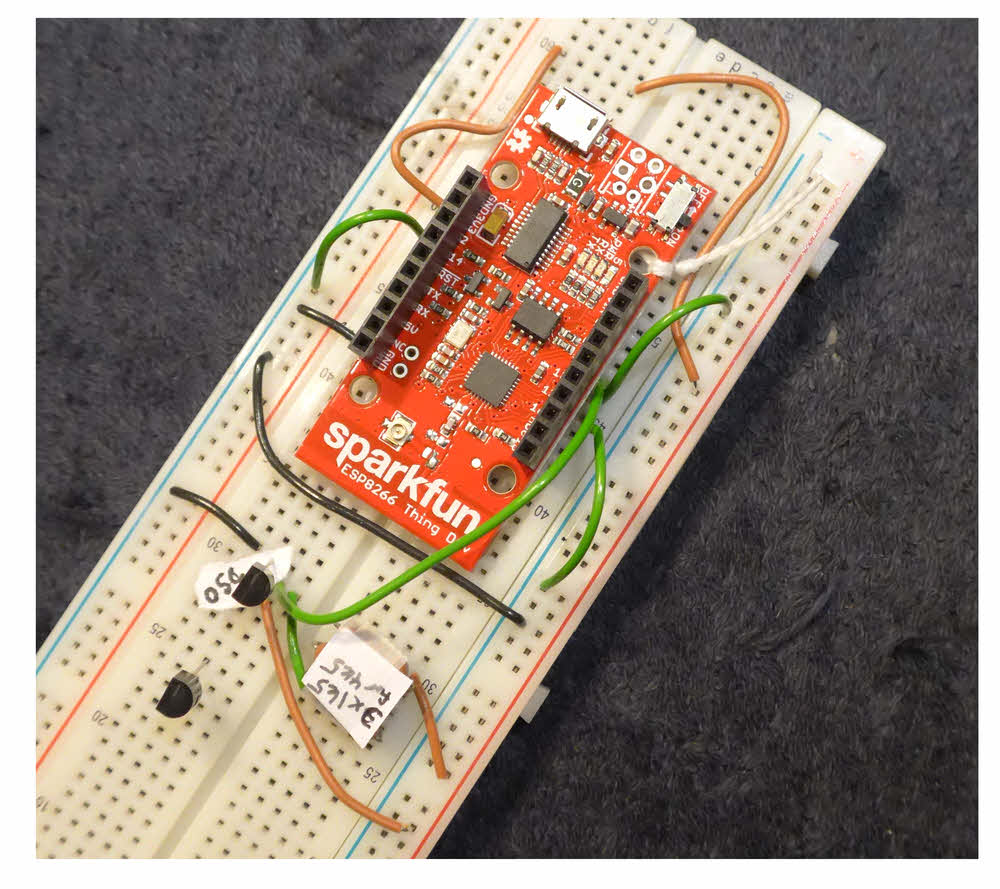
The one on the left was set up easily, and can be tinkered with. The one on the left is more robust, and doesn't tie up a breadboard. (Don't take either as exactly right, and a "model"... but both are nearly what I ended up with. Both work now.)
Both feature "counters"... not part of the basic Arduserver. Both report their data not just in human-friendly form, but also in machine-friendly form. You can use a program to monitor the values coming from the sensors, draw graphs, record data files, raise alarms if a parameter gets out of spec.
What is your time worth?
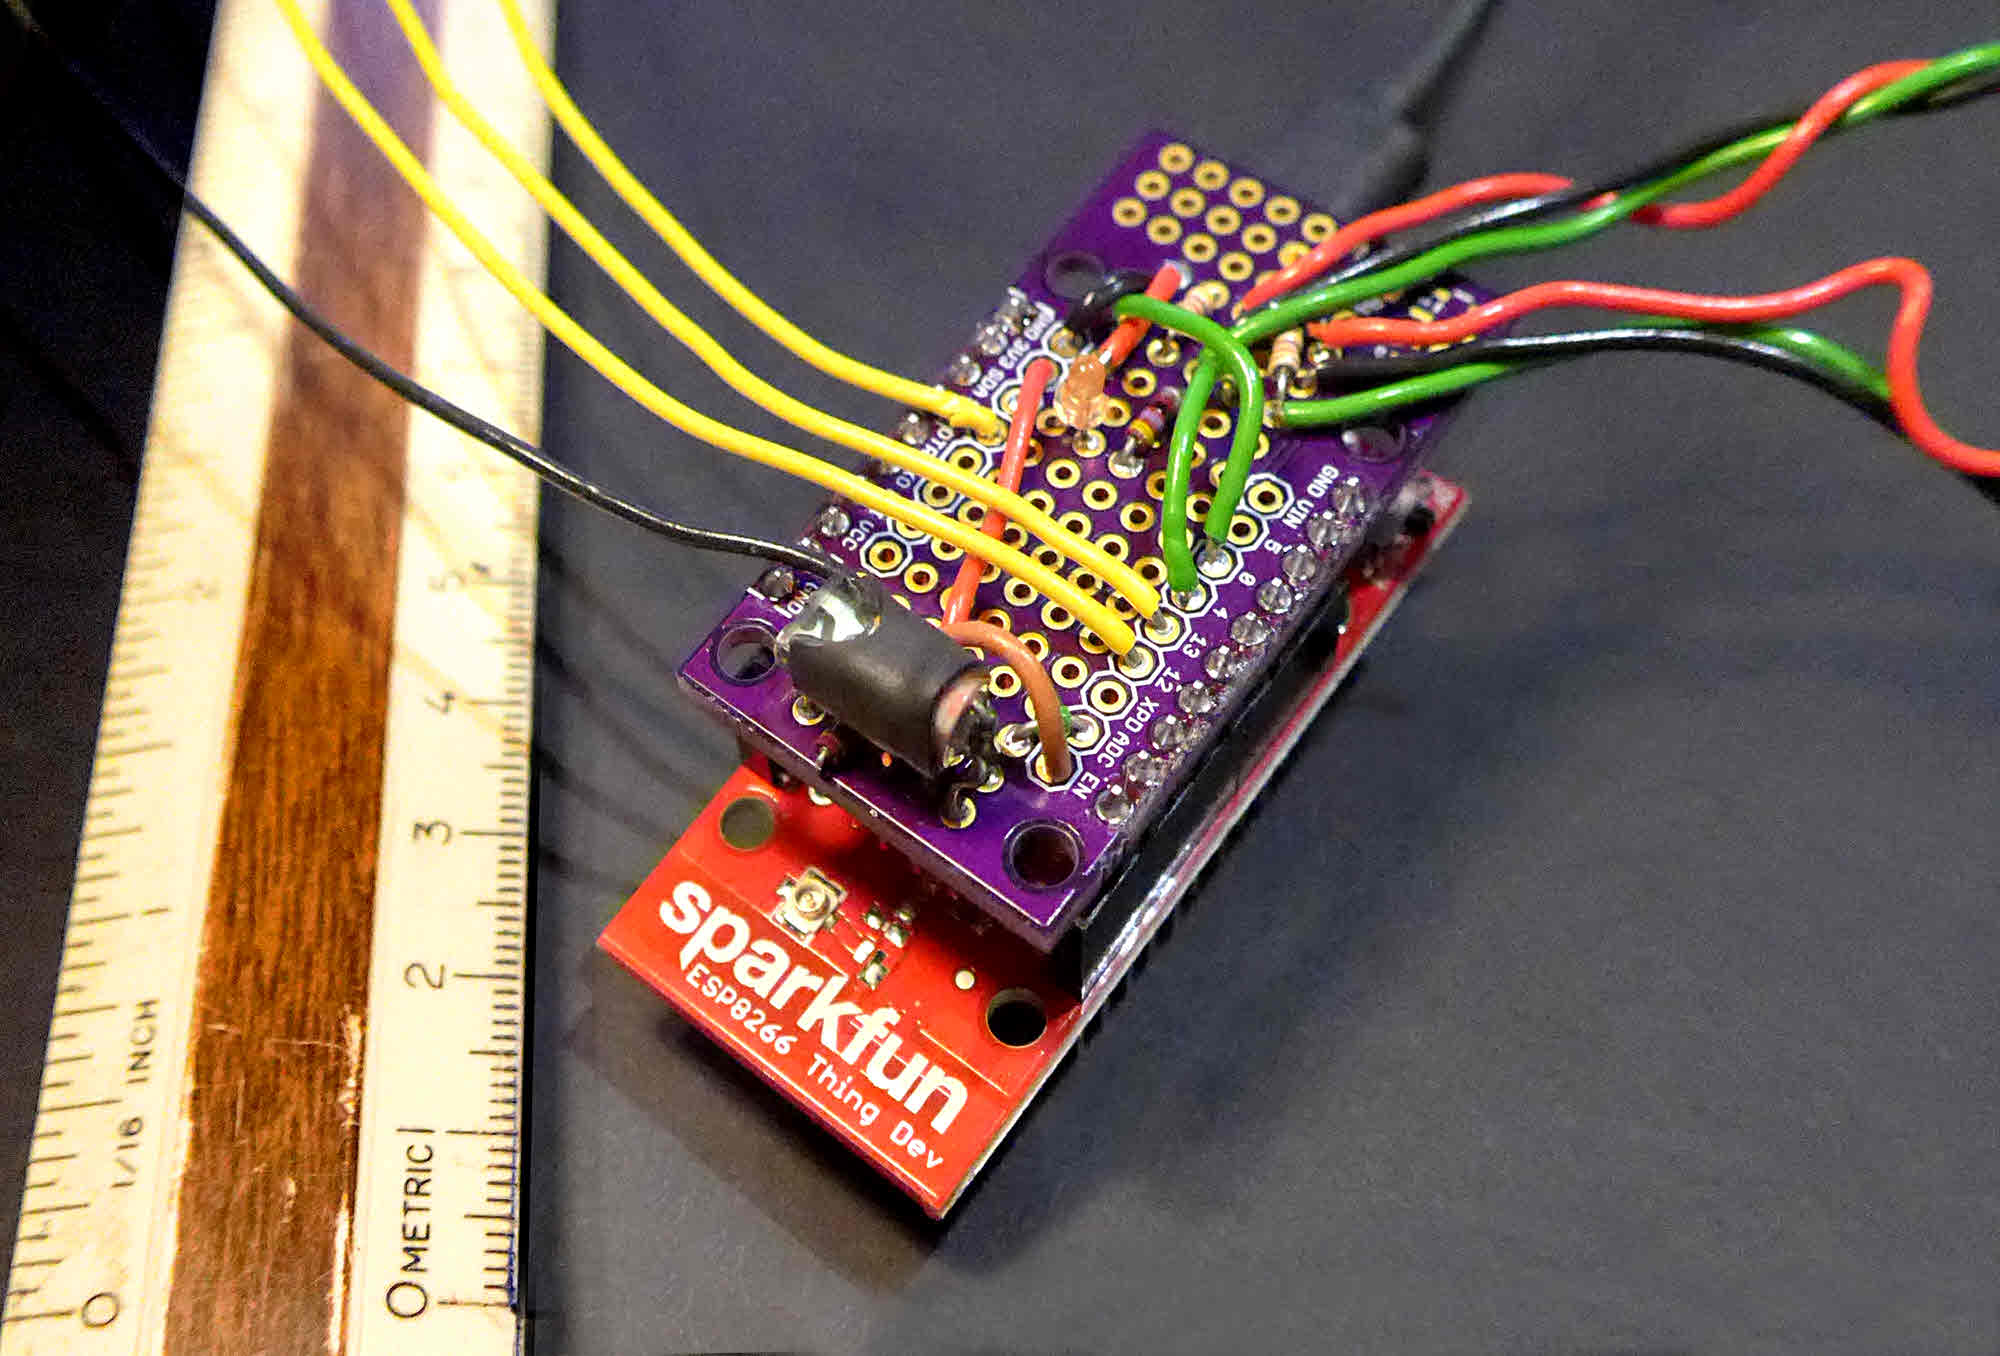
A nice person going by the tag "uChip" created a useful little (2.5 x 5 cm) PCB. It is a protoboard for the "Thing". Use it with Things which have sockets on the top, or pins on the bottom, depending on your wants. (You have to set the protoboard up accordingly.)
It is a 'public project' at OSH Park. Costs only $10 for the minimum order of three. (p&p free to anywhere in the world, and service, at least US/UK is rapid.) I not only buy this sort of thing from OSH Park, but also have my own boards made by them. Very satisfactory.
Here's a rough guide to what the board offers. The guide has not been extensively tested. Let me know, please if you spot mistakes.
(The IDs on the pads is a work in progress. Current best "for printing" artwork will not always agree exactly with what you see below... but it will be my latest effort to Get It Right.)
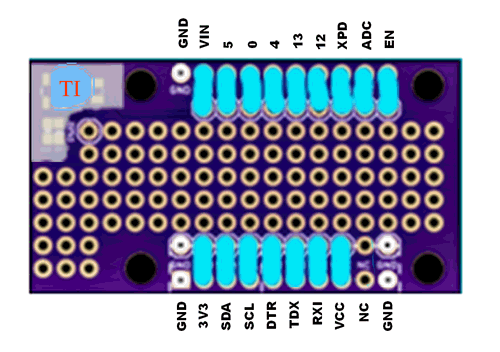
At the upper left, some pads for a power supply. I haven't investigated this, the "TI" is for "Terra Incognito".
Pay attention:: There are 5 pads I've marked with a white blob with a black spot in the center. **They are all connected to one another**.
And then there are the 16 pairs of pads which I've marked with short vertical cyan lines. The pads of each pair are connected to one another, but not, as far as I have seen connected to anything else.
As far as I have seen, all of the other pads are singletons.
I used one of these proto-shields to create my third ESP8266. (Feb 2017) It went very well. I even added some features. Robust, and doesn't tie up a breadboard, as so many of my "I'll finish that later" projects do, sigh.
Some say that 512k is too little. I say I can have a lot of fun in 512k at $15. Of course, if Sparkfun can increase the memory, at about the same price, who's going to complain? (At 8/21 I found it very hard to find anything about the Thing's memory. Eventually I went to the schematic, and then used Google Search to investigate a "mystery chip" which turned out to be a "4Meg" chip... 512K x 8 bits... so a 512 mega BYTE chip. Who cares how many BITS (1/8th of a byte) something has? Sigh.) The Adafruit Feather Huzzah with ESP8266 makes it's memory complement very clear: "4MB of FLASH (32 MBit)"... 8x what the Thing has. And they state the memory "up front".
Some say that even at $15 it is too much. I like doing business with someone I can go back to. I like supporting them because they bring me nice toys, with good documentation. I like being able to do a lot of shopping in one place, and know when my parcel will arrive. Do I buy everything there? No.
There aren't many I/O pins. No, there aren't. And my Arduino Pro Mini doesn't have built in WiFi.
Minor detail: The ESP8266 provides you with an LED onboard. Already hooked up to one of the GPIO pins of the processor. Almost like the LED on D13 of a traditional Arduino. However, instead of being on D13, it is on D5.
If you see things in my sourcecode like...
  digitalWrite(PIN_LED, HIGH); // LED off
  delay(5);
  digitalWrite(PIN_LED, LOW); // LED on
The comment may be WRONG... "HIGH" may lead to on, "LOW" to "off". (I was a bit muddled about something, AND had an LED wired strangly.)
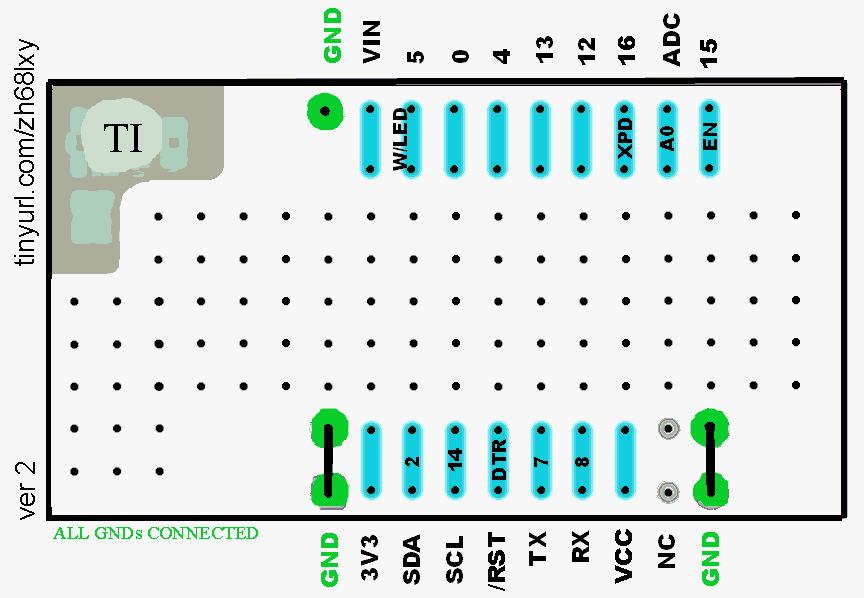
The versions of the diagram below has a little new information, was tidied and I changed the colors to be kinder to your printer, if you want to print out some copies as "worksheets" for designing or documenting things you put on one of "uChip"s "Thing Proto Shield"s...
There are many easy ways to print from a web-page, if you haven't already discovered this. Right click on the image for starters, and after that what's easiest depends on your system's setup and wants. I just used "view image", and printed from the result of that without hassle.
The designations of what signals are on each pad is a work in progress. The text in the silkscreen of the actual PCB, as purchased 1/17, doesn't exactly agree with the silkscreen on the Sparkfun ESP8266 "Thing", Dev Board. Purchased 12/16. BUT THIS ISN'T A BIG DEAL! When you've used Arduinos and the like for a while, you will come to see this as "routine".
I have started a little page to discuss "special circumstances" on some ESP8266 pins, for instance the fact that on the Sparkfun "Thing", on the PCB, there's a LED attached to data line 5. (Not that the LED on line 5 is a "big deal"!)
Please get in touch if you discover flaws in this page. Ways you are using "the Thing" would be of interest, too. Please mention the page's URL. (www. thingie)
If you found this of interest, please mention in fora, give it a Facebook "like", Google "Plus", or whatever. I've almost given up writing these pages, because it seems they are seldom read, and of course not every reader will use them... so... is there any point? If you want more of this stuff, help!?
Click here to visit my main homepage where you
can explore other areas, such as education, programming, investing.
![]() Page has been tested for compliance with INDUSTRY (not MS-only) standards, using the free, publicly accessible validator at validator.w3.org. Mostly passes.
Page has been tested for compliance with INDUSTRY (not MS-only) standards, using the free, publicly accessible validator at validator.w3.org. Mostly passes.
AND passes...

Why does this page cause a script to run? Because of the Google panels, and the code for the search button. Also, I have my web-traffic monitored for me by eXTReMe tracker. They offer a free tracker. If you want to try one, check out their site. Why do I mention the script? Be sure you know all you need to about spyware.
. . . . . P a g e . . . E n d s . . . . .