
_____________________
I'm in love... again. (1/19)
(This page subsequently edited, brought up to date 8/21.)
If you want to give me a super-duper $5000 ultra gaming machine, I won't say no.
Or a $2500 sturdy workhorse, which does half what the big one would.
Or even a $1250 "basic" computer, I still would be grateful.
But by that logic, how much should $6.95 (1/19 and 8/21) buy you?
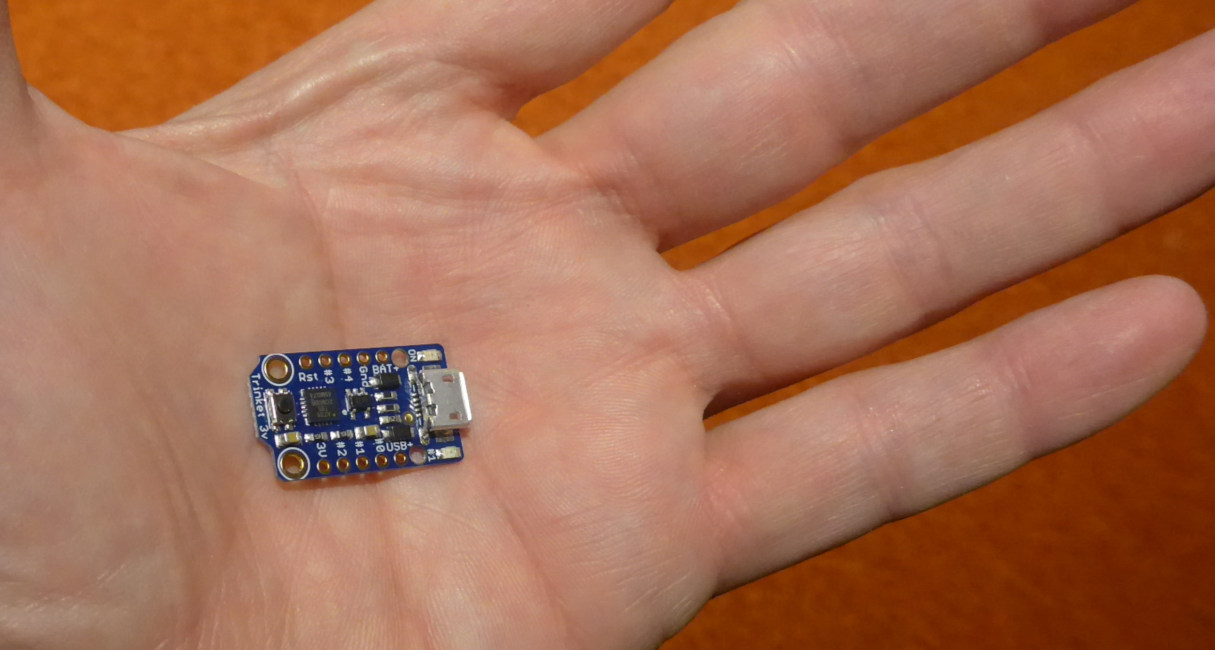
$6.95 will buy you a full blown von Neumann computer. 8 or 16 MHz clock. 8k of flash RAM, 512 bytes of SRAM, 512 bytes of EEPROM. Easily programmable in a C++- like language. 5v or 3v3.. two versions, same device.
Of course, 8/ 512/ 512 may not sound like much... but your big ultra gaming machine will have to load programs from backing store. It won't have them resident in mapped non-volatile memory, will it? $5000 is 719x $6.95. Does the big gaming machine run at 11,000 MHz? Would I ever NEED 11 GHz?? I don't think so!
Anyway... learning that pleasure can come from doing "more" with "less" is valuable in its own right.
It may seem....
It may seem that this page is endless. Fear not! it is only so long because it talks about many details. Nothing here is terribly difficult. Everything here, done by someone familiar with the processes, could be done in 15 minutes... at most!
Sad news: "[Original] Trinket is not supported on Linux operating system" appears on the Adafruit website at 8/21. I suspect that there are no problems with using a Trinket M0 under Linux... if you know, I would welcome the information. (Eddress at bottom.)
By all means, read on. But be aware: This Trinket is "the old one". There's now (8/21... and probably for some time at that date) a new Trinket, the "M0" (emm-zero). It does cost... gasp... $2 more. But that's more than worth it, for various reasons. But, as I said, read on... most of what I say here applies equally to the M0... you just get MORE with the newer device. The old Trinket is still sold at 8/21, still works at 8/21, and so here we go...
====================
Here's what you get for your money for an (original) "Trinket", from Adafruit. (Product ID: 1500/1501, depending on voltage chosen.)
When I wrote this, I had a little bad luck. I knew it had been around for a while. I'd played with, and liked, the ATtiny85's it is based on. (Even simpler, but a little more hassle to program... still Arduino compatible, but you can't program across a USB connection... but you get easier access to all GPIO lines. Choices! Choices! (With Trinket, two GPIO lines have to be used carefully.))
Bad timing! Near the end of 2018, I bought two Adafruit Trinkets.
A month later, when I went to play with one of them, the product description opened with...
Description-

Deprecation Warning: The Trinket bit-bang USB technique
it uses doesn't work as well as it did in 2014, many
modern computers won't work well. So while we still
carry the Trinket so that people can maintain some older
projects, we no longer recommend it. Please check out
the Trinket M0. It has built-in USB, more capabilities,
and is comparable in price!
(https://www.adafruit.com/product/1501,accessed 5 Jan 2019)
The details of "won't work well" are pretty sketchy, aren't they? I read on the internet that USB 3 ports may be problematic. Okay... many PCs offer some USB 2 ports. Or, you can connect the Trinket through a USB 2 hub. If you know or discover any other details about the "won't work well", I'd be grateful if you wrote to me. (Contact details at bottom.)
I used an ESP32 Trinket in August 2021, on a Windows 10 computer, and it worked fine!
I will try to do a page like this for the Adafruit Trinket M0 one day. (Emm-zero, by the way.) In the meantime, the highlights: It has a different processor. Only costs $2 more. It has the virtues of the first generation Trinket, and more of... everything! (32x the Flash, 64x the RAM, 6x faster processor.) It can be used with Arduino IDE or CircuitPython. (An exciting new option... but not "necessary". If you don't want the hassle, if you are happy with the Arduino IDE, that's fine. But you'll be missing some Neat Stuff. (You can change your mind... and change it back again, so don't close your mind to ever trying CircuitPython. The M0 might be just the way to "dip your toe in the water".))
Continuing with the highlights of the M0... (We will get to the details of the original Trinket eventually!)
All 5 GPIO pins are available and are not shared with USB - so you can use them for whatever you like. Can drive NeoPixels or DotStars on any pins, with enough memory to drive 8000+ pixels. DMA-NeoPixel support on one pin so you can drive pixels without having to spend any processor time on it. Native hardware SPI, I2C and Serial available on two pads so you can connect to any I2C or Serial device with true hardware support (no annoying bit-banging). You can have either one SPI device or both I2C and Serial... LOTS to like! (If I didn't already have my "mark 1" (ATtimy85) Trinkets, I would certainly be buying the still-less-than-$10 M0s!))
But what I had/ have is the older ATtiny85 Trinket, and the rest of this is about my experiences getting started with one of those.

Here are a few good-to-know-before-you-"give it a try" things the Adafruit page about the Trinket tells us. For a first try, I would connect it to the big computer with nothing connected to the Trinket... but don't do even that... yet.
--- Quote from Adafruit page----
"There are two versions of the Trinket. One is 3v3 and one is 5V. Both work the same, but have different operating logic voltages. Use the 3v3 one to interface with sensors and devices that need 3v3 logic, or when you want to power it off of a LiPo battery. The 3v3 version should only run at 8 MHz. Use the 5V one for sensors and components that can use or require 5V logic."
(Comment on that by me): If you aren't already all clued up about the 3v3 / 5v question, then you may need to do some work. If you just want to monitor some buttons, wink some LEDs, it isn't an issue. (Note in particular that some devices rather cleverly let you... within in limits... "mix" 3v3 and 5v in a single project. Only some devices. Keep It Simple, unless you know you don't need to: Do EVERYTHING in a given project in 3v3 or 5v. (Ah... but. But there's one exception to that: If you are working in a mostly 3v3 mode, where do the volts to run everything come from? Well, in simple scenarios, they come via the USB cable that is also how the programs go from big computer to microprocessor. That cable supplies 5v and only 5v. But all of the "3v3" devices understand that, and 5v coming in, over the cable, is okay. (It is changed to 3v3 before it goes anywhere. SOME boards give you a way to access the "raw" 5v. Don't Use It! Until you know enough to know that the way you are using the 5v is okay.)
--- Quote from Adafruit page----
"Some computers' USB 3 ports don't recognize the Trinket's bootloader. Simply use a USB 2 port or a USB hub in between"
--- Quote from Adafruit page----
"It has an on-board green power LED and red LED on pin #1"
This is no big deal... but note: If you use the "standard" Blink example, you need to change...
int led = 13;
... to...
int led = 1;
====
My first session with a Trinket was on 5 Jan 2019. I plugged a 5v Trinket into my Windows 10 desktop.
"Stuff" happened. Had a fleeting notification that my Trinket was now ready for use.
Trinket's green LED had come on when power applied. Red LED flashed for about ten seconds, went dark.
(All as it should have been.)
If you don't get that... try a different USB cable! Some only supply power. That's not enough here. Sometimes "the problem" is something simple!
DIGRESSION...
This page is written for the newest of new Arduino hobbyists. But has things for more experienced users, too. I hope the latter can be patient with the material that is here for the former. And please do not assume that all my pages are written at this level.
...DIGRESSION ENDS
Foolishly, accidentally, at the time I had my Arduino IDE (1.8.5) running, with a sketch for something else loaded. Happily, at least I had unplugged the Arduino for that project before doing Trinket things... like changing the IDE's configuration. No problems arose. (Saved that, closed the IDE. Later, when I restarted, the old project was loaded for me, as usual. I merely did File/ New to start the new, Trinket, project.)
If changing board type, always... Disconnect previous board. Make changes to board spec in Arduino IDE (Tools...). (I'd add "restart the IDE" here, but probably not necessary.) Sometimes, as with the Trinket, you need to change the "Programmer" that is specified. For the Trinket, you want "USBtinyISP". (That may not be on your menu yet... read on!) Then connect the board you now want to work with.
I checked "Tools/Port" from the Arduino IDE... didn't see a likely candidate for the Trinket. Later I learned that I shouldn't have. But I got away with my bad sequence.
READ THE EXCELLENT HELP ADAFRUIT HAS PROVIDED! I'm not going to cover everything that's there here! (But I will sketch my experiences, as reassurance for you, I hope. And I will interject some hints.)
------------------
Early on, the new Trinketer is told "If you're using Windows be sure to follow the instructions on the Windows Driver Installation page to install the appropriate drivers for your Trinket."
Given the notification I'd had when I plugged my Trinket into my PC, (a little early in the game), I thought maybe I could skip this, hoping that the driver installation had become automatic since the tutorial was written. Nope.
If for some reason you think you can skip installing the driver, use the Arduino IDE to check what you see with "Tools/ Programmer". Until I installed the driver, I didn't have the "USBtinyISP" option, which is what you use for the Trinket. (Be sure to note what you are using now, so you can go back to it after playing with your Trinket!)
As I was saying: I thought maybe I could skip the driver installing.
Not.
If you are working under Windows, you do need to go through the "install drivers" steps set out in the guide. But they are explained well, take little time, despite all the text to describe what you do... which follows...
So here's what I had to do, to install the necessary Windows Drivers. As with much of the rest of this, I am merely re-stating what is in the good guide from Adafruit, with just the odd "editorial" note along the way....
What I did is covered in the Windows Driver Installation page of the Adafruit Trinket guide.
The link took me to a GitHub page headed "Add Trellis M4 Express".. and on it, there was an "Adafruit_drivers_2.3.3.0.exe" entry.
Downloaded that; ran it. (Select file, click "Download" button, upper right... easy to overlook.)
Not wanting more "done to" my PC than I could help, I UN-ticked the "Feather WICED" entry, left Trinket (etc) ticked, and left other two un-ticked, crossed fingers, and clicked "Install". (This worked.)
*** Nota bene: Along the way, I repeatedly un-ticked the easily overlooked "Always trust software from Adafruit" in the dialog that followed. (I do trust Adafruit, but I still want to be asked when software installs arise.)
"Stuff" happened, and the driver was installed. My evidence: after the next steps, there was a "USBtinyISP" option on the "Tools/ Programmer" dialog. (The IDE must be shut, re-opened, if it was open while you were installing the drivers. Probably a bad idea, by the way.) (In hindsight... that may have been something that came into my system during the "do it one", use "Boards Manager" to install support for the board step, discussed later. I'd be interested to hear what you find, if you are using these instructions.)
I was a little confused by what came next in the guide. It talked about...
(quote)... Before you try to upload code to the Trinket
it must be in the Bootloader Mode. That means its listening
for a sketch or program to be sent to it...(end quote)
It wasn't that I didn't understand what they were saying, I was only puzzled by the context. This appears in the guide, in my view, way ahead of where it ought to be. Don't worry about it for now. I'll explain what it was saying when the right time comes.
I hope I've said that early enough? I know that reading a guide like this is depressing, and leads to thoughts along the lines of "This is too much hassle, and too many things to go wrong."
I hope you'll hang in there, persevere. It really isn't too terrible, and once you have things set up... not a huge task... you'll be able to program these inexpensive little delights almost exactly as you program an "ordinary" Arduino.
Okay... there aren't as many I/O lines. No serial monitor. But... $6.95!!! (Trinket M0 had 5 uncommitted GPIO pins, AND serial I/O.)
Call me boring, but I intended to try a "Trinket Blink" to see if I'd understood the instructions and done everything that was necessary. My advice: Always make sure you can walk before you try to run.
But first there were a few more "do once" things to deal with...
Earlier, I had disconnected my Trinket almost as soon as I connected it. (I probably shouldn't have connected it so early, but... you know! (It is not a good idea to start the IDE with an Arduino or Arduino-compatible unless you are sure that the right Tools/Board setting are in place, or that you will be making them immediately.))
)Started my Arduino IDE. I was still on vers 1.8.5, which seemed Just Right. Earlier isn't enough, and too much later may not play nicely. (More on that later.)
Loaded the "01.Basics- Blink" example sketch.
*** NOTA BENE *** Quote from a page in the Adafruit guide: "There is currently a bug in Arduino 1.8.7 which requires you to select a Port before upload but we don't use Ports for Pro Trinket uploads. If you don't have a Serial Port available to select, please use Arduino 1.8.6"
Yeah. Well. Good thing I was "behind the times", then, isn't it? (I was on 1.8.5.. and by the next time I played with Trinkets, I was on 1.8.13, and had no problems about needing to select the port!)
In 2019, I said: "This advice to "use an old version" was unacceptable to me... When the time comes to move to something beyond 1.8.5, I will either abandon the Trinket as an interesting footnote, or hope an answer has come along."
Happily, at 8/21, it seems that an answer WAS found, and is present in 1.8.13, at least.
I had an ATtiny85 Trinket in front of me, and decided to press on....
By now, I was at the "Setting up... IDE" page of the guide.
That covers your "do it once" task of installing the Arduino IDE, which I suspect most of my readers did long ago? It also says...
[Then] just follow the steps... [to] add [board] support for Trinket, Gemma, Pro Trinket & more to the Arduino IDE.

You will need Arduino IDE 1.6 or greater
... and words to the effect of "When you're finished with the Board Manager, come back to this page to continue the Trinket guide."
Well... that's mostly right, although I wouldn't install more than the Trinket support. Here's how I did it...
Off I went, via the link provided, to ...
the Adafruit Arduino IDE setup guide.
I skimmed over the first part of the Arduino IDE install page route, the "Super Easy Installation" option.
I already had an IDE ahead of 1.6.3, so no problem there.
As instructed, I invoked, in the IDE, "File/Preferences", and added...
https://adafruit.github.io/arduino-board-index/package_adafruit_index.json
... to my "Additional Board Managers URLS" box... but the Adafruit guide didn't give me all the help I needed.
8/21, I didn't find the Adafruit guide entirely clear on the details of "adding the line."
If you already have a URL in the "Additional Board Managers URLS" box, click on the icon to the right of the edit box. (It looks like file folders) A little memo editor will open. Add the new Board Manager URL as a new line there. And press "enter" again, after adding the new line, or it may not "take"!
(Alternatively, if you prefer, I think you can work directly in the box: Click. Press the "End" key, to get to the right hand end of the line. Do something to "separate" the new entry from the old... maybe a comma, maybe press enter. Add the line. Press enter. Move on.)
Once you've done that click "Ok" to close the dialog.
And then double check that you've succeeded in adding the new line! (Re-open the dialog, look to see what's in the "Additional Board Managers URLS" box.)
Then you're ready for... (tweaked Adafruit description....)
"Now you can open the Boards Manager by navigating to the Tools->Board menu. flora_boardmng.png
"Once the Board Manager opens, click on the category drop down menu on the top left hand side of the window and select Contributed. You will then be able to select and install the boards supplied by the URLs added to the preferences. In the example below, we are installing support for Adafruit AVR Boards."
(Don't be "caught" by the Arduino IDE's rather strange behavior: Once you can SEE the entry for "Adafruit AVR Boards", you have to put your mouse pointer on that panel to make the "install" button appear.)
"Next, quit and reopen the Arduino IDE to ensure that all of the boards are properly installed. You should now be able to see the new boards listed in the Tools->Board menu."
I know. I don't like installing stuff on stuff, either. But you really do need to do this, if you want to play with Trinket. And Adafruit is a reliable source.
Anyway... I clicked "install", and promising things happened. Eventually, it all settled down. The "install" button went away.
If you notice details, you'll see that the header for the box, "Adafruit AVR Boards..." now has "INSTALLED" at the end. Also, if you click in the box again, a "Remove" button will appear where the "install" button was previously.
Encouraging!!
To quote Adafruit again...
The next bit of the Adafruit Instructions For Using the Trinket is...
"Finally follow the steps below for your platform to finish the installation - basically installing drivers and permissions management...
    "Windows Setup
    "Mac OSX Setup
    "Linux Setup"
... and ...
"common errors."
The "Windows Setup" page was the one about drivers that I'd already been to.
So I tried to go forward, within the Arduino IDE. (My Trinket was not plugged in at this point. It is a bad idea to run the IDE with an Arduino attached until you have Tools/Board set to the sort of board you are using.)
On the menu for Adafruit boards was Trinket 8 MHz or Trinket 16 MHz. The 3v3 Trinket, the one I was using, only comes in 8 MHz... so chose that!
Now... I was using a 3v3 Trinket, https://www.adafruit.com/product/1501
I couldn't find QUITE that in the Tools/Board menu... but I did find "Adafruit Trinket (ATtiny85 @ 8 MHz)", and went with that. (NOT the "Pro Trinket", note.) (If you want to run your Trinket at 16 MHz, I suspect that is relatively easy... but something for later, and I doubt I will chase that myself.)
While you're here, click on one of the serial ports on offer. (It may not be used, it may not be the Trinket, but Just Do It. Long story!) (Don't worry if none are on offer,)
Before you do the next step:Look and see, under "Tools/ Programmer", what your IDE's Programmer setting is now. Make a note of that, so you can go back to it later.
ALSO: (And that this is the right choice is explained at...
https://learn.adafruit.com/introducing-trinket/setting-up-with-arduino-ide),
...still in the Tools menu, if you didn't do it already, set the PROGRAMMER to USBtinyISP
If like I, you failed to look to see what the previous Programmer setting was, the best I can do for you is to say that I have not found a reliable answer on the web as to what "the usual" setting is, but that I think it may be "Atmel ICE (AVR)". I hope so! (But don't have time for the relevant tests just now.) Let me know if you find the answer! (I also believe that it isn't even relevant in many instances... and which one you need will be made clear when it does matter.)
(You will need to change some of these things "back" before you return to "ordinary" Arduino work, of course.)
If not present from before, load the Blink sketch...
File/ Examples/ 01.Basic/ Blink
As explained previously, you need to change the pin defined for the LED to "1".
Your Windows drivers are in place. The IDE has been tweaked. You've set, in the IDE, via entries on the Tools menu item, the board type and programmer. You've loaded a simple program (aka "Sketch") into the IDE.
Upload it! Watch it in action!
But first... read thorough the following...
Giving the ATtiny even the semblance of a bootloader was a marvelous achievement.
It has a tiny "flaw" that merely brings you a taste of something that was normal in early Arduino days.
When you are ready to upload a program, just before you click on the "Upload" icon, press and release the tiny push button on the Trinket... and wait a moment. The red LED should start flashing... about 1 second on, one second off. Click the "Upload" icon as soon as that has started.
The LED will flash for up to 10 seconds, indicating that the Trinket is "looking for" "stuff" being sent to it, via the USB cable, for storing as a program.
If you are working on a large program and the compile step takes a long time you might want to delay pressing the button. If the red LED stops flashing before the upload has succeeded, you will probably have to start the upload process again. Fear not- it isn't hard to get the process right.
By the way- each time you press the tiny button on the Trinket to start the red LED flashing, you may get the Windows "Dum, deedee, dum" to say that a USB device has been attached. This is normal. Don't let that worry you.
Try running the code as it comes, apart from changing the pin number for what pin the LED is on.
If all seems well, then change the two numbers in the main loop to make it...
void loop() {
  digitalWrite(led, HIGH);   // turn the LED on (HIGH is the voltage level)
  delay(150);               // wait for a second
  digitalWrite(led, LOW);    // turn the LED off by making the voltage LOW
  delay(900);               // wait for a second
}
... and run the program again. The pattern of the blinks should change, of course. This isn't High Programming... but it is making sure that you are programming your Trinket, not just seeing the program that was in it when shipped!
The Blink example blinks the red LED. The green LED only says "the Trinket has power".
I hope this guide to getting started was a help to you.
Here is some more Good Stuff the Adafruit page about the (original, ESP32) Trinket...
--- Quote from Adafruit page----
"Trinket does not have a Serial port connection for debugging so the serial port monitor will not be able to send/receive data"
"Hardware I2C / SPI capability for breakout & sensor interfacing."
(Comment on that by me): The I2C/ SPI capabilities will go a long way to make up for the original Trinket not having a "real" serial interface. (The M0 has one.)
--- Quote from Adafruit page----
"5 GPIO - 2 shared with the USB interface. The 3 independent I/O pins have 1 analog input and 2 PWM output as well. The 2 shared I/O pins have 2 more analog inputs and one more PWM output."
(Comment on that by me): With M0, you have full use of all 5 pins... the serial interface for programming, and other things, is on other pins.
--- Quote from Adafruit page----
"Power with either USB or external output (such as a battery) - it'll automatically switch over"
--- Quote from Adafruit page----
"USB bootloader... LED indicator... you can program it with... the Arduino IDE (with a few simple config modifications)"
(Comment on that by me): Don't be worried by that "a few simple modifications". They are only what we've gone through above. They are all reversible.
Please get in touch if you discover flaws in this page. Ways you are using the Trinket would be of interest, too. Please mention the page's URL. (trink1getstarted.htm)
If you found this of interest, please mention in fora, give it a Facebook "like", or whatever. I've almost given up writing these pages, because it seems they are seldom read, and of course not every reader will use them... so... is there any point? If you want more of this stuff, help!?
Click here to visit my main homepage where you
can explore other areas, such as education, programming, investing.
![]() Page has been tested for compliance with INDUSTRY (not MS-only) standards, using the free, publicly accessible validator at validator.w3.org. It passes in some important ways, but still needs work to fully meet HTML 5 expectations. (If your browser hides your history, you may have to put the page's URL into the validator by hand. Check what page the validator looked at before becoming alarmed by a "not found" or "wrong doctype".)
Page has been tested for compliance with INDUSTRY (not MS-only) standards, using the free, publicly accessible validator at validator.w3.org. It passes in some important ways, but still needs work to fully meet HTML 5 expectations. (If your browser hides your history, you may have to put the page's URL into the validator by hand. Check what page the validator looked at before becoming alarmed by a "not found" or "wrong doctype".)
AND passes...

....... P a g e . . . E n d s .....