The following shows you how to connect an input to your Arduino. The switch can be momentary, like a doorbell's switch, or a toggle switch, like a light switch.
Much of the material applies equally well to working with the Raspberry Pi, too.
If you know the basics, but need help with the issue of contact "bounce", I wrote a separate page about that for you.
The resistor can be a common 1/4 watt resistor, or even a 1/8 watt resistor. (Although these tend to be a little fragile, physically.) It's resistance should be about 10k, or something like that.... 1k would work, but drain batteries faster than necessary and 20k or even 50k would probably also work, but you may begin to get false readings of "switch closed" if the resistance gets absurdly high.
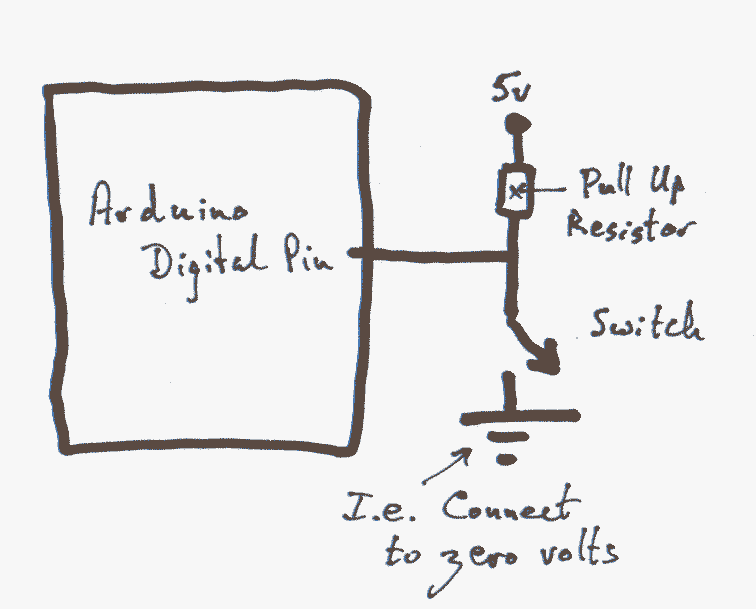
The illustration shows the "top" end of the resistor connected to 5v. That would be appropriate if you were using a 5v Arduino. If you are using a 3v3 Arduino, the voltage above the resistor should be 3V3. For the rest of this tutorial, I will refer to this voltage, be it 5v or 3V3 in your circumstances, as Vss.
For the program below to work, the switch and resistor must be connected to pin 4, and an LED must be connected, with the normal resistor, to pin 13... the pin that has an LED and resistor already, on the PCB, in many Arduinos. One side of the resistor/LED element is connected to Gnd (Ground, zero volts) and the other to pin 13. So the LED goes on if the output is set "high". That wiring would match the wiring of the LED on the board. You don't need to supply the external resistor+LED unless you wish to for some reason, but there's no harm in having both LEDs running, as long as the external LED isn't allowing a large current to flow.
So much for the hardware. We'll look at why it works in a moment. But first, Arduino software to go with it. The following is Badly Written, but it will suffice to illustrate some elements of reading an input.
void setup()
{
pinMode(13,OUTPUT);
pinMode(4,INPUT);
}
void loop()
{
if (digitalRead(4)==HIGH)
       {digitalWrite(13,HIGH);}
       else
       {digitalWrite(13,LOW);};
}
N.B. It is very easy to get things backwards in your mind. Here is the result of the way things have been done in this "How To":
When the switch is closed the input reads "low".
When the input is low, the program makes the output at pin 13 low, which, with the LED and resistor wired as indicated earlier, causes the LED to be "on".
It is certainly possible, and sometimes worth, wiring either the switch "the other way" or the LED+resistor "the other way". I.e. with the end not connected to an Arduino pin connected to 0 volts. (In this case, the resistor would be a "pull down" resistor.) Swap BOTH of them, and it is like a double negative, and the circuit will appear to operate as before, even though it will actually be doing different things "beneath the surface".
Swap just one of the ends from Vss to Gnd, and now the LED will be on when the button is NOT pressed, and off when it IS.
You could also get that behavior from the original circuit with just a tiny change to the program that is running.
Whew! All those possiblilities can get to be a bit much, but the flexiblilty is half of the fun of "playing" with these things. Just don't let your thinking get "back to front" with all these inputs and highs and lows, etc.
Another way to "go wrong": Most (but not all!) push buttons are "normally open" By that, we mean that they are "open" until you press them, like a doorbell's push button.
(You can buy normally closed push buttons. (Don't wire up your doorbell with one. The bell will ring until someone pushes the button!) You might want to pick up a few normally closed push buttons the next time you are shopping. If you have a serial device attached to your Arduino via pin 0 or pin 1, then messages to/ from it during the programming of the Arduino can be a nuisance. (The programming messages also flow over pins 0 and 1... although, with care, such "double use" is possible.) Putting a normally closed pushbutton on the line to (from) the device means that you can temporarily disconnect it, during a program upload, simply by pressing down on the pushbutton during the programming process.) (Better yet: Put the serial device on its own line!)
Virtually no electricity flows into (or out of) the Arduino over a pin that has been set for input with the pinMode command. But that pin can "read" any voltage connected to the pin. It is almost as if it were a voltmeter, but it only returns "high" or "low" for an answer.
An aside: If you want to read the voltage as "none", "very low", "quite low", etc up to "high", then you can... but you need to use one of the analog inputs. But that's a story for another page. (If you decide to use analog, the "answer" is expressed as a number from 0 and 1023 inclusive.) End of aside.
When the switch is open, the Arduino's input "sees" the Vss it is connected to, even though the connection is through a resistor. Because almost no current is flowing, the voltage drops very little between the Vss supply and the Arduino pin.
On the other hand, as soon as the switch is closed, some current does flow. (It flows through the switch, to ground.) Now the Arduino "sees" the virtually no resistance path between its pin and ground; it "sees" the zero volts. The Vss it is still connected to is "hidden" behind the resistor because the voltage "drops" when there's significant current through the resistor.
Such resistors are called "pull up" resistors because they pull the voltage at the input up when there's not low-resistance connection to ground.
"Pull down" resistors work in a similar way. It is better to go the "pull up" route, because some electronics are more forgiving if a voltage is "almost" Vss (it will "count as" Vss) than they are of forgiving a voltage that is very low, but not quite zero. Neither a pull up, nor a pull down resistor will get the voltage all the way to Vss or zero (as the case may be), but they will, if very little current is flowing, get the voltage close to Vss or zero. Close enough for digital electronics. (This ability to work with "approximate", with "close enough" voltages is at the heart of why digital electonics has given us so many inexpensive, very reliable, devices.)
You can, if you wish, wire up your inputs as above. The circuits will work just fine.
The nice Arduino (or was it the Atmel) people have built something into the Arduino in a really clever, easy to use, and easy to not use, when not wanted, manner
Look at the following. (If you are using an Aruino which is supplied from a 3.3v source (a "3v3 Arduino"), then substitute "3.3v" for the "5v" in the diagram.)
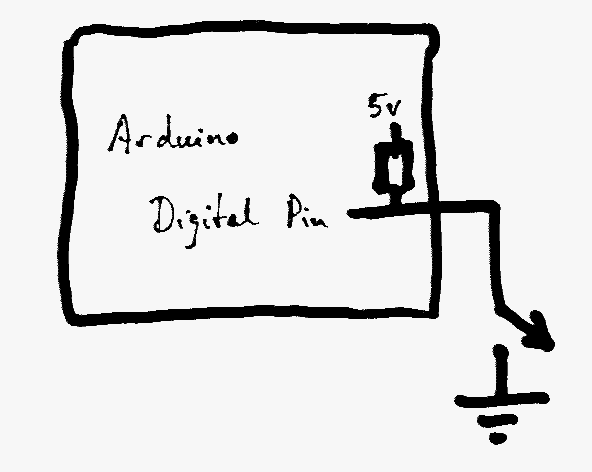
There are 20k pull up resistors built into the Arduino, inside it. One for each digital IO line. Not only are they present, but you can "connect" and "disconnect" them!
When the Arduino is powered up from "dead" all of the pull up resistors are disconnected.
Before vers 1.0.1 of the Arduino development environment, we had to do something non-intuitive to connect the internal resistors. (I'll show you that in a moment, so what's in old programs, not least on this site!, will make sense.)
Thanks to the nice people who brought us the extra features in 1.0.1, you can now simply use pinMode(5,INPUT_PULLUP); to tell the Arduino to configure pin 5 as an input, with pin 5's internal pullup resistor connected.
If you simply use pinMode(5,INPUT); to tell the Arduino to configure pin 5 as an input, it will be an input, but with no connection to the internal pullup resistor.
--------
If you are merely connecting, literally, a switch to pull the input low, I cannot think why you would not want to use the internal pullup resistors.
Using pinMode(5,INPUT); becomes necessary (sometimes) when you use some sorts of more sophisticated sources of inputs.
The following illustrates how we connected one of the internal resistors in the Arduino IDE before version 1.0.1...
There is one new line...
void setup()
{
pinMode(13,OUTPUT);
pinMode(4,INPUT);
digitalWrite(4,HIGH); //Only this line new
}
void loop()
{
if (digitalRead(4)==HIGH)
       {digitalWrite(13,HIGH);}
       else
       {digitalWrite(13,LOW);};
}
Look at the line just after......
pinMode(4,INPUT);
The one that says.....
digitalWrite(4,HIGH); //Only this line new
It doesn't make "sense". Why would you write to a pin that has just been set up for input? That digitalWrite(4,HIGH); doesn't do what you might think it does. It doesn't make the pin high. It "connects" the internal pull up resistor to the circuit, so that we can simply hook up a switch to ground, and have a reliable input without needing an external pull up resistor.
Without a pull up resistor, whether provided externally, or using the internal ones, we know that the input will read "LOW" when the switch is closed, connecting the input to zero volts. But when the switch is open, without the pull up, the input isn't connected to anything! Like this, it will sometimes report "HIGH" sometimes "LOW"... unpredictably, and unreliably. Such an input is said to be "floating". And is a Bad Thing.
(It is, by the way, with an Arduino, okay to have floating inputs on unused lines. Just don't look for sensible information from a floating input.)
I hope that has made things more clear for you? If you've read this far, you or either obsessive, or the page was worth something to you. How long did it take to read? How long to write? A Facebook "Like", or a blog mention or similar would be much appreciated. There's not much point in me writing these pages, if the limited circulation they get at the moment doesn't improve. (12/16. Reviewed 8/25.)
The official Arduino pages have a similar resource, if you want to read more on the subject.
There's also the following at the Arduino site....
General discussion of the pins, their use and function.
Click here to visit editor's Sheepdog Software freeware, shareware pages.
Click here to visit the homepage of my biggest site.
Click here to visit the homepage of Sheepdogsoftware.co.uk. Apologies if the "?FrmAht" I added to that link causes your browser problems. Please let me know, if so?
![]() Page tested for compliance with INDUSTRY (not MS-only) standards, using the free, publicly accessible validator at validator.w3.org
Page tested for compliance with INDUSTRY (not MS-only) standards, using the free, publicly accessible validator at validator.w3.org
....... P a g e . . . E n d s .....