This page is browser friendly, by the way. Make your browser's window less wide than your whole screen and you will find the narrower columns much easier to read. For more tips like that, see my Power Browsing hints.
On 12 October 2011, I went to my ArduServer, thinking I was just going to make one or two little tweaks. I did make those tweaks, most notably adding a "clicks" counter... but along the way I discovered some things that weren't really very satisfactory. I thought that code was "finished". Sorry! If you tried it before, and didn't have a good result, or if you are working with the old code, may I grovel... m(__)m ... and invite you to try the updated code?
"It" is an Arduino based web server. Anyone out there in Internet Land who knows the URL can get a page from it. The page will report the reading from a light sensor attached to the Arduino. The reading when the page was fetched. You have to re-load the page to check current levels. The page has two buttons... one turns an LED on, the other turns it off. The LED shines on the light sensor. The reading of the light sensor takes place a moment after the LED's state is changed, so that it reflects the state of the Arduino after the current LED state command. (The little "Gotcha" in that got me, the first time I built one of these!)
This ArduServer has also acquired a "clicks" counter which reports how many client requests the server has handled since the most recent time it was rebooted. (Previously... and the code for it is still in the sourcecode... it merely displayed a random number.)
Just before I turn to the details of how the Arduino can be a web server, I would point out to you that Arduinos can be other sorts of servers, too. A web server "plays nicely" with web browsers, such as Firefox. The browser is the server's client. Almost everyone using the internet has a browser on their machines. But if you require your Arduino to be a web browser, you are inflicting unnecessary overheads.
If you are willing to suffer the extra burden of obtaining and mastering different client software, it is possible to set up an Arduino as a different kind of server. The benefit is that there are fewer overheads on the Arduino, so you can do more. An additional benefit is that the client software can be written to do things a browser never dreamt of doing. Once you have mastered the Arduino as a web server, you might be interested in my ArduSimpSrv, which I've written all about in the link.
To see one in action go along to my directory of online ArduServers and ArduSimpSrvs. I will try to keep that up to date in respect of things being down, too, in case you are experimenting with accessing them.
An email with your experiences would be very welcome, especially if things didn't work properly!Here is how to email or write this page's editor, Tom Boyd.
Please leave the LED on when you finish playing... that way I'll see someone tried the ArduServer the next time I look at it. (Thank you!... many visitors are doing that for me!) I'm beginning to add "click counters" to the devices, and things that "beep" when an access occurs, but it is still nice to be able to see with a glance if anyone has visited.
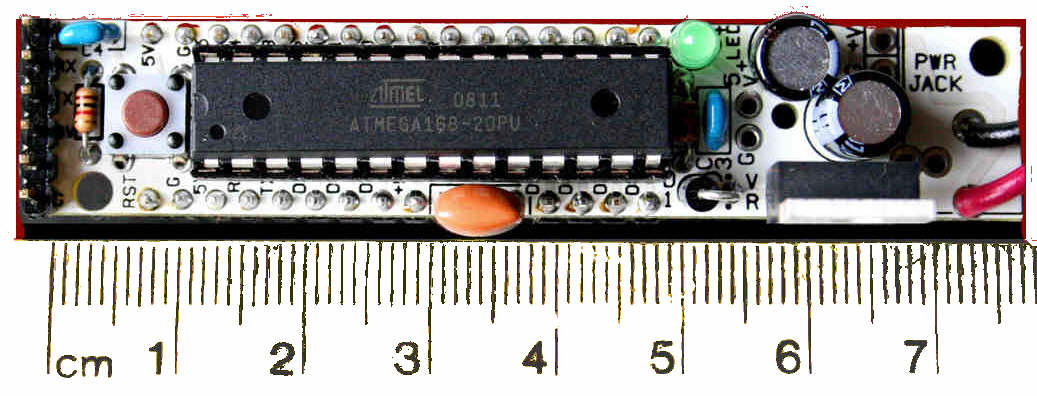
The rest of this page is devoted to how I built my first ArduServer, the one on a very small Arduino (Atmega 168 based! Inexpensive and limited program memory and physically small). It also uses an inexpensive Ethernet interface.
My ArduServer2 is working, and it probably makes more sense for you to do an ArduServer in the hardware... W5100 based... used by the ArduServer2 if you don't mind a little more expense, not a lot, and you don't already have an ENC28J60 ethernet interface. However, the tutorial below may mention some things which got left out of ArduServer2's tutorial.
(This page was started in 2011. Please see my "March 2015 ENC28J60 update" page before buying or using one of them! (That page will open in a new tab. Just close it to come back here.))
There are two major programs presented here.
The first program creates a webserver with $40 worth of hardware, including the Arduino clone. With it, your will create a page that can be accessed from anywhere on the internet. In the first example, the page is merely a "Hello World". Adding information from sensors connected to the Arduino. How to extend it for that is covered along the way to the second program.
That's right: From anywhere in the world, someone can sit down, type a URL into a browser, and what appears on their screen will come from your Arduino, "live". What you have the Arduino deliver is up to you. The indoor and outdoor temperatures where the Arduino is, maybe? (Weak example, but easy to give. If you need to be told "things" to put on the webpage, stop reading now.)
The second program is the one that runs in my demonstration site. It uses an Arduino with an LED and a light level sensor connected to it. That Arduino is the also connected to the internet, and it makes available to the world a page with two buttons on it: "Turn LED On" and "Turn LED Off". Click the button of your choice... while looking at the page in a browser window anywhere in the world... and the LED will go on or off as required.
The LED is arranged so that it shines on the light level sensor. The web page also displays a reading from the light level sensor... so you can "see" whether the LED actually went on or not. (I am so innocent.. a friend pointed out that I could have set up a page where the number would change, without any sensor at all. But that's not what I did!)
Turning on an LED is not a big deal, of course. It is just an example, from which you can build whatever you need.
If you'll forgive a little self congratulation, I will concede that making all this happen was exciting!
It may be a bad idea to use any of the following at the same time as a W5100 based shield. While this tutorial is about an ENC28J60 interface based system, your work might as well be W5100 friendly, too, don't you think?
... and D13, but this last one only if you "care" that on the shield it goes to an LED, and from there through a resistor to ground. (This merely parallels the same thing on many Arduino and clone boards... BUT, to digress from the digression, BE AWARE that the software behind "setup()" and "loop()" pulse D13 high briefly before executing whatever you specified in "setup()".)
The hardware and software covered in this tutorial now expect...
Modifying the software was easy.
To change the line used for, say, the phototransistor watching the LED in the line....
int8_t sensorPin = A1; // designate the input pin for a sensor... a phototransistor used in example
...was changed to...
int8_t sensorPin = A3; // designate the input pin for a sensor... a phototransistor used in example
... and that was all that was needed. I hadn't "planned" to need to change the allocation of the sensor to that analog input... but writing the code that way was just a matter of good programming. (I had to move one wire on your breadboard, too, of course, to move on from the original design.)
Sorry! I could have done without this, too! When will the Official Arduino Site have proper documentation of the ethernet shield and library??
As I was finishing the second program, I found myself struggling to fit all the code into my Arduino clone... which I thought used an Atmega 328. Happily, it turned out that it was using an old Atmega 168... which has only 16k of storage for the program. So! If the basics fit in 16k, then if you use even a now- unremarkable Atmega 328, it will give you another 16k of storage for "the frills". There may still be limits on the size of "page" that the device can serve, though.
It looked like I might have had to consider using a different library for my Ethernet shield, or a different shield, or a bigger Arduino... but the worst of the early slopes of the learning curve are now behind me, and I can help you up, if you want to work through what follows. What I describe above does work, even in my little Arduino.
"Arduino" / "Arduino clone". From here onward, when I say "Arduino", please assume I mean "Arduino or clone". I do most of my work with a ModernDevice RBBB Arduino clone, $13 + p&p in easily assembled kit form, 4/11. ($22.50 assembled.) (ModernDevice also sell the Arduino Uno, assembled, $30... with a different boot loader making 1.5k more memory available. It also has onboard serial-to-usb circuitry, and a standard Arduino footprint, so using shields is easy. It still uses an Atmega 328. For $65 you can blow past memory issues and get a bunch of other advantages with an Arduino Mega 2560. Memory: Mega vs older Arduinos: Flash: 256k vs 32k, SRAM: 8k vs 2k, EEPROM: 4k vs 1k. (I'd buy a Mega from Sparkfun, but there are multiple sources.)
So far, my grasp of the ArduServer only allows it to serve one page. The content of that page is hardcoded into the program which implements the ArduServer. Note that what appears on the page is not necessarily static. You can, for instance, have it display a reading from a sensor attached to the Arduino. The reading displayed would be the reading at the last time the page was accessed. There are probably ways to make the page repeatedly reload itself, but I have little patience with such wastes of internet bandwidth and won't be going into ways to do it.
That "one page only"... for the simple ArduServer... will be disappointing, I know. However, the other side of that coin is that the HTML that you use there can be very, very simple. Can be. But we will implement some HTML forms before we are through on this page, so don't imagine that "Hello World" is all that the ArduServer can do!
This is probably the place to make the brief mention that Pachube deserves in this context. I've written more extensively about Pachube elsewhere. It is a service in some ways like YouTube. It allows anyone to make a stream of data available to other internet users. The neatest thing about it is that you upload your data to the Pachube servers, and then they take care of serving that data to "the public". (Or a closed community defined by you, for sensitive data.) Not only can you, say, upload the depth of water in the river passing by your house measured once an hour for the past year, but the datafile can grow in real time. All you need... and this is where the ArduServer comes in... is a server with a webpage showing the current depth of the water. (Or whatever). In the simplest (there are other) setup of Pachube, their computers will visit your server from time to time, harvest the latest reading, and add it to the data file. Pachube also offers your adoring public a variety of ways to access, view, display the data in Pachube's archives. A neat product for certain applications. Do, when you've finished exploring using the Arduino for a web server, have a look at Pachube... even if you don't what to supply data to them, there are some fascinating data streams you may wish to access. Sadly, as they gather momentum, they are less "community" spirited. Free accounts now only archive your data for the past 30 days. Their online forum doesn't always get responses to simple questions about performance very quickly.
A big PC will be involved in programming the Arduino, but it will not be involved in the serving of the web page. It can be unplugged, turned off, etc, once the Arduino has been programmed.
You'll need an "always on" internet connection, e.g. "broadband" or DSL or ADSL. You don't need a "static IP address", if that's worrying you. (We'll come back to that issue). You'll need a router, but you almost certainly already have one, if you've met the first requirement, above. Some familiarity with simple HTML coding would be a help, but isn't essential... you can pick up enough for the simple use of your ArduServer ("Arduino- driven- webserver") by looking at the code here. You'll need a way to connect your Arduino to your LAN, i.e. an Ethernet interface.
You need an interface to connect your Arduino to your LAN. (You will "talk to" the outside world through your router, and you will "get to" your router over your LAN).
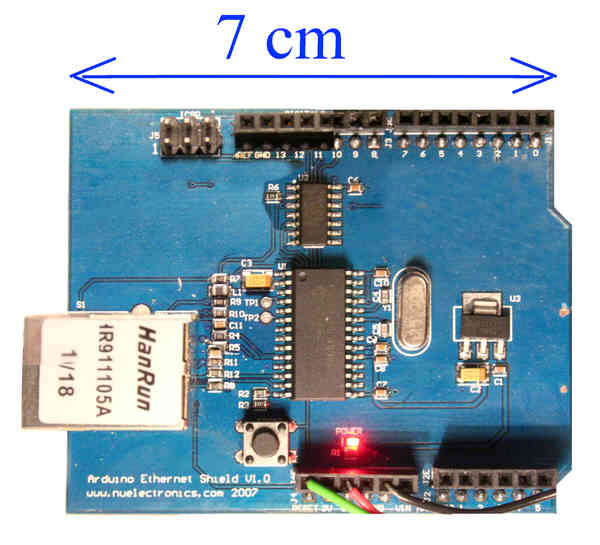
Perhaps not the best choice.... hey! At the time I first wrote this , it was only three days since I'd set up my first ArduServer!... but I am using a NuElectronics.com Ethernet shield to connect my Arduino to my router. The price was excellent: about $24 from the UK to the UK, April 2011. They had the device in stock, delivery was excellent, and it was their tutorials which allowed me the breakthroughs I am enjoying so much. And almost everything I've learned setting up my RBBB+NuElectronics ArduServer will be useful if I explore other options later.
Another advantage of the NuElectronics product for some of us is that it only needs to be supplied with 5v. Some of the modules discussed more frequently in the Arduino forums need to be supplied with 3.3 volts, as well. If you are using an Arduino Mega (at least), this won't be a problem, because there is a source of 3.3v from that... but some of us aren't using such devices... yet!
The RBBB does not have the standard Arduino footprint. The NuElectronics interface is "a shield". No problem. There are just 7 connections needed between the Arduino and the interface. Just plugging a shield in is cool... but wires work just as well for a few interconnections.
In March 2012, I became aware of a possible alternative.. costing $6.50! (3/12, excl p&p)
It is the Arduino ENC28J60 Ethernet Module from Geeetech.
N.B.: I have not tried this module myself... but looking at the tech specs, I would guess that it would work just fine, and that the instructions here are all you need to use it... You'll just have to adapt what is said about connecting the NuElectronics shield.
Second point to note well: The module must be supplied with 3v3. I believe its signal lines can be connected to a 5v Arduino without hassle or components... but I'm not sure.
So! (obviously!): I would be delighted if this text helps you connect an Arduino to the internet with the Geeetech module, but can make no promises... apart from the promise of my gratitude if you let me know what happens when you try to do what I think you can!
Word of warning... I don't know enough about the security implications of all of this. (That page doesn't say much more than I say here... but I hope to expand it!) Because of that in particular, but in fact in general, do not read further unless you are willing to take ALL responsibility for anything you do. I do not accept any responsibility for anything YOU choose to do, even if they are based on things you read here. Pay me for advice, and that might change. But as things stand, I will refund what you've paid me for this if you are unhappy, and disavow any further liability for YOUR actions. Okay. Now we can put the lawyers back in their boxes? Oh. Privacy policy. I promise not to do anything I think is bad. Well, not often. Trust me if you want to. Go away if you don't.
Just to be clear: the information here is entirely unofficial. It has not been written by or endorsed by the people who brought us the Arduino or the RBBB or the NuElectronics Ethernet shield or almost anything else that is mentioned.
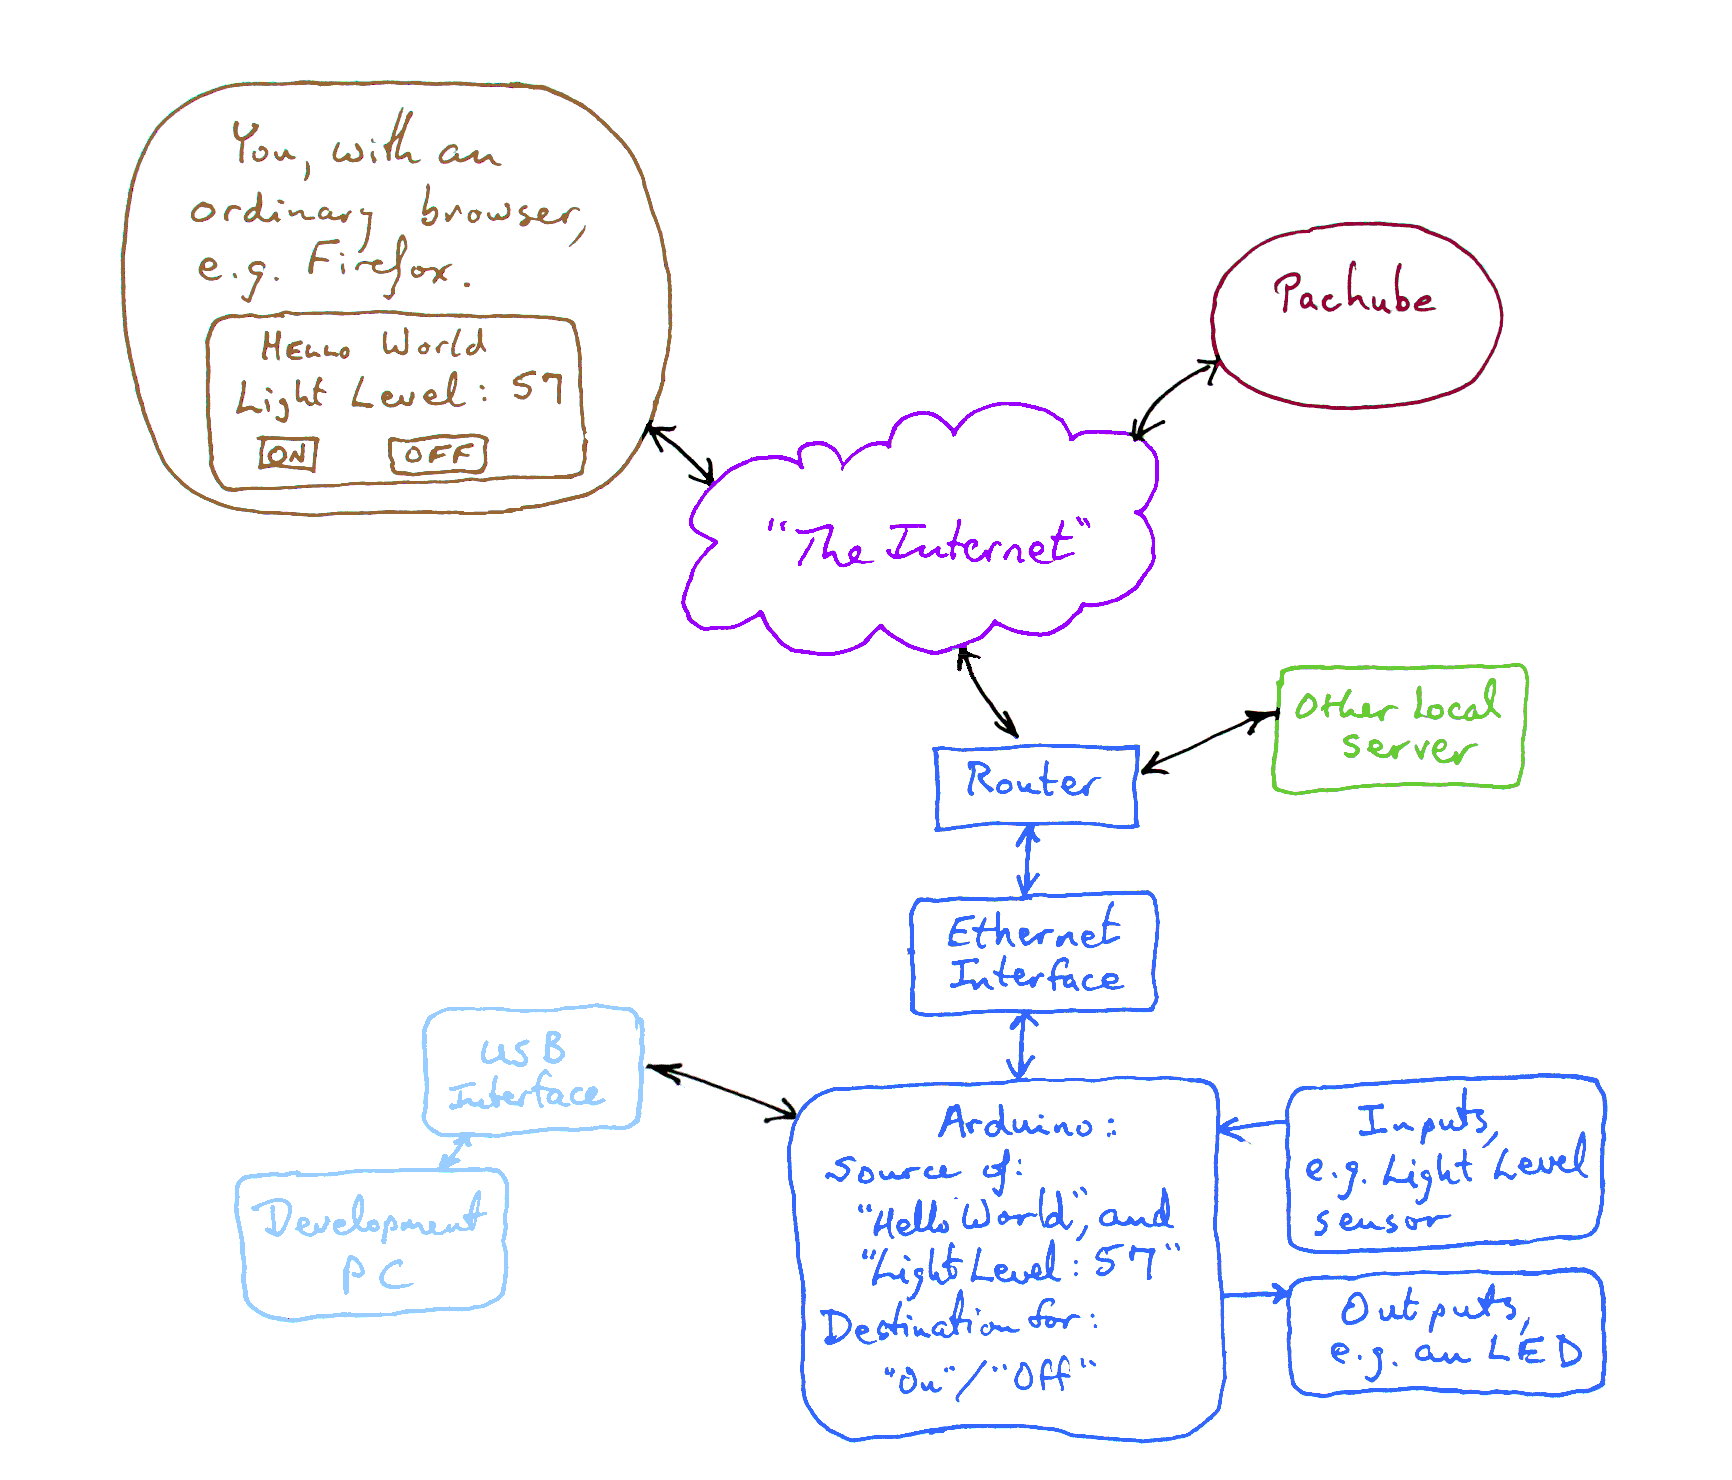
Here's the "Big Picture" of where we are going....
If you work through all of this page, you will learn how to accomplish all of that. Creating the basic "Hello World" webserver is already explained first, which is a lot less work than all of the above. If you find this tutorial daunting... just spare a thought for the work of discovering everything without a resource with everything in one place, and of writing it up. If you are really kind, maybe you'll either try some of my Windows freeware, or donate to one of "my" charities?
To put your Arduino-driven "Hello World" on the web ("Hello world" takes on a new level of appropriateness!), can cost as little as $40 including the Arduino which will, in my alternative universe, be tied up serving your page from now on. What is not included in the $40? The cost of the big computer you will use to program your Arduino, your cable for connecting your Arduino to your big computer for programming or your always-on broadband (DSL) internet connection and modem/router. You do not need a static IP address, or need to know what one is! (I only mention it as some people will be wondering and worrying.)
You do not need the "other local server" shown in the diagram... but if you already have a server on your internet connection: there's no need to disturb it in any way.
You don't need to do anything with Pachube. But if you want to be part of Pachube, the server explained here is perfectly capable of supplying a Pachube data feed.
I assume you have an always-on connection to the internet. I assume you have an Arduino or clone, and know a little bit about using it. I like the ModernDevice RBBB...
... which is just fine for what we are doing here.
You'll need a way to connect your Arduino to your LAN. An Ethernet shield is the obvious way. I believe there are alternatives. I'm using the shield from NuElectronics because I wasn't surprised when I received it Wednesday morning after ordering it late on Monday, and because it was inexpensive. ($25) I was in the UK at the time; they are in the UK. It would probably take a little longer to reach most of the people likely to read this... but not much.
That's about it for the things you need to obtain! (Including software to buy. You do have to download one free library.)
I should mention that the NuElectronics Ethernet shield uses a Microchip ENC28J60 interface. Interfaces based in the Wiznet W5100 seem to be more popular, and there are possibly reasons... but I was new to the whole topic, and didn't want to invest a lot money until I knew more. (Wiznet devices are more expensive.) Much of what you need to master, arrange, do, to connect your server as explained in this essay will still be relevant and useful if you later switch over to a Wiznet interface. No promises, but if at that time, you want to get rid of your Nuelectronics shield: get in touch with me!
If you are using an Arduino with the standard footprint, then you just plug your shield into your Arduino. If you are using the RBBB, or similar, you need to connect the following signals between the Arduino and the NuElectronics shield
That's it for the hardware you need, and how to hook it up!
(I actually had an Arduserver working fine for a few months with no connection to D2, but a re-examination of the schematic suggests that I ought to have a connection there. It is an output from the shield. Who knows what the ethernet library wants to see coming on on D2, but I'm not leaving the signal to chance.)
Go to the NuElectonics site, and read the tutorial on setting up an Arduino driven web-server. Highlights from that:
For their and my "answer", presented here, you need the library NuElectronics provide.
I have a little note about installing and using Arduino libraries, in case you haven't tried that before. At April 11, the NuElectronics etherShield library installed very nicely... you just drag the folder at the root of the zip to the right place, and restart your Arduino development environment. That will give you the library and several useful example programs.
You may need to change a line in the program to assign your ArduServer an IP address suitable to your LAN. You may need to change one line to change the MAC address that the device will present. (All devices on a given LAN must be using different IP and MAC addresses. Change the default IP address/ MAC address if something else on your LAN has already been assigned the numbers in the code below.)
To access your server from beyond your own LAN, over the internet, you will need a URL that is "you", and you'll need to put that into the line that says....
static char baseurl[]="http://192.168.0.240/";
... in the version of the demo code below. N.B.: Unless you have a static IP address on the WAN (you would know, if you do!), you will put something like "mon7nc.dyndns.org" in to replace the "192.168.0.240".
If the "mon7nc..." stuff is a bit daunting, start off with "192..." (modified as explained in other parts of this), which will let you access the server from your LAN. You can then tackle the next set of obstacles, and move it out onto the internet, without having a lot of backtracking to do as the price of this "by stages" approach.
A little aside. Don't worry too much about it, if it doesn't make sense to you. Your router can probably be told to restrict the local IP addresses it issues via DCHP to a subset of a band. You could, for instance, tell it to use only 192.168.0.100 to 192.168.0.199 for DCHP issued IP addresses. This is probably a good idea (a subset, not necessarily the one I gave as an example) for you, because your Arduino isn't clever enough to participate in DCHP, and will have a fixed (local) IP address. (This is a completely separate issue from the matter of your "external" IP address, the one that is probably "dynamic", and will probably need dyndns services to deal with.) By telling your router to issue local IP addresses from a subset of a band, you put yourself in the position of knowing other local IP addresses which can be used for things with fixed IP addresses... like the web page serving Arduino you will set up, if you go through what is described in this tutorial. Once you've done something like this once, all sorts of other things... for instance IP cameras... become much easier. (You may want to use a fixed address for one of them, too.) One "price" of going the "simpler" fixed local IP addresses route: You have to stay on top of which devices have been assigned which IP address. you can have a camera and an Arduino both with IP address 192.168.0.240.... but only if they are not on the same LAN. Put them both on the same LAN, and you must first change the IP address coded into one of them.
A word about something the server doesn't do...
If you have a website, even one hosted for you by a service, you will be used to having more than a single page. As presented here, the ArduServer isn't as fancy as that. It just presents one page. The fancy ArduServer, the second program presented, isn't entirely static. The numbers on it, i.e. the random number and the reading from the light sensor change, but that's about it elevating the program past the simple "Hello World" which is the fruit of our first program. (Even with the fancy page, the numbers only change when you click one of the buttons. What users see when they fetch the page is a random number chosen for them, and the light level at the moment the page was fetched. Even if the light level changes, the number on the user's screen won't change before the page is re-fetched. (The random number is going to be replaced by a count of requests to the server since the device was reset, and this page may not be got up- to- date immediately. If you notice I've forgotten to revise the text here, please email me?)
Anyway, here is the first program, the "HelloWorld" demo. It is almost entirely just the program I downloaded with the library (in the "Examples" folder) from NuElectronics. You'll never change the vast majority of it, so don't worry about what it all means. If you skip down to the end, you can see the bit that you will change to have the page you are serving up say something different to what is built into the demo.
You need to know a little about creating HTML by hand if you are going to edit those lines. But nothing very clever or advanced is necessary or wise.
I do, by the way, have some ArduServers online for you to try out. None of them are the modest "Hello World" page that the code below serves up, but they are heavily based on the same code. They had to lose some of the "pretty" text to make room for the "neat" features.
Information not in the Nuelectronics tutorial:
(This paragraph and the next need editing, merging. Sorry. Later?) As presented, the code in the tutorial limits the amount of text you can have on your web page... quite severely. I believe that you can increase the amount of text on your webpage if you increase the setting of "BUFFER_SIZE" (originally, in the NuElectronics example, set to 500) in the relevant line quite early in the program. (Certainly seem to have "got away" with boosting it to 520, for instance. I do have to report that it doesn't fail elegantly... if you try to put too much text into the page, it seems to compile and load... but when you try to fetch your page, your browser tries for a bit, but then just says "can't load". Hey! What do you want for $40??!) Of course, if you increase the 500, you decrease the amount of memory available in your Arduino for the program, and features in your ArduServer.
Further information on the BUFFER_SIZE setting: Make it too small, and the program won't work, as the buffer is inadequate. Make it too large, or make your program too large, and parts of the buffer that are there in theory will be in "places" where there is no silicon to hold the numbers it is supposed to, and your program won't work. And, to make matters worse, I don't know an easy way to know which state you are in when the program isn't working. The "Binary sketch size" report which you get after compiling doesn't include the space set aside for the buffer... Sigh. There may be ways around this, and the problems are not insurmountable... but they are still tedious.
Near the top of the code is a line that says...
static char baseurl[]="http://yourdomain.com";
If you JUST want to use your Arduino server inside your LAN, replace that with http://192.168.0.240",or whatever local IP address has been dedicated to your ArduServer. You DO use the numbers in the other places, even if you want the server visible outside the LAN. However... if you want it visible to anyone on the internet, first you need a URL. (That is discussed elsewhere in this page.) Once you have your URL, put that in, e.g....
static char baseurl[]="http://mon7nc.dyndns.org/";
... is what I could put in because that is a URL for me. (I have to add ":81", so that things for my ArduServer go to my ArduServer, instead of to the OTHER server on my connected to the internet LAN.. but that's also explained elsewhere in this page.)
#include "etherShield.h"
//See remark a few lines below here for source of right library

/*ArduHelloWorld
ver: 18Apr2011

Derived from the example, "ethershield_webserver.pde"
supplied with the necessary library "etherShield". Only
limited changes, mostly cosmetic. The library comes from
http://www.nuelectronics.com/download/projects/etherShield.zip

Info on using libraries included in tutorial below...

This software discussed in tutorial...
http://sheepdogguides.com/arduino/art5serv.htm

Changes were done by TK Boyd, of
http://sheepdogsoftware.co.uk

See also http://ArduServer.com

*/

/*==============
Define the MAC address the device will present to the LAN
  All MAC addresses on a given LAN must be different from each other.
  Note: The values are separated with commas. */

static uint8_t mymac[6] = {0x54,0x55,0x58,0x10,0x00,0x24};

/*Define the IP address the device will present to the LAN
  All IP addresses on a given LAN must be different from each other.
  Note: The values are separated with commas. */

static uint8_t myip[4] = {192,168,0,240};

/*Define the port your server will use. Normally,
  port 80 is used, but others are possible,
  if you know what you are doing.*/

#define myport 80 //no ; here

/* To use this code for a server accessible only on your LAN,
   you will need to modify the next line if you changed either
   the IP address or the port on the lines just above here.

   If you are using IP address 80, and IP address 192.168.0.240, then
   set baseurl[] to http://192.168.0.240/, which is how the this
   software was posted on the web.

   If you are using a different port, say, 81, then set myport
   to the port you chose to use.

   If you want your ArduServer to be "seen" from anywhere on the
   internet (or on your LAN) replace the digits with the URL for
   your system. In my case, for example, I might use...
      http://mon7nc.dyndns.org

   If you are using a non-standard port, i.e. some port
   other than 80, you do NOT add the port number, after a colon.
   So, in my case, using port 81, I would NOT set baseurl to....
      http://mon7nc.dyndns.org:81 << DON'T DO THIS

   */

static char baseurl[]="http://192.168.0.240/";

/*You may need to change the buffer size... if you change
  the amount of text on the webpage served, or the amount
  of code in your version of the program.

  N.B.: The size of the buffer is fussy... too big or too small, and
  you will get hard-to-debug problems. (Worst case: The code compiles
  and runs, but when you ask for the page it is meant to serve, the
  client waits and waits until the browser times out.

  Make the buffer too (unnecessarily) big, and you reduce the amount
  of code you can insert to add Good Stuff to your ArduServer
  without getting any benefit from the over-large buffer.

  Make the buffer too small, and I think you will encounter over-run
  and crash the server.

  I believe that if you add enough text to the page being served,
  you have to increase the buffer size.

  There may also be another limit to the amount of text which can
  be on a served page, but I'm not sure about this yet.

  "Text" in both cases discussed above includes the HTML tags.*/

#define BUFFER_SIZE 550
static uint8_t buf[BUFFER_SIZE+1];

//The following does NOT have to be changed, even if you've
//   changed MAC address, IP address or port.
static uint16_t mywwwport =myport; // listen port for tcp/www (max range 1-254)

#define STR_BUFFER_SIZE 22
static char strbuf[STR_BUFFER_SIZE+1];

EtherShield es=EtherShield();

//The next two lines puzzle me, TKB. But even though I don't believe
//   they are doing what the original remark says, they do no harm,
//   and may be doing good, so I left them!

// prepare the webpage by writing the data to the tcp send buffer
uint16_t print_webpage(uint8_t *buf);
int8_t analyse_cmd(char *str);


/* ============  setup() =============================== */
void setup(){

//You can insert your own code here....


//....to initialize things for features you have added.


/* HERE BEGINS code from NuElectronics web server demo*/

//initialize enc28j60
es.ES_enc28j60Init(mymac);
es.ES_enc28j60clkout(2); // change clkout from 6.25MHz to 12.5MHz
delay(10);

/* Magjack LEDs configuration, see enc28j60 datasheet, page 11 */
// LEDA=green LEDB=yellow
//
// 0x880 is PHLCON LEDB=on, LEDA=on
// enc28j60PhyWrite(PHLCON,0b0000 1000 1000 00 00);
es.ES_enc28j60PhyWrite(PHLCON,0x880);
delay(500);
//
// 0x990 is PHLCON LEDB=off, LEDA=off
// enc28j60PhyWrite(PHLCON,0b0000 1001 1001 00 00);
es.ES_enc28j60PhyWrite(PHLCON,0x990);
delay(500);
//
// 0x880 is PHLCON LEDB=on, LEDA=on
// enc28j60PhyWrite(PHLCON,0b0000 1000 1000 00 00);
es.ES_enc28j60PhyWrite(PHLCON,0x880);
delay(500);
//
// 0x990 is PHLCON LEDB=off, LEDA=off
// enc28j60PhyWrite(PHLCON,0b0000 1001 1001 00 00);
es.ES_enc28j60PhyWrite(PHLCON,0x990);
delay(500);

// 0x476 is PHLCON LEDA=links status, LEDB=receive/transmit
// enc28j60PhyWrite(PHLCON,0b0000 0100 0111 01 10);
es.ES_enc28j60PhyWrite(PHLCON,0x476);
delay(100);

//init the ethernet/ip layer:
es.ES_init_ip_arp_udp_tcp(mymac,myip,myport);

}// end "setup()"


/* ============  loop() =============================== */
void loop(){

/*You can insert your own code here, to implement extra
     features of your own. Your code should not take long
     to execute, and it certainly should not "block"
     the processor.

You CAN (in fact I will!) add things in other places... but
     the chance of messing up the web serving is greater.*/


//End of best area for adding your own code.


/* HERE BEGINS code of "loop()" from NuElectronics
  web server demo*/

uint16_t plen, dat_p;
int8_t cmd;

plen = es.ES_enc28j60PacketReceive(BUFFER_SIZE, buf);

//plen will be NOT equal to zero if there is a valid packet (without CRC error)
if(plen!=0){

    // arp is broadcast if unknown but a host may also verify the mac address
    //      by sending it to a unicast address.
    if(es.ES_eth_type_is_arp_and_my_ip(buf,plen)){
      es.ES_make_arp_answer_from_request(buf);
      return;
    }

    // check if ip packets are for us:
    if(es.ES_eth_type_is_ip_and_my_ip(buf,plen)==0){
      return;
    }

    if(buf[IP_PROTO_P]==IP_PROTO_ICMP_V && buf[ICMP_TYPE_P]==ICMP_TYPE_ECHOREQUEST_V){
      es.ES_make_echo_reply_from_request(buf,plen);
      return;
    }

    // tcp port www start, compare only the lower byte
    if (buf[IP_PROTO_P]==IP_PROTO_TCP_V&&buf[TCP_DST_PORT_H_P]==0&&buf[TCP_DST_PORT_L_P]==mywwwport){
      if (buf[TCP_FLAGS_P] & TCP_FLAGS_SYN_V){
         es.ES_make_tcp_synack_from_syn(buf); // make_tcp_synack_from_syn does already send the syn, ack
         return;
      }
      if (buf[TCP_FLAGS_P] & TCP_FLAGS_ACK_V){
        es.ES_init_len_info(buf); // init some data structures
        dat_p=es.ES_get_tcp_data_pointer();
        if (dat_p==0){ // we can possibly have no data, just ack:
          if (buf[TCP_FLAGS_P] & TCP_FLAGS_FIN_V){
            es.ES_make_tcp_ack_from_any(buf);
          }
          return;
        }
        if (strncmp("GET ",(char *)&(buf[dat_p]),4)!=0){
          	// head, post and other methods for possible status codes see:
            // http://www.w3.org/Protocols/rfc2616/rfc2616-sec10.html
            plen=es.ES_fill_tcp_data_p(buf,0,PSTR("HTTP/1.0 200 OK\r\nContent-Type: text/html\r\n\r\n<h1>200 OK</h1>"));
            goto SENDTCP;
        }
 	if (strncmp("/ ",(char *)&(buf[dat_p+4]),2)==0){
                plen=print_webpage(buf);
            goto SENDTCP;
         }
        cmd=analyse_cmd((char *)&(buf[dat_p+5]));
        if (cmd==1){
             plen=print_webpage(buf);
        }
SENDTCP:  es.ES_make_tcp_ack_from_any(buf); // send ack for http get
           es.ES_make_tcp_ack_with_data(buf,plen); // send data
      }
    }
  }

}//end of "loop()"


/*============ Subordinate subroutines, from NuElectronics demo ===== */

uint8_t find_key_val(char *str,char *key){
// The returned value is stored in the global var strbuf

        uint8_t found=0;
        uint8_t i=0;
        char *kp;
        kp=key;
        while(*str &&  *str!=' ' && found==0){
                if (*str == *kp){
                        kp++;
                        if (*kp == '\0'){
                                str++;
                                kp=key;
                                if (*str == '='){
                                        found=1;
                                }
                        }
                }else{
                        kp=key;
                }
                str++;
        }
        if (found==1){
                // copy the value to a buffer and terminate it with '\0'
                while(*str &&  *str!=' ' && *str!='&' && i<STR_BUFFER_SIZE){
                        strbuf[i]=*str;
                        i++;
                        str++;
                }
                strbuf[i]='\0';
        }
        return(found);
}// end of "find_key_val()"


/*==========================*/
int8_t analyse_cmd(char *str)
{
        int8_t r=-1;

        if (find_key_val(str,"cmd")){
                if (*strbuf < 0x3a && *strbuf > 0x2f){
                        // is a ASCII number, return it
                        r=(*strbuf-0x30);
                }
        }
        return r;
}// end of "analyse_cmd()"


/* ============  PRINT WEB PAGE ==================*/
/* You make changes within this subroutine to change
   what your webserver serves up to the world.

   Be a little careful about what you do... don't
   get too adventurous! We'll look at fancier stuff
   in the next program. For now, we're just trying
   to get started!                                 */


uint16_t print_webpage(uint8_t *buf){

uint16_t plen;

/*This first line is part of the "wrapper" for what you are sending,
     and I wouldn't mess with it unless you know more about all of
     this than I do! */
plen=es.ES_fill_tcp_data_p(buf,0,PSTR("HTTP/1.0 200 OK\r\nContent-Type: text/html\r\n\r\n"));

/*Next we have one or more lines which all start....

   plen=es.ES_fill_tcp_data_p(buf,plen,PSTR

... and end with....

   ("x"));

   ... but with something more interesting that x between the "s.

That "something more interesting" will be HTML.

If you need a quote mark (") inside the quote marks, use \"

The HTML you see in my example is Very Bad HTML... but it is
  important to strip the code down to the shortest form you can
  find will work. If you set your ArduServer to send too many
  characters, not only will it fail to serve them, it won't even
  fail gracefully. You may, for instance, find that when you try
  to access the page, your browser merely hangs up with "Connecting
  to..." until it times out. There MAY be a limit to the number of
  characters on the page in addition to the limit imposed by the
  value in BUFFER_SIZE... I am still trying to get to the bottom
  of where the limits are to what I am trying to do, so I can
  work around them!                                            */

plen=es.ES_fill_tcp_data_p(buf,plen,PSTR("<center><h1>Welcome: NuElectronics Ethernet Shield Server Demo</h1>"));

plen=es.ES_fill_tcp_data_p(buf,plen,PSTR("<hr><br><h2><font color=\"blue\">"));

plen=es.ES_fill_tcp_data_p(buf,plen,PSTR("<br>Tweaked 17 April 2011, Sheepdogsoftware.co.uk"));

plen=es.ES_fill_tcp_data_p(buf,plen,PSTR("<br>HELLO WORLD!</font></h2></center>"));

plen=es.ES_fill_tcp_data_p(buf,plen,PSTR("<hr>V1.0 <a href=\"http://nuelectronics.com\">nuelectronics.com<a>"));

return(plen);
}//end of "print_webpage"
Put the above in your Arduino, plug the Arduino into your LAN, and, if you don't get firewall and IP address clashes, you should find that when you enter 192.168.0.240 into an internet browser on any PC on your LAN, you will get a "Hello World" page... from your Arduino!
Cool, or what?!!
(If you answered "What", you can stop reading now. You are beyond help.)
Making that available to the world! across the web isn't much harder. You've done the hard bits. We'll look at that next, after a little review....
(You might want to open the page again in a new window, and arrange to have both the text you are reading now and the big diagram near the top of the page visible at the same time.)
So far, I have, I hope, made clear to you how to set up your Arduino so that it will serve a simple "Hello World" page over your LAN to any PC on that LAN.
Start at the bottom of the big diagram. We have not looked at inputs or outputs for the Arduino yet. The page the program above serves does not have the "Light Level: 57" line, or the "On" or "Off" buttons, or a way to respond to them, once they are provided.
But we have talked about the Arduino, and made a good start on the programming required. We have talked about the Ethernet interface. (We're done talking about that now.) The Ethernet interface's connection to the router is in place... it is simply the Ethernet cable
Not shown on the diagram is a PC connected to the router. It could, in fact, be the PC being used for developing the Arduino's software. I left the arrow between it and the router out of the diagram in hopes of avoiding confusion. All of the devices on the same LAN as the Arduino will be connected together via the router.
We haven't talked about the USB interface between the Development PC and the Arduino, so I'll do that now. It is nothing more than whatever you normally use for programming your Arduino. Although it is more appropriate to a general discussion about Arduinos and clones, I will mention one thing you may not have come across: You can buy Arduinos with, and without, the USB interface circuitry incorporated on the Arduino. You can buy simple USB cables, which are nothing more than some connectors joined by wires, or "fancy" USB cables which at one end plug into a USB port and at the other end plug into an Arduino without USB circuitry, and which have, in the cable, the circuitry you need.
If you are only ever going to have one Arduino, it doesn't matter which route you choose, other than the fact that you've made a false start if you later decide you do want more than one Arduino.
If you are going to have several Arduinos, it makes sense to buy the simple Arduino and the fancy cable. The USB circuitry isn't needed except for programming the Arduino, in many applications. Once the Arduino is programmed, the programming cable is unplugged, and any USB circuitry on the Arduino is superfluous to getting done whatever job the Arduino is dedicated to. Why pay for multiple instances of the USB circuitry, if you are only using it with one Arduino at a time?
Enough about the "USB Interface" box on the diagram! (I hope... do write, if you want more on this, or if this section needs revision... after you have read the material at the "General Discussion..." link a few paragraphs back.)
Onward!....
The first thing you're going to have to deal with to make your Arduino webserver visible to the world (!) is to either have a static IP address, which may be the case for some lucky readers.... but isn't likely to be the case for you, mortal reader. I don't have one, and am jealous if you are one of the lucky ones!
Instead of using a static IP address, mortals make use of the free service from Dyn.com, previously known as DynDns.org, or a similar service from some other provider. The name derives from "dynamic domain name service. More on this in a moment.
I'll try to come back and say more about this later, but for now, after the next few paragraphs, just pop off to their website (link: above), and read what they tell you. You can use their service for free, if you don't mine a small nuisance, or, for not very much, you can pay to make the nuisance go away.
We normally use things like "http://bbc.co.uk" to go to a website. "bbc.co.uk" is a domain name. However, behind the scenes, the internet uses numbers. Places you visit have numbers, and you have a number, when you are using the internet. These numbers are "IP addresses". Part of why the internet is so easy to use is that there's a mechanism which looks up the numbers for us, from things like "Http://bbc.co.uk". The part of the internet that does this looking up is the DNS, the domain name service, which came up a moment ago. ("DNS" is also sometimes defined as "Domain Name System", and then you would talk about a "DNS service", provided by DNS servers".) It is a bit like a telephone directory... in a world where people's telephone numbers change more frequently than they do in this world. The BBC's webpage has been at bbc.co.uk for many years... but the IP address for that website has probably changed many times. But, thanks to DNS, I have no idea what the IP address has been doing. I only have to remember "bbc.co.uk".
The number for the internet connection you will be putting your ArduServer on probably changes from day to day, and "you" may not yet have a domain name, or a mechanism to keep the DNS records up to date. This would be a problem for people trying to visit your webserver without a service like that provided by Dyn.com (previously known as DynDns.org). The "dynamic" part of DynDns refers to the fact that the IP address associated with your domain, e.g. your "www- thingie", changes from time to time. The DynDns service takes care of this for you. (The also issue you with a domain name that is "yours".) But there's a gotcha for those of us who want to use an Arduino as a webserver. Something where you have your router must frequently check the IP address your system has been assigned. When that local updater finds a change, it passes a message to DynDns. THEY make sure that when people "call" you, i.e. your domain name, they are directed to the right IP address. (Sorry... I'll try to explain that better someday... if you write in and tell me it is not clear. (Eddress at bottom of page.))
IMPORTANT BIT: I said "Something where you have your router must frequently check the number your system has been assigned". In my case, I use a "big PC" (a Windows XP machine) to do this. It has to be on all the time to do the update checking, but I don't mind, because I have another webpage... indeed SET of webpages... served by it, so it needs to be on all the time anyway. But for some of you, gentle readers, part of the reason for trying to get an Arduino to do web page serving was to avoid having a big PC on all the time, wasn't it?
The Good News: Many routers have dyndns updater services built into them. I can't help with the individual details of all the different routers out there, but if you don't want to leave a PC running to inform DynDns (or another dyndns provider) of your current IP address each time it changes, and it will, then look in your router, and hope that you find an updater. They aren't unusual today. Another possible solution is any IP camera you may have on your system. They sometimes have dyndns updaters in them.
A word about "IP address". If you run the code above exactly as presented, 192.168.0.240 is the "IP address" assigned to the Arduino. (I said you might have to change that. But you won't change it very much, and you won't be able to "see" your Arduino from out on the 'net with that IP address.) 192.168.0.240 is one of a range of IP addresses set aside for "local" addressing. Part of your router's job is to present a "global" IP address to the outside world... this is the IP address to which DynDns will refer requests for your page. Then, within the router, messages for your Arduino web server are re-directed to 192.168.0.240. When answers are generated, they are sent back towards whoever asked for them. As the message travels, the router reverses the process, and sends the answer out as if it were from the global IP address on the "outside" of your router, and the local IP address remains hidden.
So... if you are ready to learn more about dyndns services, now is the time to try the free service from Dyn.com's site, one of the providers of such services. ("Dyn.com" was once at "DynDns.org")
I'm sorry... I've made that seem more complicated than it is. I'll try to re-work it one day. Bottom line: You need a URL, i.e. a "www- thingie" which will bring the world to your router. And getting one isn't so very terrible. In my case, for putting my Arduino on line as a server, my URL is mon7nc.dyndns.org. I get the use of that URL from Dyn.com. (What if you have a website, as I do (sheepdogguides.com)? Can you use that? No, not if you are asking the question. If you not only have a website, but are also serving the website, i.e. the computer holding the pages of your site are at where ever you are, then yes, probably you could use the URL. But most of us do not serve our own pages. We upload them, across the net, to someone else, our "web host", and they take care of providing the server, the computer holding the files people fetch when they visit your site.)
If you want to explore dyndns, and serving webpages, etc, etc, further, you might like to look at my FarWatch information. FarWatch lets you monitor premises from afar, across the 'net. You won't need big parts of the FarWatch system for putting your Arduino online. (You won't need the "WAMP" stuff.) But FarWatch uses dyndns too, and maybe re-reading "the same" material, but from another perspective will help consolidate your understanding. Or just go to the Dyn.com (previously known as DynDns.org) site, sign up, and Just Use It, without worrying too much about "understanding"!
In the following discussion of "your firewall", I am talking about the firewall which I hope you have in your router. Many of us have multiple firewalls... one in the router, one in each PC connected to it. Happily, you can leave the firewalls in the PCs alone.
This is a good point to remind you that setting up an Arduino connected to the internet may create chinks in your armor. You may be introducing ways for Bad People to "get into" your system to snoop around or install malware. Your firewall, and the anti-virus (etc) software you do (I trust) have in your PCs "should" protect you... but in order to connect your Arduino, you are opening up a potential channel for attacks. I don't know enough about the security issues to tell you exactly how much risk you are taking on. How much do you want to do this? I wanted to do it badly enough to take the chance that I was wrong about "firewall should protect me".
However... you will almost certainly have to tell your firewall that the Arduino's traffic is okay. If you just get annoyed, and simply turn the firewall completely off, I would guess you have a pretty good chance of having problems before long.
Inside your router, there is a marvelous mechanism called NAT. We've already discussed it, but didn't give it its name at the time.
NAT stands for "Network Address Translation". ("Network Address", for our purposes here, is the same as the "IP Address" we've spoken of previously.) Network address translation happens in the router. As I said before, your router "talks to" the "outside world" through one IP address. (That IP address may change from time to time, but it is one address, for the purposes of this section.) For the sake of this discussion, we'll say that your router is currently assigned 80.0.210.5
What if you have two computers on your LAN, and they are both "talking to" the internet?
Each computer will have a local IP address, one probably in the form of 192.168.0.xx (or 192.168.yy.xx). Your Arduino, for the purposes of this section, is just another computer on the LAN. (That's what it is, after all! Just not as expensive (or quite as capable of SOME things) as your "big" computer.
When computer "A", at, let's say, 192.168.0.100, asks for something from the internet, it communicates with the router via 192.168.0.100, but when the router passes the request on to the internet, the internet "sees" that request as coming from your router's external IP address, 80.0.210.5 in our scenario.
So far, so simple. The really clever bit is that at the same time as computer "A" has asked the internet for something, computer "B" (192.168.0.200) could also be asking for something. And the router will have sent that enquiry out, also "from" 80.0.210.5. When the answers come back, both are sent to 80.0.210.5. Then the router "magically" routes "A's" answer to 192.168.0.100 on the LAN, and "B's" answer to 192.0.168.200! This really is very cool... and, happily, something you can (mostly) just leave to the router's silicon intelligence.
In "everyday" internet use, you send out a request for something, and let in the answer when it arrives. Which your firewall knows about, and is already allowing, if you are reading this in a web browser.
To make your Arduino a server, you need to tell your firewall that the opposite is okay. You are prepared to receive requests for the stuff your Arduino is serving, and you are willing for the Arduino to send out the responses.
Not only do you have to say that this is okay, but you have to tell your router, "When a request for something comes in, send it to the Arduino (192.168.0.240, if you were able to use that IP address. I also told you I told you how to change it if necessary. And how to determine if it is necessary!)"
Now, as I said in a different context, I can't tell you the exact details of making these settings in each of the various routers on the market. But here's what I had to do. I have a Netgear DG834G, and it was delightfully easy to set up... or I just got lucky!
I logged into the router's administration pages. (They are a little website in their own right. The router is a webpage server while you are changing its settings.)
I clicked on "Firewall Rules" in the menu.
I added an inbound service, using the pre-defined "HTTP/TCP" type of service, made it "Allow Always", and told the router "Send to LAN Server 192.168.240". (It isn't set up quite like that now. Don't worry if you've noticed.)
And I said "Allow any WAN users to use this inbound service". (WAN: Wide Area Network, i.e. "the internet".)
My system was already set up... in the router's firewall, anyway... to allow any outbound services, to anyone.
Don't forget that with many routers, you have to save your settings and re-boot the router after making changes before it will be operating according to the new rules.
And that was it... for the simple case of adding an Arduino as a server on a LAN which didn't already have a computer providing services to the internet.... which may well be the case you are dealing with. (If it isn't, you would know. Don't worry if you are, say, participating in the World Community Grid's distributed processing initiative... you don't have a "server" to do that. (Highly recommended, by the way, if you are an altruistic person. No cost to you, if you leave your computer on from time to time. The grid helps with various projects. Some pursue scientific developments, others support humanitarian causes, others help foster technological breakthroughs.)
Many of you won't need to worry in detail about the next thing I'm going to talk about, but at least skim this material.
"The standard" web page serving service operates over "port 80". You don't have to worry too much about "ports". They are another part of the designation of the channel though which "stuff" flows through your router going to, or coming from, the internet. For simple "webpage" type "stuff", the port is 80. You don't have to do anything with it, or about it, if your Arduino is the only server on your LAN.
However, if you already have another web page server on your LAN, and you don't want to kick that (hopefully) sleeping dog, ports are your salvation. And those of you with sharp eyes will have spotted something odd about my Arduino web server which arises from the fact that I did have such a server, which I did not want to disturb. It is shown on the big diagram as "Other Local Server". It is local, as it is on the same LAN as the Arduino. It is not limited to serving locally, however. It serves up my FarWatch page to anyone, from any place in the world, who comes visiting. (And if anyone on the ISS is connected to the WWW, he or she can see the weather and some photos from my FarWatched premises from someplace beyond the world.... but I won't worry if little of my traffic is extra-terrestrial.)
So- what did the sharp eyed among you see?
To access my Arduino, when it is online, you enter the following into your browser....
The ":81" at the end is a little unusual, isn't it? It tells my router, when the request arrives, "Don't send this to the usual place for HTTP (port 80), send it to the local computer you've been told to use for HTTP requests over port 81".
If you can't get into my ArduServer like that, try...
... which should take you to my FarWatch server. (If you get in, you'll see a graph, and if you scroll down, some CCTV images.)
If you do get into FarWatch, but don't get into my ArduServer, it probably means that somewhere at your site, access to non-standard ports is blocked. If you don't get into either site, my connection to the internet may be down. Rare, but it happens.
Going back to "add :81".... that is all the "extra" stuff that users of pages served by my site need to know, to fetch pages from my ArduServer without getting instead stuff from my pre-existing other web server on http://mon7nc.dyndns.org. What, as the server managers, do you and I have to do, so that the requests for the Arduino go to it?
First, you have to make two changes in the Arduino program listed above. You have to change the line...
#define myport 80
You make it say 81, if you want to use port 81. And you have to add ":81" (or whatever port you are using) to the line that says something like....
static char baseurl[]="http://YourUrl.dyndns.org/";
... and make it...
static char baseurl[]="http://YourUrl.dyndns.org:81/";
(Of course, in your case that line will have something different in place of "YourUrl.dyndns.ord". Just follow the pattern, which I've tried to make clear.)
Recompile the code, re-upload it to your Arduino. Simples!
You may well find that you are already able to see your Arduino served pages via 192.168.0.240:81 if you try to access them across your LAN. (But even that simple exercise may be blocked by your PC's anti-malware settings. Try to access the page over your LAN... and look at your anti-malware settings (besides other things) if you don't succeed.)
However, for the outside world to "see" your pages across port 81, not only do they need to add the ":81" to the URL, but you need to give your router some instructions.
In my NetGear router, it was as simple as going to "Services", and adding a new "custom service". I called it "Ardu", made it of type "TCP", set the start port to 81 and the end port to 81.
I then went to the same "Firewall rules" as discussed previously, and added a new inbound service rule saying that service "Ardu" should always be allowed, and that its traffic should be sent to LAN server 192.168.0.240.

In a little while, I will give you the completed code for a much fancier ArduServer. It will present a page with two buttons on it, and those buttons will turn an LED on the Arduino on and off, from anywhere in the world. The Arduino will also have a light level sensor, and the LED will shine on that, and the web page will report how bright the light on the sensor is. The LED and light sensor are, of course, not going to be what you want on your Arduino. I hope you see that they are just illustrations of driving and output, sensing an input? (The page once also had a random number which changed each time you click a button. That has been changed to a field that reports how many requests the server has had from clients since it was last rebooted.)
But, even though I am only giving you the "finished", "does everything" code, I am going to tell you how it was built up, so that you can adapt it to your needs.
I'm not going to tell you every detail. For instance, I'll assume you'll know to put a line in setup() to configure the line controlling the LED as an output.
This was one of those "computing moments" we've all had.
Adding lines to the output of the webserver is quite easy... The following, inserted after the "Hello World" line in the first program, would add "To infinity..."
plen=es.ES_fill_tcp_data_p(buf,plen,PSTR("<br>To infinity..."));
You just need the....
plen=es.ES_fill_tcp_data_p(buf,plen,PSTR("x"));
... stuff, and you change the x to the text you want displayed. Yes, there are "codes" ("HTML tags) which you can insert to "fancy things up", but basically, it is all text, and you just put it in place of the x. Those codes are enclosed in less-than, <, and greater-than, >, signs, <like this>, and generally come in pairs, with a / before the second instance...
<h2>This would be writ large</h2>
That's your "How to write HTML" lesson for today!
But.
What if you have something in a variable? That should be easy, right?
Well, I'm sure I'm missing something. (I even have an idea of what it is!) But you can't even do the following, even if sTmp is a variable capable of holding a string....
sTmp="Hello World";
plen=es.ES_fill_tcp_data_p(buf,plen,PSTR(sTmp));
... and you certainly can't display the value stored in an integer variable...
iTmp:=432;
plen=es.ES_fill_tcp_data_p(buf,plen,PSTR(iTmp));
... but I'll show you some code which isn't doing anything more than that should do. The code looks terrifying, but you only have to copy/ paste/ use.... not understand. Before we get to that...
I don't know as much as I would like to about phototransistors, but I do know enough. The following works! (I used an SFH300 NPN phototransistor.) Connect the "output" below to the Arduino's Analog3 input... i.e. the fourth one. (The first was "Analog0") And the ground of the following to the Arduino's ground, and Vcc to the Arduino's Vcc.) The voltage where the resistor and phototransistor join, relative to ground, will change as the light level falling on the phototransistor changes. (If you are new to voltage dividers, I have a page of introduction for you. The link will open in a new tab or window, making it easy to resume your reading here later.)
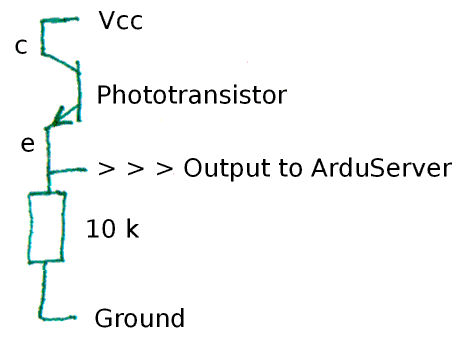
Lots of good news: As long as you keep the resistor above about 1k, I don't think you can go wrong "just trying things". Knowing "the right" phototransistor, "the right" resistor, etc, will improve your light level measuring... but what I've told you is enough for our needs. You may be using a different sort of light level sensor, anyway, after all!
The Arduino's analog to digital conversion capabilities make reading the changing voltage easy. You can put...
sensorValue = analogRead(sensorPin);
... into the program. The "obvious" place to put it is at the top of the "loop()" subroutine. As long as you have declared sensorValue as an integer variable, and set sensorPin to A3, or whichever channel you want to use for reading the light level, that will "work"... but it gives rise to a problem that I'll explain another time, as a curiosity.
To avoid that problem, it is better (in some ways, if not in keeping your code "clean" and logical) to put the analogRead statement at the start of the "print_webpage" subroutine.
To "declared sensorValue as an integer variable...", you use...
int8_t sensorPin = A3;  // designate the input pin for a sensor... a phototransistor used in example
   //"A3" is a funny sort of "number"... but it is set to what we need by things deep inside
   //the Arduino IDE.
Once upon a time, when I had the phototransistor in a very slightly different circuit, analogRead(sensorPin) returned a low value when the phototransistor was illuminated, and a higher value when in darker conditions. This wasn't very intuitive, but subtracting the value returned from 1023 (the maximum possible returned value) inverted the results, giving the web page user something more "sensible": A big number for a bright light, a lower number for a dim one. (On 13 October, 2011, I re-wired the phototransistor circuit, and after that, subtracting from 1023 was no linger needed.)
So.. the Arduino is reading the light level into the "int" variable sensorValue.. but we still have to report it to the reader of the webpage the ArduServer serves up.
The values I was getting from the phototransistor, after inversion, were about 300 (dark) and 700 (light). Further down in print_webpage, initially I used.....
        if (sensorValue < 500)
        {plen=es.ES_fill_tcp_data_p(buf,plen,PSTR("Phototransistor in dark"));}
        else
        {plen=es.ES_fill_tcp_data_p(buf,plen,PSTR("Phototransistor in light"));};
That worked just fine... and it avoided the tedious issue of how to get a number from a variable onto the web page.
But we really should be able to do that, should be able to display a number from a variable. The following "ain't pretty"... but it DOES work! (Thank you, NuElectronics, for the second part. And apologies for the first. This can certainly be Done Better... A nice "exercise for the student, Gentle Reader!)
 //First, make a string out of the number in sensorValue.
 //  Store it in temp_string.
 //Assumes sensorValue <2000. (The max returned by analogRead is 1023,
 //so as long as that's where sensorValue is coming from, you're okay.)

 i=0;
 if (sensorValue>999)
   {temp_string[i]='1';
   i++;
   sensorValue=sensorValue-1000;
   };

 i2=0;
 while (sensorValue>100)
  {i2++;
   sensorValue=sensorValue-100;
  };
 temp_string[i]=48+i2;
 i++;

 i2=0;
 while (sensorValue>10)
  {i2++;
   sensorValue=sensorValue-10;
  };
 temp_string[i]=48+i2;
 i++;

 i2=0;
 while (sensorValue>1)
  {i2++;
   sensorValue=sensorValue-1;
  };
 temp_string[i]=48+i2;
 i++;

 temp_string[i]=0;//Mark end of string

 plen=es.ES_fill_tcp_data_p(buf,plen,PSTR("<br>Light level: "));


 //Now cause the characters in temp_string to become part
 //  of the webpage that ArduServer will return...

 i=0;
 while (temp_string[i]) {

         buf[TCP_CHECKSUM_L_P+3+plen]=temp_string[i++];
         plen++;
       }

 plen=es.ES_fill_tcp_data_p(buf,plen,PSTR("<br>"));
Note that we are using a slightly different approach here. I'm pretty sure that inside the "while" loop we are merely moving some things into a buffer, and they are, as it were, "appended" ahead of the "<br>" which we eventually send to the web page.
Remember: The complex bit of code just presented merely takes the number in sensorValue and passes it to the web page ArduServer is presenting.
With that code in place, I tested what I had so far by fetching the web page with the phototransistor illuminated and with it dark, and made sure that the light level reported changed accordingly. I just shone a flashlight on it, and fetched the page. A bit cruder than the eventual goal!
So! We can read, from anywhere on the web, the state of an input to the Arduino that is serving up the web page. Half the job done!
The web page has two buttons, which are created with HTML "forms" tags. But before I start on that, I want to create something I can call for turning the LED on or off simply by calling a subroutine.
The subroutine is called "LEDOnOff", and it takes one parameter. If you say "LEDOnOff(0)", the LED goes off. Say "LEDOnOff(1)", and the LED goes on. Always try to encapsulate the elements of anything you do. The subroutine is as follows....
void LEDOnOff(byte bOnOff)
{
//When 0 is passed to the subroutine: Turn the LED off.
//   If something else is passed, turn the LED on.
if (bOnOff==0)
{digitalWrite(ledPin,LOW);}
else
{digitalWrite(ledPin,HIGH);};
}
Nothing very "clever" in that. Good. I like "not clever" things... easier to debug.
Sadly, the mechanism for creating a button on the form, and for reacting to users clicking it isn't nearly so simple.
First, let me show you the HTML which you have to cause to be added to the webpage the ArduServer is serving...
<form METHOD=get action="{see text}">
<input type=hidden name=cmd value=1>
<input type=submit value="LED Off">
</form>

<form METHOD=get action="{see text}">
<input type=hidden name=cmd value=2>
<input type=submit value="LED On">
</form>
Study that. The first thing you notice, I hope, is that "it" is two things... very similar to one another.
Let's get the "see text" bit out of the way first. Somehow... I haven't analyzed it in detail (yet!), it is possible to pass some variables to the commands which put things into the webpage ArduServer serves. (It is probably a simple(?) matter of the type (in the narrow, programmer's, sense of that term) of variable involved.) Within the program below, in the relevant lines, you will find that if the ArduServer resides at mon7nc.dyndns.org, then the first line in each of the halves of the material above turns into...
<form METHOD=get action="http://mon7nc.dyndns.org">
The "http://mon7nc.dyndns.org" will have come from the variable baseurl[].
Now then. I can't pretend to understand a lot about using the HTML "form" tags... but I've figured out enough, from the NuElectronics demo "etherShield_web_temperature.pde", and the excellent Embedded Ethernet and Internet Complete, by Jan Axelson, to build the webpage we're working on, and adapt our first program to respond to it in a satisfactory manner.
As I said, the two blocks of HTML above will cause two buttons to appear on the form. They will be labeled "LED On" and "LED Off".
When you click either one, I'm not 100% sure of what EXACTLY happens, but I do know that the effect is almost like causing something to be typed into the address box of the internet browser which was being used to click on the button. That, by the way, may or may not be involved in EVERY use of the "form" and "input" and "submit" HTML tags... but the way they are put together here, and the software in the server they are being sent to work like that... WITH a frill I haven't mentioned yet.
Not only does the code in the server at least seem to be typing something into the address bar of the browser running in the client, but WHAT it types isn't merely the URL of the page the buttons are on.
You can see what the ArduServer is doing, when you use the site.
Click on mon7nc.dyndns.org:81, but don't (yet) click on either button. Look at what's in the address box after you've pressed enter and the page has loaded. A "/" may have been added at the end, and the "http://" at the front, but these aren't major changes.
Now click on the "LED On" button, and look at the address box again.
Not only did clicking on the button reload the page, but it reloaded it with something added to where we went, the "?cmd=2" part. (In fact, it doesn't have to RE-load the page the button is on... it could load any page. And add anything to the line before the load.)
Why did it do that? Because we told it to, in the code of the server. I'll show you the details in a moment. But first, click on the "LED Off" button. This time the page reloads, but with "?cmd=1", right?
When the server responds to the incoming request for "stuff" to be sent to the client, it looks at the line that caused the request to go to the server... it is passed across the internet along with things like where to send the answer. In the code in the server, it looks for a question mark in the line that caused the request. If it doesn't find one, it doesn't do anything special, it just sends the page that was asked for.
If the line coming in has a question mark in it, as it will, as a result of how the "form" and "input" and "submit" HTML tags work, when they are as we have them, the server's software looks at what comes after the question mark. The word "cmd" isn't "universal", it isn't part of the basic definitions of HTML. There was a cmd after the question mark because we put "cmd" in our <input type=hidden name=cmd...> line.
Whew. Deep breath. It gets just a little deeper, and then we start rising back to the surface.
You have to dig a little in the code for the simple webserver demo from NuElectronics, but when you do, you'll find something that it didn't actually need! The code that is so helpful is...
cmd=analyse_cmd((char *)&(buf[dat_p+5]));
        if (cmd==1){
             plen=print_webpage(buf);
I'll take you through that in just a moment. But first a promise: The code isn't very "fancy". Understanding it will be easy... compared to understanding why it was put where it was, and building all the things we're not even going to look at which make it work!
What does it say?
It says, "Put something in the variable called "cmd""
That "something" is whatever's after the equals sign after the "cmd" which was in the line from the client browser. ("cmd" is used twice here, for two different things. It might have been better to give the variable in the server code a name like "CmdWas" or somesuch, to say that "in this variable, we are going to have whatever was after the "cmd=" from the client." But you're a Programmer. You can understand this. (And you will write your own programs with fewer such ambiguities, won't you?))
So... if the line from the browser was....
http://mon7nc.dyndns.org:81/?cmd=1
... then the code we're looking at, so far, has put a "1" in the variable cmd.
Next the code says, "If there is a 1 in the variable called cmd, then do....
plen=print_webpage(buf);
I don't know a lot about that... nor do I want to. Someone else has taken care of getting the right thing into "buf" already. I don't know what will subsequently be done with plen, nor do I care. But I know that calling "print_webpage()" sends a page of stuff to the client out there on the internet, the client that asked for something.
As written, the client will just get the same page back again. And, as written, the code only responds to the case when the line coming in has "?cmd=1" at the end. Have a look at what I put in the server code to replace what we've just been talking about....
if ((cmd==1)||(cmd==2)){ //first level of nesting
      if (cmd==1)
          {LEDOnOff(0);delay(100);}
        else
          {LEDOnOff(1);delay(100);};
      plen=print_webpage(buf);
      }// first level of nesting
That says...
If cmd has a 1 or a 2 in it, then do the following....

    If it has a 1 in it, then.....
           Call LEDOnOff(0) (the thing we built earlier. Turns LED off)
           Wait briefly (so that the LED has become dark,
                               before we get to the "read light sensor" bit)
    (Otherwise, if it doesn't have a 1, else...)
           Call LEDOnOff(1) (Turn LED on)
           Wait briefly

    And then: Send out the webpage that the client requested.
Almost too simple? The Nice People at NuElectronics have done all the hard work. We just had to find the right place to make our little tweak!
And so, faithful reader, we reach the end.
I have put the full code for the second program presented in this tutorial on a separate page.
I hope that was useful. Let me know if there are areas which weren't adequately explained? Let me know what "Gotchas" got you?
Please remember that the information here is entirely unofficial. It has not been written by or endorsed by the people who brought us the NuElectronics Ethernet shield.
![]() Page tested for compliance with INDUSTRY (not MS-only) standards, using the free, publicly accessible validator at validator.w3.org
Page tested for compliance with INDUSTRY (not MS-only) standards, using the free, publicly accessible validator at validator.w3.org
CSS behind the page checked, at least once upon a time!, with http://jigsaw.w3.org/css-validator/
Why does this page cause a script to run? Because of the Google panels, and the code for the search button. Also, I have some of my pages' traffic monitored for me by eXTReMe tracker. They offer a free tracker. If you want to try one, check out their site. Why do I mention the script? Be sure you know all you need to about spyware.
....... P a g e . . . E n d s .....