I began this page in 2013. Most of this page is from then. I updated the links and prices (some came down, none went up) in October 2017.
The elements I recommended then I still recommend today. They are all you need to make a "serious" start to using Arduinos.
But! Today (October 2017), if you want to make a limited (but not limiting!) start, you can do it with $10 for someone happy with soldering, etc, or $25 for someone with (so far!) limited soldering, etc skills. (You'll need a few bits of wire, and want some switches (I twist two wires together, with stripped ends positioned a few millimeters apart, and squeeze them together to "close" the "switch"!), a few LEDs, resistors, too. Incidentals!)
I'm going to mention specific products from a specific supplier. There are many alternatives. I Just Like Sparkfun, and would recommend that a novice start there. Once you have a little experience, if you want to "shop around", "go for bargains" (and all the "joys" they bring!)... fine! But as a novice, don't you want to minimize the chances of hassle, and have maximum support?
$10 will buy you an Arduino Pro Mini 328 - 5V/16 MHz, and $25 will buy you an Arduino Uno - R3.
You'll also need an ordinary PC, an ordinary USB cable. If you go for the "quick/ cheap" start, you can skip the items described below as C, D, E, and F!
But all the work you will do will be entirely applicable to "going further" if you become excited about Arduino work. My "$10" is a bit exaggerated... you'll need the cable, tools, etc... but these things you may already have! But it is more "fair" than many marketing claims. And (see below) $50 is more than comfortable for making a serious start.
"Stop press" ends... rest is mostly from 2013. (And the Arduino was mature then!)
Let's see if I can be concise. (If you want to know more about Arduinos, I have written more... lots more... elsewhere.)
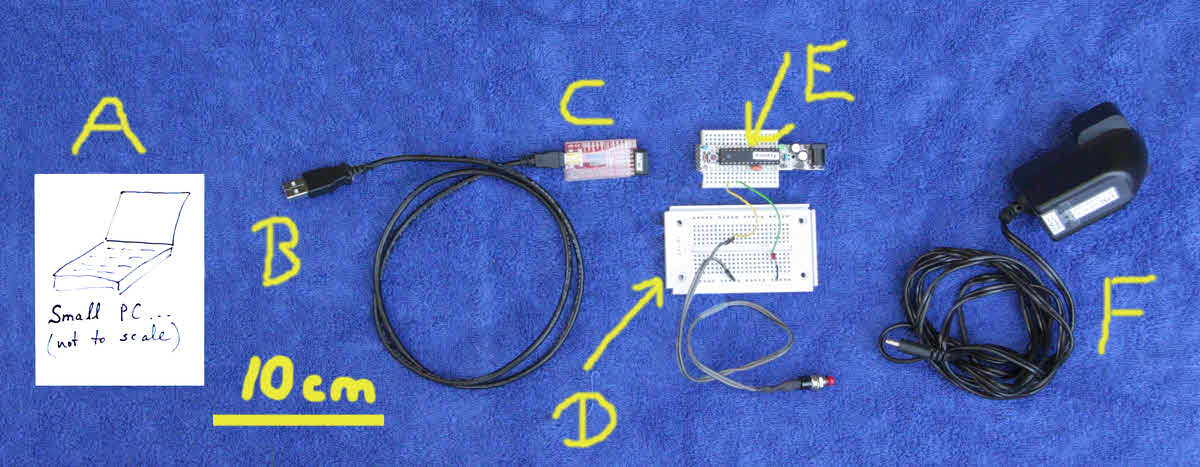
A: A small (in capabilities) computer. Or just use your "main" computer. Until you get to advanced projects, where the computer is being used as a partner to the Arduino, saving data, maybe, you only need the "small computer" while you are programming the Arduino to do whatever you are making it do. Cost: You probably have one!
B & C: "The cable", with FTDI USB-to-serial interface: There are various approaches to using Arduinos. I like to have a "smart" cable, which is used just during programming. For 5v: Sparkfun FTDI Cable 5V, DEV-09718. (There's also a 3.3v version. You have to decide: Are you going down the 5v path, or the 3.3 v volt path? Start with 5v if in doubt. Not a BIG deal. $15, 10/17, excl p&p. (You can buy Arduinos with the "clever stuff" on the Arduino... but it makes them (slightly) more expensive, and you will often not be using that circuitry.)
You won't need the FTDI module if you go with an Arduino with that circuitry on-board, such as the Sparkfun Pro Micro, $20, 10/17, excl p&p (vs "Mini", $10, needs FTDI when being programmed))... but you buy the FTDI module once for muliple Minis, and pay the extra $10 over and over if you go down the Mini route. Maybe if one child is going to use one Arduino, at least start with a Micro, for One LEss Thing To Go Wrong. The next one can be a mini!
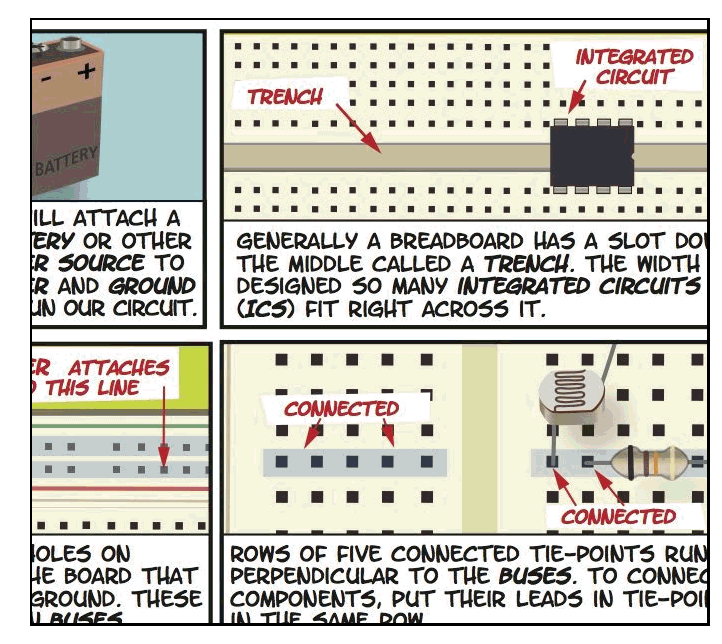
D: Breadboards, or "proto-boards": You can't have too many. Two shown in picture. Makes connecting stuff up, at least for the development stage, easy. DO NOT SKIP THESE. (ModernDevice.com/product/mini-breadboard/ $3 each, 10/17, excl p&p.) There's a wonderful graphic explanation of breadboards from Makezine.
E: The Arduino! Well, AN Arduino... they come in many shapes, sizes and capabilities... but all "work" more or less the same. The one shown is a RBBB from Modern Device($11 each, 10/17, excl p&p.).... Another nice, inexpensive starting point, requiring just a TINY bit of soldering... sticking some pins on... is the Sparkfun Arduino Pro Mini 328 - 5V/16 MHz DEV-1111, Sparkfun.com($10 each, 10/17, excl p&p.)
F: A "wall wart".. a source of low DC voltage. Depending on the circuits you add, you will want one supplying 9v or so. (Not more than 12)... OR you may want to power your Arduino (when not tethered to "big PC" by the USB cable) from a USB charger. N.b.: If you are using a USB charger to power your project, you need to connect the power to different pins than you would use if powering it from a higher voltage. (I would be inclined to go with the "from USB charger" route. You can connect the power via the same pins the smart cable connects to, if a USB charger is your power supply.) (Sparkfun (and the internet more broadly!) supply breakout boards to make using a standard cable easy. (The link is for a mini-B socket. ($2 each, 10/17, excl p&p.)Sparkfun also do a breakout board for the micro-B socket.
If you look closely on the breadboard marked "D", you'll see an LED. There should be a resistor there, too, but I only just remembered! There's also a push button switch. And some wire. That's all you "need" to get started with Arduino. You will soon want more than one LED, more than one switch... and you can go on "adding things" endlessly... from $1 temperature sensing chips, and $10 3 character seven segment LED displays, to ethernet interfaces, GPS receivers, LCD graphics screens, etc, etc.... but these are just the input and output devices. All you "need", for basic Arduino work, is in the photo.
(The software to program the devices is free, open-source... you just fetch it from the internet when you are ready to start.)

What you see above is how you'll be set up while you are programming your Arduino. It will draw its power through the USB cable which is also being used to pass the program from the PC, where it is created, to the Arduino, where it is stored and executed.
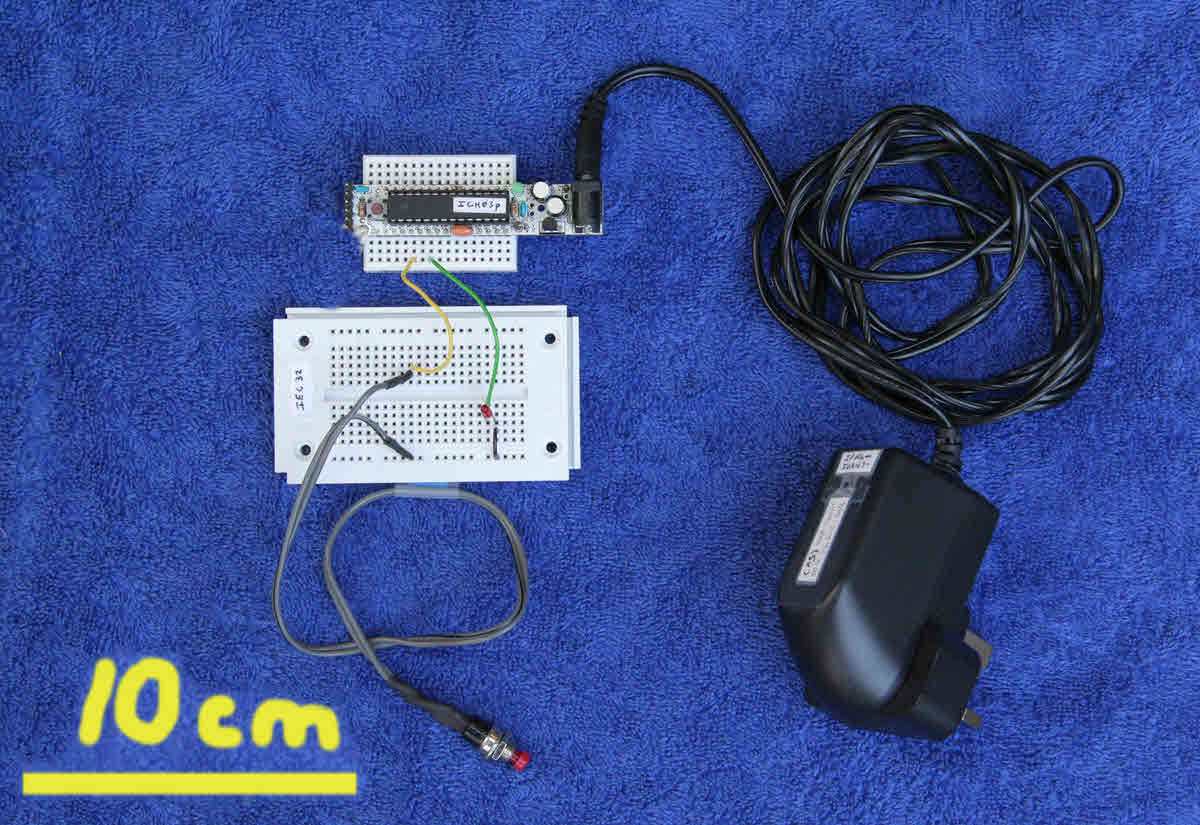
This is all you'll need once the Arduino has been programmed, and the switches, LEDs, etc, "got right". The small PC and cable will no longer be needed... they can be off doing other things... maybe programming a second Arduino to do some new project! As the Arduino was getting its power from the small PC, you now need to give it power from a different source, e.g. the "wall wart" I'd shown.
If you visit 1&1's site from here, it helps me. They host my website, and I wouldn't put this link up for them if I wasn't happy with their service.
Click here to visit editor's Sheepdog Software (tm) freeware, shareware pages.
Click here to visit the homepage of my biggest site.
Click here to visit the homepage of Sheepdogsoftware.co.uk. Apologies if the "?FrmAht" I added to that link causes your browser problems. Please let me know, if so?
![]() Page has been tested for compliance with INDUSTRY (not MS-only) standards, using the free, publicly accessible validator at validator.w3.org. It passes in some important ways, but still needs work to fully meet HTML 5 expectations. (If your browser hides your history, you may have to put the page's URL into the validator by hand. Check what page the validator looked at before becoming alarmed by a "not found" or "wrong doctype".)
Page has been tested for compliance with INDUSTRY (not MS-only) standards, using the free, publicly accessible validator at validator.w3.org. It passes in some important ways, but still needs work to fully meet HTML 5 expectations. (If your browser hides your history, you may have to put the page's URL into the validator by hand. Check what page the validator looked at before becoming alarmed by a "not found" or "wrong doctype".)
AND passes...

Why does this page cause a script to run? Because of the Google panels, and the code for the search button. Why do I mention the script? Be sure you know all you need to about spyware.
....... P a g e . . . E n d s .....