I've "known about" IfTTT.com for years. Just never got around to playing with "If This, Then That" before.
But then I saw a note at Sparkfun, and three days went out the window! That link led me to an earlier one about a similar... project, which gave more detail.
IfTTT (at the heart of both) is BRILLIANT!
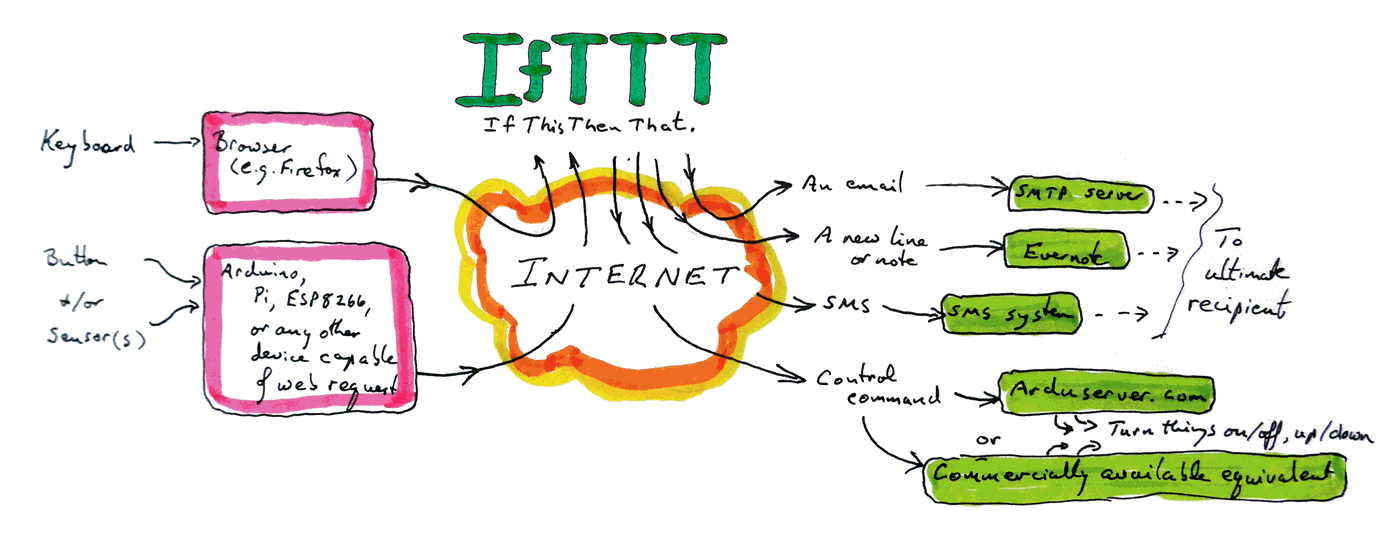
Like many brilliant things, it has so many sides that it can be a bit tough getting started. Try this little project if you have an Arduino or ESP8266 or similar which is connected to your LAN (be it by WiFi or cable), and you know about the issues of getting a webserver visible "to the outside world". We won't be creating a web server, but we need a DDNS solution in place, and all the usual firewall, etc, issues solved. (If you can run a webserver, an Arduserver, for instance, the hardest bits of what follows are dealt with.)
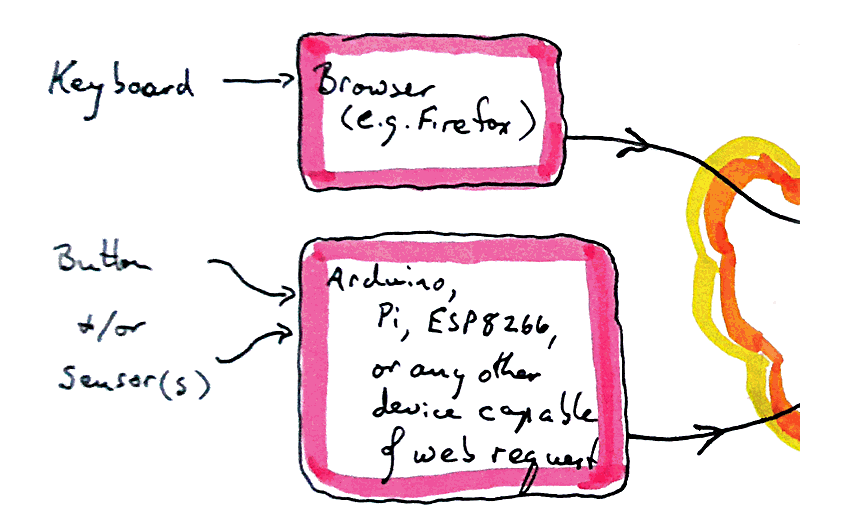
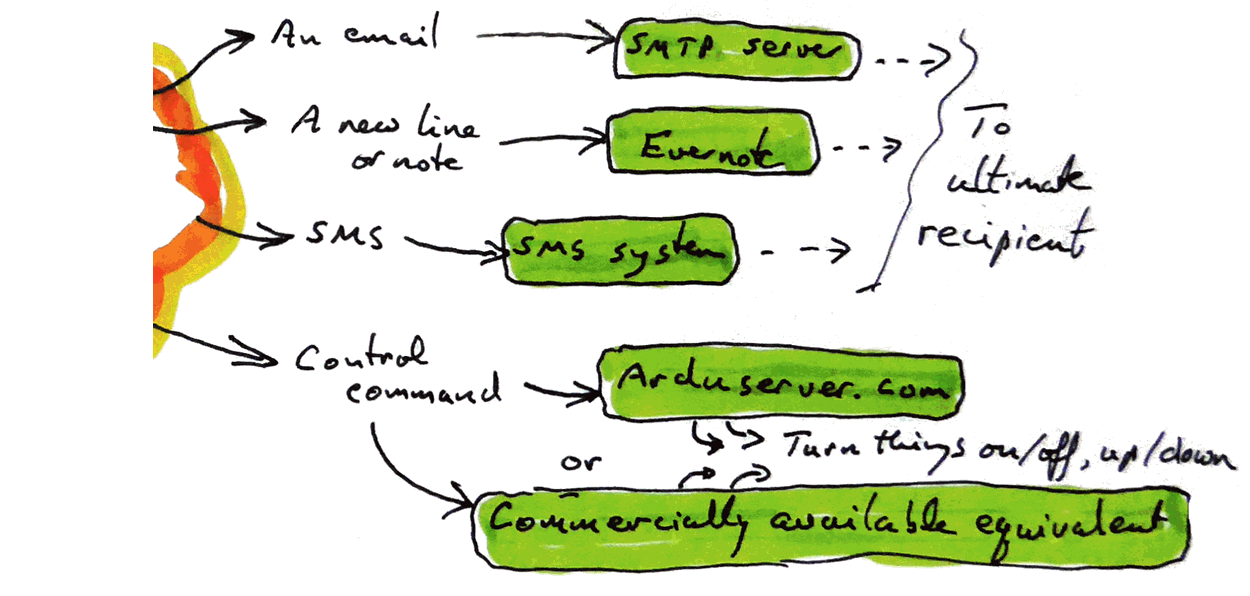
We're going to create (in Arduino) a device with a button. When the button is pressed, a IP/TCP "Post" message will be sent off to the nice people at If This Then That. When it gets there, it will cause an email to be sent, due to things we will set up before we press the button. (They only need setting up once.) (I believe you can have the process send an SMS just as easily, but haven't explored that, personally.)
(I have, however, played with having IfTTT add lines to an Evernote note. (And notes to "Notebooks"!) I'd never used Evernote.com before, though I know it has been around and popular for years. Because IfTTT NEEDS (for genuine technical reasons) pretty scary access to emails and Evernote accounts to do what I've done, I set up a special email account, just for IfTTT + Evernote. And a special Evernote account, to used just with IfTTT. Of course both of those tasks took some time. INCLUDING those tasks, building on my ESP8266+IfTTT "send emails when a button is pressed on ESP8266" work, I had the the same ESP8266 event adding lines to an Evernote note in under an hour. Maybe do a tutorial someday... tell me if you try, but need help. Tell me if you try, and DON'T need help! (It seemed pretty clear and intuitive to me... maybe I was just lucky.) Please! (And please cite this page's ID: art4ifttt.htm.)
FIRST... you may want to set up one, or even two, new "disposable" email accounts. The first needs to be with Gmail. Google will know about your IfTTT account, and that email address will be known to IfTTT. (Indeed, your IfTTT account will be tied to it.)
I would not, if I were you, connect to IFTTT via a Google account I use for anything else. Or use the "Continue with Google" means of logging in. Do the latter, and it seems you give IFTTT full access (read/send as/delete) access to Gmail accounts connected to the Google account you "Continue with" (log in as). (Oh... and stuff you do connected THAT way won't be "visible" when you are logged in with an IFTTT user ID/ password.)(I have a for-this-only Gmail account which I use for IFTTT, and an email address elsewhere that I only use as the destination for emails from IFTTT applets. Happily, the "elsewhere" allows me to forward emails arriving there on to one of my "used every day" eddresses. But once the email has left the IFTTT applet, IFTTT knows nothing of where it goes from the first destination. I don't like my peas touching my carrots.
To reiterate part of the above: you may wish to set up a second disposable email account which can forward emails to a third account. Happily, the third account would typically be one of the accounts you routinely monitor. (And you would have no every-day need to visit either of the first two accounts.)
We'll come back to the email accounts in a moment.
IfTTT always boils down to the "recipes" which you create.
(IfTTT changed the name they use for what they used to call a "recipe". They now call it "an applet". I will go through this site in due course... but not tonight! Where you see "recipe", just treat it as what IfTTT calls "applet". And vice versa.)
A recipe is just a rule for something happening if certain circumstances arise.
Our recipe, in essence, is....
IF THIS: (a certain message reaches the IfTTT.com servers) THEN, do THAT, "that" being:" send an email, as specified within the recipe. ("Specified": Recipient and text in the message.)
Now... you could have the recipe send the email to the Gmail account that your IfTTT account is attached to... if you look at incoming emails to that eddress. (The email will be SENT FROM that email account, by the way. Consider the security implications, which will be as varied as your use of this system.)
However, you can ALSO have the recipe send the email someplace else.
And if that "someplace else" can forward emails, you can "break the chain" between "you" and your IfTTT activity.
So!... The recipe can send an email. That's the "That" (sort of, for now) taken care of.
The "this": Once the recipe is set up, if you were to send, by whatever means you wish, a message to (something like)...
https://maker.ifttt.com/trigger/door_status/with/key/gUzblh2...C9L4GMy7J
.. then a recipe in my IfTTT account would cause an email to be sent to me.
"... send, by whatever means..."
Just sticking it into the address edit box on an ordinary browser would suffice. (Very handy for testing purposes!)
Let's take a moment, get ahead of ourselves, and look at that in detail.
The following will always be just what you see here...
https://maker.ifttt.com/trigger/
Then will come the name of one of the "applets" you have defined (with a recipe) on your IfTTT page. I created something called "door_status", for some wants I had one day. This example (almost) uses that applet.
door_status
then, always, as this....
/with/key/
... and finally, the "key"... Lots of gibberish. I've replaced a bunch of it with the "...."
gUzblh2...C9L4GMy7J
That's it! Put that in a browser, and the "This" part of one... or many... recipes will say "Oh! It Happened! I need to do the "That"".
The magic or the "This" being seen, and orders to effect the "That" all happen in IfTTT's servers. (The service is free, by the way.)
(I'll show you the details of creating the recipe later.)
Sending the thing that creates a "This" moment from a web browser, by hand, would have few uses outside of your development work. Hence the place of the Arduino, or ESP8266, or other silicon brains, in the scheme of things.
REMEMBER WE ARE MERELY WORKING UP A LITTLE DEMO HERE!
... but that allows almost all of the above. (Adding the input to Arduino-from-sensor isn't covered, but the IfTTT aspects are trivial... and even have a little discussion here!)
For our demo, I'm using a Sparkfun ESP8266 "Thing" (another recent (12/16) great enthusiasm!)
ALL you need, besides the device itself, and the software I am about to discuss, is a "doorbell" type switch (SPST momentary) which will connect D4 to ground when it is pressed.
And then there's the software....
This listing isn't tested yet. The SOFTWARE is tested... but publishing it on the internet is fraught with "issues". I would be very grateful if you would contact me, if you are able to use this "as is", or with notes on flaws needing fixing.
Nota Bene: The code won't run exactly as you see it. You have to "tweak" it, supplying things like your WiFi's SSID, and the password into your WiFi connection. This is also written to "put" the ESP8266 at a specific LAN address (192.168...), and to use a specific port. Those things will need setting. And last, but not least, you need to tweak the name of the recipe it will trigger, and supply YOUR key for that. Search on "q-FixThis" to find the bits which need tweaks.
A detail- with good news!.... In the following, you'll see....
attachInterrupt(digitalPinToInterrupt(button_pin), changeDoorStatus, FALLING); //Was "CHANGE"
This use of an interrupt to detect a falling edge on the button_pin line is CLEVER! (I copied it along with the rest from the source cited.) But if it gets in the way of your IfTTT usage learning, ditch it! Use something else to trigger the "send web request" code. The use of the interrupt is NOT central to the "send web request" code.
/*

 ** REMOVE SENSITIVE MATERIAL BEFORE PUBLISHING!! **
 * If you see this with password or IfTTT key in it, PLEASE
 * contact me...
 * http://sheepdogguides.com/ctact.htm

 SendIfTTTTriggerCode
 See messages to serial monitor for official name, version.
     (search on "gotoVers"

 Lightly adapted from....

 http://randomnerdtutorials.com/door-status-monitor-using-the-esp8266/

 Example created by Rui Santos

 All the resources for this project:
 http://randomnerdtutorials.com/

 Rui said "Based on some ESP8266 code examples"
*/

#include <ESP8266WiFi.h>

WiFiServer server(1203);

//THREE LINES ADDED BY TKB TO BASIC DEMO....
//Block 1 of 2 to set static IP address
IPAddress ip(192, 168, 0, q-FixThis);
IPAddress gateway(192,168,0,1);//These probably the same in most cases
IPAddress subnet(255,255,255,0);These probably the same in most cases


//////////////////////
// WiFi Definitions //
//////////////////////
//Tweak next two for your WiFi environment, and take
//  care not to tell people who shouldn't know
//  what settings you've supplied to the Thing...
const char* ssid = "q-FixThis";
const char* password = "q-FixThis";

//Tweak next with the name of the "This" element you
//  are creating. (You get to choose the name, but what's
//  here, and what's provided for in your IfTTT account
//  must match,.... and.....
//The "key" for the trigger. (This will be discussed later
//  in the essay this listing appears in.)
const char* apiKey = "q-FixThis";
const char* triggerName = "q-FixThis";


const char* host = "maker.ifttt.com";

int button_pin = 4;
int OutPutWithLED = 5;//(Use 5 to drive onboard LED of Sparkfun ESP Thing.)
volatile int state = false;
volatile int flag = false;
//"Door" used throughout in places where "switch" might have fit context better
const char* door_state = "closed";//Assumed switch to connect button_pin to ground is OPEN
  //when program initiates. <<double check this one! <<

unsigned long previousMillis = 0;
const long interval = 3000;

void changeDoorStatus() //This happens after interrupt...
   {
    unsigned long currentMillis = millis();

    if(currentMillis - previousMillis >= interval) {
        previousMillis = currentMillis;

        state = !state;
        if(state) {
            door_state = "opened";//was "opened
        }
        else{
            door_state = "closed";
        }
        flag = true;
        Serial.println(state);
        Serial.println(door_state);
    }

}// end of changeDoorStatus()


void setup() {
    digitalWrite(OutPutWithLED,HIGH);
    Serial.begin(9600);
    delay(100);
    Serial.println("Preparing the Door Status Monitor project...");
    //gotoVers (target for searches)
    Serial.println("Program: SendIfTTTTriggerCode");
    Serial.println("(I.e. this program will send the trigger code to make an IfThisThenThat recipe happen.");
    Serial.println("Version: 11 Feb 17");
    Serial.println("(Started 10 Feb 17... my first IfTTT day.)");
    Serial.println("Inspired by a note in a routine Sparkfun mailshot.");
    Serial.println("-");
    Serial.println("This code almost the same as example in...");
    Serial.println("http://randomnerdtutorials.com/door-status-monitor-using-the-esp8266/");
    Serial.println("Preparing the Door Status Monitor project...");
    Serial.println("-");

    pinMode(button_pin, INPUT_PULLUP);
    pinMode(OutPutWithLED, OUTPUT);

    //My thanks to...
    //http://randomnerdtutorials.com/door-status-monitor-using-the-esp8266/
    //... and a tip of the hat to Jeremy Rudge, who would be so pleased, for
    //"introducing" me to interrupts. I've never used one in a program before!
    //And to...
    //https://learn.sparkfun.com/tutorials/esp32-thing-hookup-guide
    //... for, in respect of the Sparkfun ESP8266:
    //"Arduino core also supports interrupts on any pin with the attachInterrupt() function."

    attachInterrupt(digitalPinToInterrupt(button_pin), changeDoorStatus, FALLING); //Was "CHANGE". Interrupts: Very cool. Story for another day.

    Serial.println();
    Serial.println();
    Serial.print("Connecting to ");
    Serial.println(ssid);

    //ADDED TO DEMO BY TKB... 2 of 2 to set static IP address
    WiFi.config(ip, gateway, subnet);

    WiFi.begin(ssid, password);

    while (WiFi.status() != WL_CONNECTED) {
      delay(500);
      Serial.print(".");
    }

    Serial.println("");
    Serial.println("WiFi connected");
    Serial.println("IP address: ");
    Serial.println(WiFi.localIP());
}

void loop() {
      if(flag){
          Serial.print("Connecting to ");
          Serial.println(host);

          WiFiClient client;
          const int httpPort = 80;//This is port at destination... not of sending ESP8266
          if (!client.connect(host, httpPort)) {
            Serial.println("connection failed");
            return;
            }//of "if (!client.connect(host, httpPort))

          digitalWrite(OutPutWithLED,LOW);//TKB addition... to confirm to user
             //that a POST is happening.

          String url = "/trigger/";
          url +=triggerName;
          url +="/with/key/";
          url += apiKey;

          Serial.print("Requesting URL: ");
          Serial.println(url);
          client.print(String("POST ") + url + " HTTP/1.1\r\n" +
                       "Host: " + host + "\r\n" +
                       "Content-Type: application/x-www-form-urlencoded\r\n" +
                       "Content-Length: 13\r\n\r\n" +
                       "value1=" + door_state + "\r\n");
          flag = false;
          digitalWrite(OutPutWithLED,HIGH);
      } //end of if(flag)...
      delay(10);
}//of Loop
Right! That's the code. Shove it into an ESP8266. Watch the messages on the serial monitor. Hook up the switch.
Right... assuming your email addresses are in place, off to IfTTT.com
Click "Sign Up", and supply the Gmail email account you want to use with IfTTT, and password. (At this stage, I'm not sure if that's the email account's password, to "let you in" to the next stage of signing up, or your chance to define the password which will control your IfTTT account. I think it's the latter. (If someone following these notes could let me know, I'd be grateful.
Sidebar: Along the way of all this, you will encounter three logos built around an "M".
There's the IfTTT "Maker" logo. (You have an IfTTT "Maker" account as part of your IfTTT account.) Then there's the "M" logo of Gmail. Your IfTTT account CAN be tied to a Gmail eddress (and should, to give you access to things you can't do unless it is), but it is only "connected" in that you signed up to IfTTT off of a Gmail eddress. AND, in the course of using your IfTTT account the way I will describe, each will become aware of the other. But IfTTT isn't (yet) just a sub-division of The Evil Empire. And then, there's the "M" logo of Makezine... nothing to do with any of this, but IfTTT projects do get discussed there. (Sidebar ends)
Once you have your IfTTT account, if you want a simple exercise to get started with, use a TIME "This" and a GMAIL (not EMAIL) "That". If you are ready to go at, say, 9:18, set up "If (time is 9:30) THEN (send me an email)
But! For what I am excited about, you have to go a bit fancier.
Start a new Applet (My Applets/ New Applet)
(Click on the blue "+this" to access the "specify the 'this'" page.)
Type as much of "WebHooks" as you need to into the search bar to filter the alternatives down. You want is shown below...
(In Feb 2017, "Webhooks" was called "Maker". You may see IFTTT "How Tos" which still refer to "Maker". By July 2017 you want to substitute "Webhooks" when you see "Maker".)
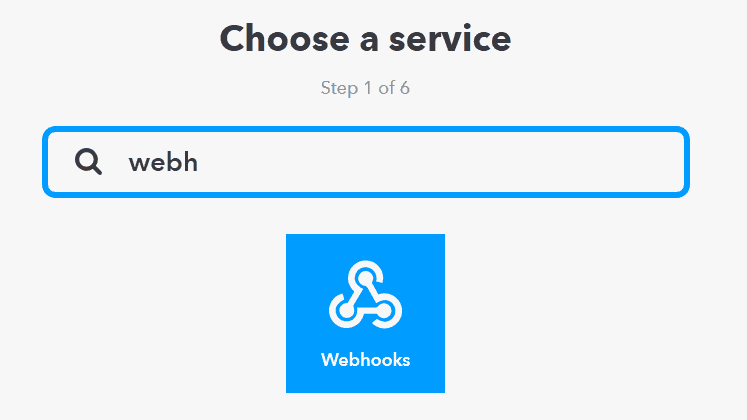
The next page, if you're using the Webhooks "If" creator, looks like a mere "help" page. Says "Receive web request...". But the "help" text is actually a button for getting to the NEXT page....
... Where you will be asked to name the event. Keep it simple for now. For this time, use "My1stTrigger". You will, over the years, make many, if you find you like IfTTT. What you put here is what you put in for q-FixThis in...
const char* triggerName = "q-FixThis";
... in the program in the ESP8266.
For now, that's it, as far as the "This" part. The wizard will take you on to the "set up the 'that'" part. And for that, in our example, select a Gmail (not mere Email) "action". That takes you to a button for "Send an Email". (I.e. "Set things up TO send an email.) Fill in a "To" eddress. You don't NEED to tinker with the rest, so, for now, probably best to leave the default entries. (You CAN alter these things.... just put your insertion point in the field and start typing.)
Once the screen is as you want it, click "Create Action"... and you are "done". Well. Your action is created, anyway. There's a "Check Now" button... but that merely checks SOME aspects of the new recipe. (You CAN, of course, go back and edit the recipe at a future date. N.B.: The text in the first box is JUST DESCRIPTIVE... and isn't updated automatically if you change a parameter of the applet.)
You also need to go along to https://ifttt.com/maker_webhooks
Click on "Settings" (upper right), and you'll get something like...
Account Info:

Connected as   (your IfTTT user name... defaults to first part of eddress)
URL  https://maker.ifttt.com/use/LongCodeOfGibberish
Where I've shown "LongCodeOfGibberish", you will have... what it says.
Make a careful note of that. It will be your LongCodeOfGibberish not only for this recipe, but for others in the future. Keep it SECRET.
(Also be advised: If you visit the page again, and click on "Edit connection", you will cause the key to be replaced. Once replaced, the previous key will be invalid and cannot be recovered! One key can be used to produce many triggers. I somehow got into a state where the user id shown here didn't match the user id I was using. I HAD to click "Edit Connection". This fixed the mismatch... but I had to revise any web requests which were using the old "line of gibberish" (more elegantly called "apiKey" in the code this tutorial discusses.))
Now, just in an ordinary browser, try to access....
https://maker.ifttt.com/trigger/My1stTrigger/with/key/LongCodeOfGibberish
... with LongCodeOfGibberish replaced with what was on your screen. You should get...
Congratulations! You've fired the My1stTrigger event
... AND an email should turn up, as per the "That" you assigned. (Give it a little time... it may not turn up "instantly". Give it maybe five minutes if you think it "ought" to be okay? (The process completes a lot faster, usually, though... even with my complex system of forwarding emails.)
(If you get sent to the Webhooks page (ifttt.com/maker_webhooks), there was some flaw in the URL you tried.)
A digression: Another way to test your applets:
If, at https://ifttt.com/my_applets, you click on one of your applets, you will go to a page which is all about it. And at the bottom, there's a "Check Now" button. I'm pretty sure that does NOT trigger the script. I.e. it does NOT takes care of making the "If" part true for a moment, so that the "then" part will happen. It appears to be more a syntax/ service availability checker.
Digression ends.
Earlier, I told you how to fix the...
const char* triggerName = "q-FixThis";
... line in the code for the ESP8266. You will probably have guessed that the "LongCodeOfGibberish" goes in place of q-FixThis in...
const char* apiKey = "q-FixThis";
Once those are fixed, and the ESP8266 up and running, pressing the button should...
1) Take the place of using a browser to send the following request...
https://maker.ifttt.com/trigger/My1stTrigger/with...
Pressing the button on the ESP8266 will send the request whenever you press the button you wired to take /D4 to ground as long as the button is pressed.
(The blue LED will flash on the ESP8266 when you do this, to let you know that it "saw" the D4 event.)
And, just as when you did it with the browser, IfTTT, when it receives the "thing", should send off the email you specified. In my case, as explained, I think, the email goes to "account A" first, and from there it automatically forwards to "account B". The email for account B was usually on that server within 20 seconds of me pressing the button.
I hope you find all of that cool? 'Cause I haven't time or energy just now to "explain" it all. Sorry! Thank you for struggling through with me; I hope your IfTTT recipe is working?
Not only can LAN or internet-connected Arduinos, including ESP8266s be the source of a trigger ("this") in an IfTTT recipe, programmed differently, Arduinos can "do things" as the result of an IfTTT action, the "then" part of IfTTT.
And the good news is that you get a double reward for struggling through the above. Sending a "do it" command to an internet connected device, sending a command as the "That" of a "If this then that" recipe is EASY... if you've got through all of the above. And the link in the previous sentence will take you to a tutorial on setting up such a recipe!
One last thing...
The code presented, as I hope you now know, will make an ESP8266 send "stuff" to IfTTT. And when IfTTT received it, it can trigger an applet. It can be the "if" part of the IfTTT.
The stuff the ESP8266 can be more than "make the applet do something". You can send up to three data WITH the "stuff"!
In the example code, the ESP8266 sends one datum. It always sends "closed". (When I started the project, I thought I was going to use the system to monitor whether a door was open or closed, but that got a bit confused along the way.)
If you are using the trigger to send an email, you can include the value of the datum in the email.
So, with a little work on the code, the ESP8266 could, once an hour, send a temperature to IfTTT. And, very crude, IfTTT could then send you an email with the current temperature at the ESP8266. And when you've got THAT working, you can tweak things again, and use the system to fill a spreadsheet with values, automatically. (Beats opening and transcribing 24 emails a day!)
You insert the data into the email by using...
{{Value1}}
... in the text of the email. This fetches data from the "Value1" field, which the nice people at IfTTT have filled for you, all ready to be used. (Click the "Add Ingredient" button to see the things you can insert this way.)
NOTE: You are limited: You can pass up to three data this way. You ocn't have to pass any. In theweb request, they have to submitted as values for "value1", "value2" and "value3".
HOW DOES ALL THIS HAPPEN?...
At the moment, in the ESP8266 program presented: It happens very crudely! But even now, we are not far from a good state.
Before I go further: A detail. The data type of the data we're talking about is "variable length text". So: When the details have been put in place, you can send data like "opened","closed","red","vermilion", etc. You CAN ALSO send "42". Or "1984".. Or 3.1315. BUT! All of these will not be "numbers". They will just be collections of characters. But, the receiving program can then convert things like 3.1412, and use it as a number. Perhaps I stain at a gnat.
For simple testing, sending the request from a browser, the following works to send a value for Value1. (You replace "XXXapiKey" with YOUR apiKey, in each case.)
http://maker.ifttt.com/trigger/doorbell17102/with/key/XXXapiKey?value1=99
To pass, in a "by hand" URL, more than one datum, you use...
http://maker.ifttt.com/trigger/doorbell17102/with/key/XXXapiKey?value1=99&value2=abcde&value3=1,234.56
To put values into a PROGRAM, which will send the web request to trigger the applet MIGHT be done the same way. However the example I worked from did it as shown in the code way up the page. That example (sends string in variable "door_state") is crude and limited. The following covers "what's next" in term of the development of this program's development...
You're going to have to make changes as indicated below...
    client.print(String("POST ") + url + " HTTP/1.1\r\n" +
       "Host: " + host + "\r\n"+
       "Content-Type: application/x-www-form-urlencoded\r\n"+
       "Content-Length: 38\r\n\r\n"+
       "value1=" + door_state+
       "&value2=" + "ABCD"+ //Note the "&" in front of "value2"
       "&value3=" + "12.34" + "\r\n");
       //The three data field NAMES are "set in stone"....
       //  but the CONTENT is up to you. The data you send
       //  can then be used in your IFTTTT applet... for
       //  instance, if the applet sends an email, the data
       //  can appear in the email.
       //You can send NO data fields, or 1 or 2 or 3.
       //HOWEVER: Before this will be of much use,
       //  the program must be made more clever.
       //At present, the total length of everything, from
       //  "value1" to "2.34", including the =s and &s, must
       //  be exactly 38... because of the
       //  "Content-Length: 38" line just before.
       //Fixed "easily enough"... I just don't have time for
       //  it just now.
       //"All" you need to do is...
       //First: Move the building of the line of parameter names
       //  and data to BEFORE the "Content-Length" line.
       //2nd: Determine the length of the current line by code, and
       //  insert, dynamically, the right value in the "Content-Length"
       //  line.
       //SIGH. PLEASE CONTACT ME IF YOU MANAGE IT, send the details,
       //  quoting "for webpage sg/arduino/art4ifttt.htm"... please!!
I apologize for the abrupt end! Questions welcome, but please cite the page: "http://sheepdogguides.com/arduino/art4ifttt.htm"
Getting everything in place IS a little tedious... but it costs next to nothing, and can lead to a LOT of fun!
If you visit 1&1's site from here, it helps me. They host my website, and I wouldn't put this link up for them if I wasn't happy with their service.
Click here to visit editor's Sheepdog Software (tm) freeware, shareware pages.. Material on this page © TK Boyd Feb 2017-July 2017
Click here to visit the homepage of my biggest site.
Click here to visit the homepage of Sheepdogsoftware.co.uk. Apologies if the "?FrmAht" I added to that link causes your browser problems. Please let me know, if so?
![]() Page has been tested for compliance with INDUSTRY (not MS-only) standards, using the free, publicly accessible validator at validator.w3.org. Mostly passes.
Page has been tested for compliance with INDUSTRY (not MS-only) standards, using the free, publicly accessible validator at validator.w3.org. Mostly passes.
AND passes...

....... P a g e . . . E n d s .....