You may find that the database included in OpenOffice delights you as much as it has me. This page tries to help you use it.
Remember that Open Office, including ooBase, is free. Don't let that fool you, though. Big organizations, governmental and civilian, have adopted it as their standard office suite... and saving million$, but still Getting The Job Done. And making things easy for users on different platforms... Linux, Mac, Windows all spoken here!
There's more about ooBase in the main index to this material. Adabas? Star Office? Ancient history.
This page is "browser friendly". Make your browser window as wide as you want it. The text will flow nicely for you. It is easier to read in a narrow window. With most browsers, pressing plus, minus or zero while the control key (ctrl) is held down will change the texts size. (Enlarge, reduce, restore to default, respectively.) (This is fully explained, and there are more tips, at my Power Browsing page.)
Page contents © TK Boyd, Sheepdog Software, 2/06- 7/16.
Before I start, my thanks to the good people at oooForum.org. Without them, and others at the new forum, I would still be trying to build my first table.
The subject of this tutorial has come up at the forum many times. I've tried to do what is below many times. It was a post by VooBase at oooforum.org/forum which was the final push to take me out of Ignorance into Enlightenment.
Oooforum.org seems to be gone. I have a page with news of my current preferred forum. Contact me, by all means, if you wish, but for a general question, at a forum you can probably find the answer already awaiting you, if you just search the old posts, or get several minds to work on it, if you really do have a new question.
Imagine a very small police force... let's say it is in charge of a island in the Caribbean.
It wants to keep track of citations people have received .
If you are a bit new to ooBase, it might pay you to read my preliminary tutorial, which more gently starts you down the road to the "all singing, all dancing" "answer" presented in the page you are reading now.
Warning: That tutorial is not a small one, and the one you are reading is a monster tutorial... but it covers a lot of skills and concepts. Please be assured that most of my tutorials are less taxing.
What the Chief of Police wants from his IT person is a simple form so that when a person is involved in an incident, the chief can quickly, easily, get a list of all the incidents in which that person's been involved. The chief wants a form with two lookups... one for first name, one for surname. If he selects "Bloggs" from all the surnames in the records, the second lookup is re-populated so that it only holds first names for which there is a Bloggs. When he selects "Fred" (having previously selected "Bloggs"), he should see (in a data sheet on the form) all of the incidents Fred Bloggs has been involved in. (The "incidents" lookup isn't achieved in the preliminary tutorial on this topic.)
For this tutorial I've set up set up and posted online a special database holding the names of people and "incidents". The incidents table holds a number for each incident (primary key for the table), the ID of the person involved, and a description of the incident. This is VERY VERY Badly Designed, as will become clear in a moment, I hope, but it WILL let you do a complex form of a kind you may not have met before. It will illustrate skills which will prepare you to go even farther in another tutorial which I hope one day to write. The tutorial I hope to write will use the well designed Paradise Police Force demo database, which is another of the things I have online for you. That, however, for the moment doesn't have many forms.
You can download the database for this tutorial, complete with the finished tables, etc. After you have downloaded the database, you may need to register it. (Main menu: Tools | Options | OpenOffice.Org Base | Databases: New) If you decide to build the database from scratch, register it. I had hoped that registering wasn't necessary, but I may be wrong, and it isn't hard to register it "just in case". (It worked, up to a point, just fine without registering, July 16.) You will, I fear, need to enable macros for the "optional, extra" answer developed in the last stages of this tutorial. (You don't need to enable them before you get to that part, if you are... as you should be... nervous about running too many macros from unknown sources.)
The database uses three tables.
The first is very boring: "People". It has three fields...
As usual, to be good test data, it pays to have several people with the same surname, several instances of a person called, say, "Fred". For this tutorial, it really would pay you do download the database, which is already populated with suitable data.
- - - - - - -
The second table, "Citations" isn't complicated either... just three fields again, but it is at the heart of the flaws in this database. What is supposed to go in the second field makes for unnecessary work for the user, and dreadful potential for errors. What is supposed to go in the third field, in part, is Just Weird, but necessary to keep this tutorial "sensible". Once you have completed the tutorial, you will be well on the way to doing the same job... but the Right Way. The table isn't complicated, but using it will be a little complicated.
The "Citations" table comprises...
Each record in this table is going to record that a person was involved in some incident. One of the Really Bad aspects inherent in the Bad Design of this database is that if two people are involved in a single incident, there's no reliable or unambiguous way to tell that, or to look it up. But you an get a list of what incidents any individual was involved in! More on the "one incident, several people" thing in a moment.
ID: This is the ID of the citation's record. It is not the ID of a person. Don't get the various "ID"s confused.
PersID: Each record records that someone was involved in an incident. The PersID field will hold the ID for a person, as coded in the People table. If Lucy Bloggs has People.ID "2" (as she does, in the copy of the database you can download), then a "2" goes in the Citations.ID field for every record of an incident Lucy was cited for.
You can set up a relationship between People.ID and Citations.ID in order to prevent users from entering numbers in Citations.ID which do not yet appear in People.ID... and you should use such data validation tools in a "proper" database. Even though this is only for illustrating something about building a type of form, I'd recommend that you do set up the relationship if you know how.
Nature: Here's the strangest distortion of "sensible" operation in the database. Suppose we are entering a record about an incident for which Lucy was cited. As already explained, we put "2" in the Citations.PersID field. So we have already "said" that this record relates to Lucy. Even so, we are going to repeat that information. (A Very, Very BAD idea.... we try to avoid having data repeated in the database. For many reasons.)
Let's say Lucy was guilty of littering. The record in Citations would be:
That "LucyB" at the start of the Nature field's entry is a dreadful kludge. Just bear with me. In every record, in the Nature field, put the offender's name (abbreviated if you like), in brackets, before the description of the nature of the offense. All will be revealed... much later.
I said that it is a Bad Idea to repeat data inside a database. The simplest reason can be illustrated with out Citations table. Is would be easy to make an error, put "3" in when we meant "2" in the example just given, and create a record which, for the data in the database you can download, is internally contradictory. The record says in Citations.PersID that Charles Brown (People.ID=3) was the offender, whereas the "(LucyB)" in the start of the Citations.Nature entry says that the record relates to Lucy. Such problems don't arise in properly designed databases. But, as I've said a few times, this database is good for illustrating a form design technique, so we'll live with the flaws.
- - - - - - -
You know the saying about some things being like running into the surf? Well this is one of them. Be strong!
The third table is just weird. Simple. But weird. But Worth It, because, as you will see if you are tough enough to stick with this, it makes something possible.
We will call it "Dummy". (It isn't stupid, but it is in some ways "false"). It only has two fields....
The ID field will be of type integer, and it will be the table's primary key. But it does not need to be auto-incrementing. (That's explained in a moment.)
SNam_Holding: This field should be of type text, and however long Surname is in the People table. The field will hold a surname "plucked" from the People table. (The "plucking" explained later.) Apologies for the dreadful name. It arose early in my experiments, and I'm funking trying to change it at this late date. Often you can change names, with ooBase successfully propagating those changes through to everywhere they need to be made... but I don't want to risk it here, now. Sorry.
I said this table was weird. It's no so much the table that's weird, as how we will use it. It will only ever have a single record in it. The record will change from time to time, but there won't be more than one. Readers with a programming background can think of this table as a global variable.
IMPORTANT DETAIL: Put something, anything into the table. Make sure there is no more than one record, but make sure there is one record. It can be, say, 1,"(Lucy)xx"
Well! That's all the tables you need! Now for the form that is the reason we needed all of the above.
Load the demo database. Open the form "PeopleByLookupNoMacro", play with it. The way you use it is as follows:
Click on a surname. Then you must click on the "Save Record" and "Refresh" buttons on the navigation bar. You can use the one on the form itself, or the one your ooBase brought up... if it did bring one up.
There are some asterisks over the record navigation bar on the form... a pair and a triple. (See illustration below) They were over the buttons you need to click for "Save Record" and "Refresh"... but I see just now, 7/16, as I run the database again on a new machine, that they are not correctly positioned anymore. Sigh.
Once you have done the "Save Record" and "Refresh", you should see one or more first names in the first data sheet (the "thing" with "First Names" as a heading). You will probably see some citation records in the second data sheet... but if you've added names to the database, without adding citations, you might choose someone who has been good, has no citations.
After the two button clicks, you should only see first names that occur in the database for people of the selected surname. One of those Firstnames will be selected as soon as you've done the button clicks. You can change to a different Firstname, if several appear, as they will for "Brown" in the database you can download. The second data sheet will automatically fill (and refill) with any citations recorded for different people as fast as you change the Firstname selected You only need to do the two button clicks if you are changing the Surname of interest..
That business of clicking the "Save Record" and "Refresh" buttons is very tedious. And unnecessary... if you will learn to do macros. Sorry. Scary, I know. I avoided them for years. Not too awful, actually, especially since ooBase 3.1, because 3.1 introduced the feature allowing us to store macros within a database. The macro you need is very, very simple. How to do this exercise with the macro, and avoiding the nasty "click the buttons" requirement is just a tiny little post-script at the bottom of all this. You will be told how to do it that way, if you want to. And if you don't, the solution presented without macros works, too.
At last! We are just about to start making the form.
Let me re-cap what it will have, what it will do....
Users will start by clicking on a name in the Surname selector.
We would like that to bring up the First Names associated with the selected Surname, and the citations of the first person in the list. If, as in the illustration, we want to know about the citations of someone else, we just click on the appropriate First Name. To achieve the result above, we first selected "Brown", and then "Charles" from the Browns.
The "(ChasBrown)" which is part of each citation record on display is "unnecessary".... but while we are working on the database, it helps us be sure that our form is selecting the right records.
A moment ago, I described what we want to happen. Sadly, without a macro, it won't work exactly like that. As explained before, we have to do two little clicks after we change the surname of interest. Getting rid of the need for that can be done with a macro, as be explained at the end of this tutorial.
After you select, say, "Brown", you have to click on the "Save record" button on the navigation bar, and then on the "Refresh" button. They are the buttons with two and three asterisks over them, respectively.
It seems strange, but there's a reason for the next bit of news, which is good news. Although you have to do the two clicks on the navigation bar to get the First Name and Citations data tables to fill with the right data, you do not have to do anything "extra" after clicking on the First Name appropriate to your enquiry.
Patience! We are nearly there. First I must digress on a little discussion to help you understand the basic principles. Without them, you might be able to follow a recipe, but you'd get stuck in some things you might want to do on your own.
I'm a pretty big fan of ooBase, but one thing annoys me. (Maybe it was inherited from earlier traditions.) The word "form" is used in at least two ways within the context of ooBase.
The "thing" we have above is a "form". I hope you have been using forms since your earliest ooBase days... they are the Way To Go for mundane things, and allow clever things, too. The ooBase main project manager window, quite rightly, implies that "Forms" are one of the four fundamentals of database work.
So far, in every case, I've been using the word "form" in it's first and usual sense.
There's another thing that gets called a "form" by ooBase. I'm going to call it a fform to distinguish the two.
You may not have come across the fforms yet, or if you have, you may not have paid much attention to them, or realized they weren't the same thing as "the" form you've been working with.
Start up a new form. As much as I like wizards for some tasks, sometimes they do too much behind the scenes. So, for this exercise at least, eschew the wizards. Use "Create Form in Design View".
That "form" is not a fform... although it contains one... more on this in a moment.
Use the "Toolbars" item in the Form Design window's menu item "View" to ensure that the Form Controls and Form Design toolbars are visible....

(They may be "floating free", or they may be "stuck" to one or another side of the Form Design window. You can drag them to where you want them, and resize them.)
The "OO version 3.1" in the illustrations was put there with photo manipulation software. This tutorial was reviewed in July 2016, using OO 4.1.1, and efforts were made to write up anything that now works differently.
Click on the Form Navigator button... it's the 5th one on the Form Design bar above. Note that from here onward, if you see "Form", then I speak of a "Form" in the sense of "form" that you've probably met before. Since I did not say click on the "FForm Navigator button...", I don't think that the Form Navigator is (primarily) about navigating fforms.... although that is a secondary role for the Form Navigator. You won't see the term "fform" anywhere within other ooBase documentation... it is my own device for differentiating between the two things the word "form" is applied to within ooBase work.
With a new form, opened in design view, not started with the wizard, when you click on the Form Navigator button, you will get a small window with the word "Forms" in it... I would call them fforms. We have ONE "form"... the "sheet of paper" we are going to put things on. Those "things" will be contained in fforms. The Form Navigator is your main way of getting to the fform you want.
If you have made some simple forms (one f) in the past, they will mostly have contained one fform. In that fform, on your form, you will have had table controls (what the wizard calls data sheets) and/ or text boxes, displaying data, and probably some label fields just to identify the things on the screen.
If you used sub-fforms (what ooBase calls, ambiguously, a "sub-form"), then you are already into the world of forms... even if you didn't know it, and probably couldn't (much) control it.
I'm going to put you in charge. "All" you have to do is hang in there. Don't start skimming. Don't let your eyes glaze.
Until you are told to, don't try running the form we are going to spend the next several minutes creating.
So far you have a new, but still empty form. You have the Form Navigator open. It has "FForms" showing in it, only with just one "F".
Right click on that, click "New", click "FForm" (ooBase spells it with just one F... that's the last time I'm going to explain that. You see "FForm" here, you look for "Form" on the ooBase page, but remember that it is not the "ordinary" form, it is the other thing. What that is should become more clear over the course of this tutorial.)
Beware: There will be a few places ahead where we are naming things. In such places, I will have "FForm" here, and you are supposed to type FForm(two F's) (or a word containing FForm) into your ooBase.
ooBase will add a fform to the structure displayed in the Form Navigator. It will be given a default name of "Form". Right-click on it to rename it "MainFForm". (Use two F's). (After you do the right-click, and choose, "Rename", it isn't obvious, but the name has been selected and opened up for editing... Just type the new name. As soon as you type the "M", the "Form" that was there will disappear... finish the new name, press enter.)
Before I give you your next instruction, a bit, I hope, of clarification: The "Form Controls" toolbar is not, as you might think populated with things to control the form. It is populated with "controls" (noun) which can be placed on a form. It is a (mostly) palette of "pieces" for building forms. There are also some buttons on the toolbar which make things happen immediately, like the one that is second on both of the toolbars illustrated above. They are just two copies of the same thing, by the way. (You click on that button to enter or leave design mode.)
Sometimes you see the term "palette" being used as an alternate for "toolbar".
Being sure that MainFForm is selected in the Form Navigator, click on the List Box icon on the Form Controls toolbar, and drag out a ListBox on your form.
(When I say "your form", I mean the big window which opened when you invoked "Create form in design view". Your "piece of paper" where you are building what the user will interact with.)
If the ListBox wizard launches, cancel it. You should be left with a ListBox on the form, though!
(The form controls toolbar has a "Wizards on/ off" button you can de-select, to suppress the launching of wizards when you add a control to your form.)
By now, the ListBox is probably selected in the Form Navigator. I think it would be a little more logical if "MainFForm" were selected, but it won't matter.
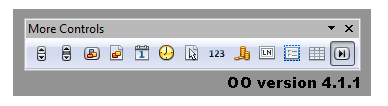
If the "More controls" toolbar is not already showing, click on the "More controls" button on the "Form Controls" toolbar, to add the More Controls to your screen. (The button is third from the right in illustration above.)
On the "More Controls" toolbar, click on the "Navigation Bar" icon (triangle-with-vertical-line, right-hand-most one below), and drag out a navigation bar on your form.
In the Form Navigator, right-click on MainFForm. Click "New", "FForm".... and the Window should now have....
FForms ((shown as "Forms", of course))
   -  MainFForm ((shown with two F's))
           ListBox 1
           Navigation Bar 1
           Form
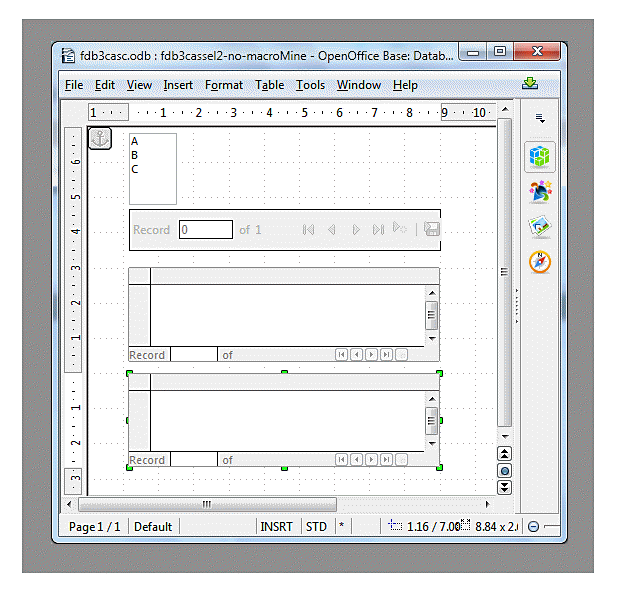
Save what you've done so far. Remember: It is saved within the database, as part of the .odb file. Call the form "fdb3cassel2-no-macroMine". (Free Data Base, level 3 tutorial, about CAScading SELection.) (The database comes with a form already created and working called "fdb3cassel2-no-macro" (No "Mine" at the end of the name). It does what your's will do.)
Rename the last item in the Form Navigator (i.e."Form"). Rename it "SubFForm". It is a subfform, just like ones you may have created with the Form Wizard.
Be certain that "SubFForm" is selected. Find the "Table Control" item on the More Controls toolbar. (Grid-thing- the right-hand-most-but-one in the illustration above.) Click on it, drag a "table control" out, on the Form.
A "Table Control" doesn't, exactly, "control" a table. A "control" is just one of the "things" you can have on a fform. A Table Control is a "Table Thingie", and there's one "behind" any grid of records from the database that is on any form the user deals with.
A "Table Control" is the basis of what the Form Wizard calls a Data Sheet. Don't expect the one we just added to be "complete" yet.At this point, in the Form Navigator, you should see....
FForms
  -   MainFForm
           ListBox
           NavigationBar
       -   SubFForm
                  Table Control 1
Because I have done things in the order I have, the items in the diagram are arranged in a nice order. The order doesn't really matter, though. It is the indenting that is important. (The order can be a pain... if it isn't right in something you do, don't bother fighting with it. If it isn't, now, as above: Scrap what you've done so far; start again. Sorry!)
Right-click on "SubFForm". Click "New". Click "FForm". Change the name the new fform from "Form" to "SubSubFForm". (Put two f's in the name, to help you remember it is a "fform", not an ("ordinary") form.
Making sure that SubSubFForm is selected, add another TableControl to the "sheet of paper" in the Form Design window.
In the Form Navigator, you should now see....
FForms ((showing as Forms))
   -  MainFForm
           ListBox 1
           Navigation Bar 1
        -  SubFForm
                  Table Control 1
              -   SubSubFForm
                         Table Control 1
"Table Control 1" appears twice. The form would still work, but just to make things easier, rename the first one "FirstNames" and the second "CitDet" (For "Citation details", i.e. the "Nature" (of citation) field from the Citations table.)
Just re-doing that, just now, 6/16, was hard work! (I was checking the page for readability, and making little tweaks to reflect minor changes in how OOBase names things since I first published this tutorial.
You have my admiration if you are slogging through this as a student.
You are about, I hope, to have your reward!!
Well... not quite. We have got our form assembled. All the pieces for it are there... but they don't "work" yet, do they? (Don't try it yet).
Before you forget... click "Save" again. I hope you have been doing that from time to time, as you would, say, with a wordprocessing project? And will continue to do so!
We really are making progress. Slow, perhaps, but steady and solid. We've two more "hard" things to do, and then some easy, and our "without macros" version is done! (Adding the macro, to make it "slicker" is easy! (And explained.))
The first hard thing is getting to grips with what a fform is, and why it matters.
A fform is a container.
In the form we have been building, we are using nested fforms. The indenting in the Form Navigator diagram tells you what is contained in what. It is a bit like folders within folders on your hard drive.
The fform SubSubFForm, and the Table Control it holds, "CitDet", are contained within the fform SubFForm. SubFForm also contains the Table Control "FirstNames".
And this "contained in" business continues up another level. SubFForm (and all it contains) is contained within MainFForm. Also in MainFForm, at the same level as SubFForm, is the ListBox and the NavigationBar.
Look again at the diagram in the Form Navigator. The hierarchy of what's contained in what should be clear.
You shouldn't need to rearrange things in the Form Navigator at this point, but if, in a different project, something has somehow got in the wrong place (in the hierarchy, is at the wrong "level"), you can, subject to consequences, drag things around to change their place in the hierarchy.
The important thing is how far an item is indented. You can't (I don't think) do anything about the order of items. The indents are everything.
All of this hierarchy business is important to your fforms, but that should emerge later.
It will do no harm to "run" your form at this point!... but it won't do much yet.
You "run" a form by temporarily switching the design mode off. There's a button on both the Form Design and Form Controls toolbar for this. (Second from left, "pencil/ ruler/ draftsman's triangle".)
This is the second hard thing, but sadly we must deal with it before we can move on the to the easier things.
The Table Controls, which we come to in a moment, are pretty simple. They look like tables, can hold data from tables, and if edited, the data in the tables ends up edited as well.
The List Box is a whole lot more complicated. I'm not even sure I "properly" understand it, so take the following with a pinch of salt... but I think it is roughly right. I can at least Do Things with a List Box, even if perhaps I misunderstand the mechanism!
A List Box can be used to change what is in a field in a record. (They have other uses, too.)
Two things have to be set up to make a List Box change a record.
First, of course, you have to say what field, in what table, should get values as a result of activity in the ListBox.
This is one of the places fforms come into the picture. The List Box doesn't, directly, connect to a table... but the fform it is in does!
Every fform is connected to a table. (Or to something we don't have to worry about yet that looks like a table.) Anything contained within the fform (like our List Box!) is also connected to the table. That's part of how fforms work.
List Box 1 is in MainFForm. In the Form Navigator window, right-click on MainFForm, and click "Properties" from the menu. (If "properties" isn't available in the menu, then the window displaying MainFForm's properties is already open somewhere.)
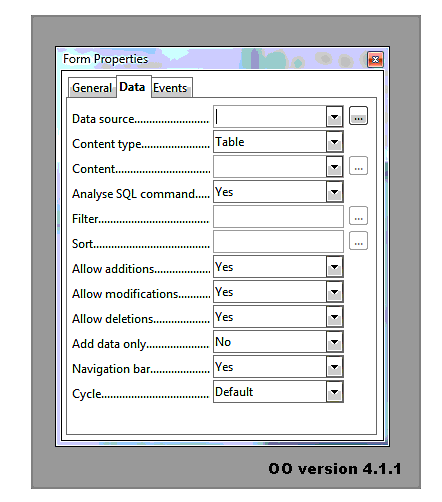
Once the form's properties dialog is open, click on the Data tab, if you weren't already looking at that tab's fields.
I'm sorry to have to tell you that I don't fully understand everything that is going on here, and so you are a little bit on your own. Apologies.
We need to get our form connected to the underlying tables. I thought that would be "automatic", but hit a few bumps in the road.
The first time I made the form, as far as I can recall, everything was automatic... I didn't at that time even realize there were issues!
However, when I went back to this, worked through it as I imagine that you, Gentle Reader, are, I encountered A Problem.
I downloaded the database from my own website, by the same link available to you on this page. I had created a folder to put the .odb file into, and then I opened it up, and proceeded to create, from scratch, as part of the recently "installed" (by download of the .odb) database "fdb3casc".
When I say "proceeded to create", I mean that I was just working my way through the instructions here.
If, at some point, you create your own database, from scratch, using some of what I've demonstrated here, I think you will find that it "just works". Because when you started your database, the "registration" issue may have been taken care of. I suspect that The Problem arising for us trying to add a form to a downloaded database may be "registration" related. I think you would find that the "Data source" field was already filled for you.
But! Here's what you do...
A moment ago, we opened the form's Form Properties dialog, and moved to the Data tab.
We need to Do Something with the empty field to the right of the label "Data source". If you click on the down- pointing- triangle to the right of the edit box, you may or may not get a list of databases... depending on previous OOBase work... and even if you do, I doubt that the one you need will be in the list at this point.
I'm going to tell you what I did in July 16. It may not be an answer, in which case I will do something further until I HAVE an answer! It may not be the best answer. It may not be the only way to achieve what we need. But it is what I did, my best guess. And I suspect that it is at worst harmless!
We are going to "register" the database. Don't worry. This isn't anything to do with telling Big Brother what you are up to. And I don't think it will slow your system down. I suspect it is a Good Idea... but must confess that I often don't bother to register simple things. I think it is about letting the main Open Office "central command" on computer you are using know where to find the database you are working on, so that other apps can access data from it.
(Leave the Form Properties dialog open... we will return to it in a moment.)
Go to the ooBase main project manager window.
From the menu, choose "Tools/ Options" and open the "OpenOffice Base" tree. Click on "Databases".
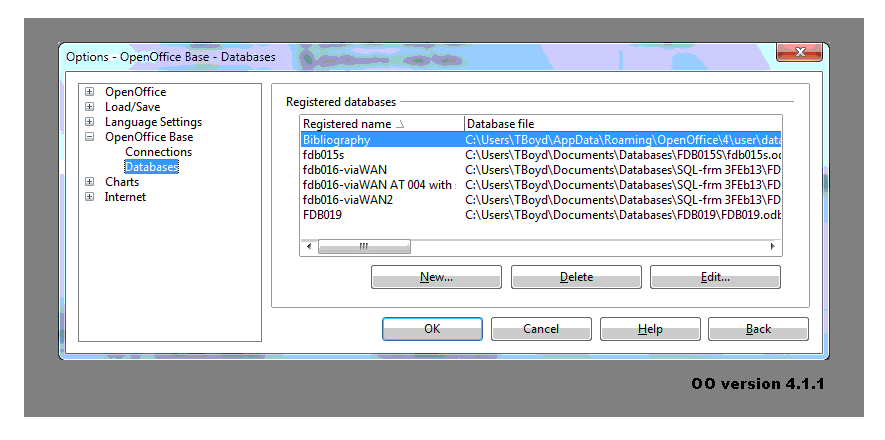
Click the "New" button... not to create a new database, but to add a new registration link to a database on the system. (I AM somewhat making things up as I go along. If you KNOW this is wrong, please get in touch??)
Use the Browse button to "drill down" to the database we're working on, and click the "Open" button. (We're not "opening the database", just "opening" access to it... I think! (I know we aren't opening the database.))
At this point, a cautious person would save all of his/ her work, back out of the system, and restart it from scratch.
I re-saved the database (for the 100th time), and then pressed ahead, just to give OpenOffice a chance to impress me!
Went back to the Form Properties dialog, and clicked the down- pointing- triangle to the right of the Data source edit box, and looked for the name I'd given the database for the purposes of the registration system. I may have overlooked it, or it may not have been there.
Undaunted, I closed the Form Properties dialog... and immediately re-opened it, tried again. And, lo!, the name was present! Clicked on it.
NOW my new form is "connected" to the tables I want to access with it! Hurrah!!!
STILL working in the Form Properties dialog, you should find that the second property, "Content type" is already filled with "Table"
The third property, "Content" (not "Content type") needs to be set to "Dummy", which you should be able to do easily with the down- pointing- triangle to the right of the "Content" edit box. When you click the arrow, you should get a list of the tables which are part if the database. If you don't, re-try the "registering" stuff above, and please don't be shy about getting in touch if you have an problems... so the next person can be spared hassles!
Assuming you do get the list of tables, what you do at this point is: Click on "Dummy", to make the "Dummy" table the data "behind" this form.
Now that you have set the fform's data content to the Dummy table, everything in SubFForm is dealing with that table.
While we're still in the properties window for MainFForm, also on the Data tab, make the following properties "No":
Allow additions
Allow deletions
We made "Dummy" a one-record table, by hand, once and for all during the database set-up. We don't want that to change. By the way, we haven't made it impossible to add records to the table... just impossible for anything contained within MainFForm to add a record.
Leave the Form Properties window open.
In the Form Navigator window, click on List Box 1.
Now in the Form Properties window, we see the List Box 1's properties. (this isn't illogical... List Box 1 is a part of our form.)
On the Data tab, use the arrow to the right of the "Data field" edit box to expose the list of fields available. Choose "SNam_Holding".
You have now set up the List Box to send data to the SNam_Holding field of the table called "Dummy". That's pretty cool! I'm not sure I understand quite all that implies... but I think I understand the basic idea. I do at least know I need to do it to make what I want to work to work!
What is going on?? is the forlorn cry I hear from someone hiding at the back of the room.
Good! Someone is thinking. You won't get far with computers if you are happy with simple "just press this" "explanations". I hope I can't make it a little less unclear in the coming paragraphs.
We're going to put, say, "Brown" in that field of that table when we want the first names of any Browns to appear in the first table control, (data sheet), the one we named "FirstName". How can ooBase do this for us if we don't put the surname we're interested in somewhere?
Moving on....
Now we'll deal with the other part of setting up a List Box. We've set up what field of what table is going to be filled... now we need to determine what values can go in the field. We'll start with something very trivial, and get fancy in a moment.
In the Form Navigator window, click on List Box 1. On the Properties window, go to the General tab. About half way down, you will see "List entries". Whatever is here will be the things you can choose between when using the List Box. Type an "A" in the box, without the quote marks, and don't press the enter key yet. Press SHIFT-Enter, and then press "B". Shift-Enter again, and press "C", and now, at last, press the enter key in the normal way.
While you were doing that, you should have got....
A
B
C
.. but as soon as you pressed the final "enter", it turned into...
"A";"B";"C"
Don't worry... all is well.
Hmmm... we need to digress. I see I haven't at any time given advice on WHERE to put the various controls on our form. Or how high and wide they should be. The following shows them roughly the right sizes, shapes, arranged, roughly in the order we created them...
Going back to here we were before the digression...
Run the form, i.e. switch out of the design mode. (The second button on either the Form Controls or Form Design toolbars, if they are as they are in the illustrations above) will accomplish this.
You should have a form with a List Box offering A, B or C.
Click on one of them, and click on the "Save Record" button on the navigation bar. (The bar is the control under the "A/ B/ C" "box" in the illustration above.
Congratulations! You will have saved the letter you chose to Dummy.SNam_Holding... but you can't see that you've done it, yet. (You could, if you had a form to view the table's contents open in a separate window, so you could see if things were working properly. If you go that route, you must click the "refresh" button of that window before you will see the effect of selecting a letter.)
But! We didn't want to put "A", "B" or "C" in Dummy.SNam_Holding. We were just making a start.
Onward. You can leave "A";"B";"C" where it is in the List Box's properties. Even though those values will be ignored when we make the following changes:
Go back into the design mode. On the List Box's properties Data tab, change "Type of List Contents" to "SQL {native}". And in the next property, "List Content", put....
SELECT "Surname" FROM "People"
.. and try running the form. (That's just a normal little query, by the way. You'll soon learn to write them.)
It "sort of" works. (If you are now seeing....
... in place of the old "A / B/ C".
If all is well, you are now getting a list of names on the screen, not A", "B", "C".
You should be seeing, one name to a line: a blank line, then Bloggs, Rochet, Bloggs, Brown, Brown.
But we don't want Brown and Bloggs appearing twice each in the list!
Easily fixed. Just add the word "Distinct" to our previous query, thus:
SELECT DISTINCT "Surname" FROM "People"
Ta! Da!... the List Box works! (Remember that we need to click the "Save Record" button each time, until such time as we have the macro doing that for us.) We now have a way to put the surname we are interested into the sole record in the Dummy database. In a moment, we'll use it!
One quick aside: And even better query would be....
SELECT DISTINCT "Surname" FROM "People" ORDER BY "Surname" ASC
Make the change, if you wish. Not "necessary".
In the Form Navigator, click on SubFForm. With the property window, as before, make...
... 1- Data source: (Whatever you named it in the "registration" process) (Same thing you had before.)
... 2- Content type: Table
... 3- The table that SubForm is connected to: "People".
Now comes a bit that may be tricky to understand. Be sure that the forms wizard is not on. (You control that with the last button on the Form Controls toolbar.
On SubFForm's Data tab, there are two properties which we need to set as follows. The button {...} to the right of the properties' fields tries to make it easy. Either one of them should bring up the following without the "Surname" and "SNam_Holding" entries, which you "fill in" using the downward pointing triangles at the right of the two edit boxes.
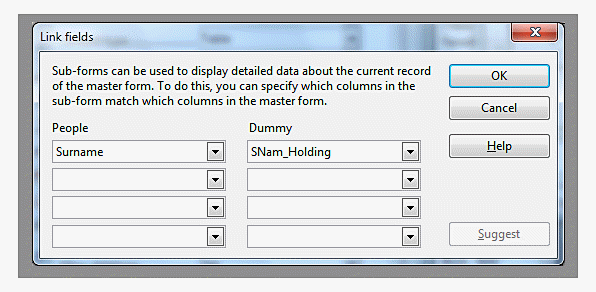
When that's been done, and you click "Okay", you should see the following entries on the data tab of SubFForm's properties...
Link master fields..... "SNam_Holding"
Link slave fields........ "Surname"
Analysis: Because SubFForm is contained within MainFForm, the "master" is the table tied to MainFForm. The "slave" is the table tied to SubFForm.
The SNam_Holding field will hold a surname. When we set fforms and subfforms up like this, we are creating an opportunity for filtering. With the "master" / "slave" link, we can create something very like a query. From "People", within SubFForm, we are only going to be dealing with those records which, in their "Surname" field, match whatever is in the "SNam_Holding" field of the currently record in Dummy. ("The currently selected record", in Dummy, will always be the one record. But in just a moment we'll see a case where there are multiple records in the master table.
A slight diversion: When you clicked on the {...} to the left of "Link master..." or "Link slave..." a little dialog came up. I find a choice made by the ooBase writers confusing. To me, it would be more intuitive if they put the "chose a field from the master table" item on the left.
Whatever. In the example we have just worked with, the field names make it impossible to go wrong. (A good reason to choose field names carefully!) Another time things might not be so clear. Just remember: The master table is the one linked to the fform "above" (in the Form Navigator hierarchy) the slave table's fform.
Don't struggle with that too much on a first pass. We are about to do something which may shed light on the issues.
But before we can do that, we need to get some FirstNames appearing. We have a nice table control in SubFForm for that... but we haven't finished it yet.
In the band across the top of the table control, where you would expect column headings, right click. And click on "Insert column" when that appears.
Insert a Text Box.
Next, get the column's properties displayed in the window we've been using to set all those other properties. Just clicking on the "Text Box 1" label which has appeared should be sufficient. Or right-click on it, choose "Column".)
On the General tab, change "Label... Text Box 1" to "Label.... First Names". (While we're at it, change the Name to laFNam.)
On the Data tab, select "FirstName" as the field data is to be fetched from. Remember: The table we are dealing with was been set when we assigned "People" to SubFForm, the fform containing the Table Control we are currently editing, "FirstNames".
Before you can see what we've done working, you may need to adjust the width of Navigation Bar 1. You need the "Save Record" and "Refresh" buttons visible.
AT LAST!!! If you run the form (leave design mode), and click on a surname in the List Box, and remember to click on both the "Save Record" and "Refresh" buttons of the Navigation Bar (I stress "bar", as we have been doing so much with the Form Navigator.).... if you do all that, then you will see a sensible list of first names in the FirstNames Table Control. You'll see the Browns in the database after clicking on "Brown", and the SaveRecord and Refresh buttons. And the Bloggses, if you... etc.
Hurrah!!! At last! Something non-trivial WORKING!! (I hope! Let me know if you find gaps in the instructions for getting here.)
You may find that you want to adjust the width of the column. That is easy to do- just go back into design mode, and drag the vertical line which marks the right hand end of the area where the column heading is displayed.
(There's more on relationships and joins in a short(er) page I've done talking about these important concepts in general terms. They are not the same thing, but the differences constantly blur in my mind, and I hope to help you fight that problem. (You've just been making a join.)
Moving swiftly (for once) onward...
Now tie the Citations table to SubSubFForm. This is just a repeat of what you did above... with the table's Data Content being "citations". The link fields are...
Citations. PersID
People. ID
Putting that another way, when you've done that, you will be able to set the links for SubSubFForm as follows:
Link master fields..... "ID"
Link slave fields........ "PersID"
That deserves some analysis. We are saying that we want to see records from the Citations table which have, in Citations.PersID (which is not that table's primary key, nor the field with the citation's ID. It is the field in a Citations record which tells us, in "coded" form, what person was cited over whatever the record records.
I said that with the link fields we are saying which records we want to see from the Citations table. The choice will be made as follows: A single record from the People file will be selected in the Master table... the one in SubFForm. We are only displaying what's in the FirstName field of that record, but the computer still "knows" what is in every field of that record. For the purpose of selecting Citations records to display, the computer has been told to filter out any Citations records which do not have, in PersID the same number as was in the ID field for the People record currently selected in the Table Control on the form as part of SubFForm.
So! That's the analysis. Set the fields as above, and all that's left is to create a column in the Table Control "CitDet". Set it to display Citations.Nature. On the General tab of CitDet, set the Label property to "Cited for...", and the column's name to laCit.
That, at last, is what it takes to get the form fully working... as far as it can be got working without an itsy bitsy macro.
By the way... don't be alarmed if you ask the database for George Brown's citations, and the "Cited for" table is empty... he has no citations in the database, as distributed.
(Forgive a little self-indulgence? I'm leaving in the following, which was true at one stage in this tutorial's genesis: "It is 2:10 am. My eyes are crossing. I'll extend this later." End of self-indulgence.)
A few words about macros in general....
Until a few ooBase 3.1 came along, using macros with ooBase was a little tedious. Not impossible, just not as elegant as it became at version 3.1 of ooBase.
Not everyone like macros.... I'm one of those who shirks them. But they do have a place in ooBase work. You don't need them in every place where some people are happy to use them... but you do need them in some places.
July 16: After many hours (which I didn't have) over several days, this tutorial was nearly much better than it was!
Right at the final fence, I almost "fell".
I'd got "everything" working, OO 4.1.1, and the text polished...
But the "do it with a macro" part was not working. I could have sworn it worked previously.
The "secret": The problem lay with the security settings of my OOBase installation. (That's an area you need to be careful with, by the way.) From the main ooBase main project manager window, select Tools/ Options/ OpenOffice/ Security.
Set the security on macros to "medium", "Confirmation required before...".
And then close everything "Open Office", and re-open it, and the database.
While most settings can be made "on the fly", most will take effect immediately, changing the security setting on macro execution only prepares the way for how things will behave the next time that Open Office has a fresh start.
Whew. It would have been an enormous blow to get this far, and not be able to deliver the "grand finale"!
If you want to know more about macros, have a look at the macros section of my ooBase tutorials. (I've set that link up to open the page in a new tab or window. just close it when you've looked at the macros stuff, and you will come back here.) No one needs to study any of what's there, but depending on your approach and existing skills, you may want to spend time there. Everything you need to complete the Paradise Police Citation Lookup form is below... but some parts are done "quickly", without giving you click- by- click guidance.
I will now show you how to create a form which is very like the one we just completed... but one without the navigation bar, one in which the Firstnames and Citations data sheets fill as soon as you click on a surname.
Remember that your Open Office environment needs to be willing to execute macros. I would suggest the "medium" security setting. In critical environments, you need to determining whether answering "enable macros" at the beginning of a session enables them for all documents in a current session.. dangerous... or whether you get asked again, if you open a second document.
Close everything except the ooBase main project manager window. Go to the Forms section of that, if you are not already there. Right-click on the PeopleByLookupNoMacro form supplied when you downloaded the database. Click "copy". Still in the pane with the names of your forms, but not over any of the names, right-click again. Click "paste". For the ".. name of object to be created" enter "PeopleByLookupWithMacroMine".
Double click on the name of that form, to run it, and make sure that, so far, it works the same way as your own "NoMacro" version, just created from the instructions above.
Close the window with the running form. Re-open the form, but this time use right-click, and choose (open for) "edit".
Re-open the form navigator if it disappeared along the way.
Those of you who downloaded the database will already have the macro you need, and you will already have the macro library that the rest of you will have to create.
But how to "see" it??
Here's what you do...
From the ooBase main project manager window's "Tools" menu item, choose...
Macros...
Organize macros...
OpenOffice Basic
That should take you to a dialog showing you what macros are available. You should find, if you click the little "+" in front of the database's name ("fdb3casc.odb") a container called "Standard", which should hold a container called "TKB" (my initials).
That "Standard", and its contents, is stored in the document. Anything those macros do will only do it to that document. You aren't changing how your Open Office behaves across all of the documents opened with it. And you are ensuring that the macro(s) you add will be available to the document, even if you move the document to a different computer.
Click on "TKB", and you should see a macro called "Reload" in the "Existing macros.." pane. (I'll explain that in more detail in a moment.) The macro is nothing more than....
Sub Reload (oEv as object)

oEv.source.model.commit()
oEv.source.model.parent.GetByName("SubFForm").reload()

End Sub
(By the way, it really ought to have been called "SaveAndReload", or even "SaveDataAndReloadForms")
If you are comfortable that you can create or access the Reload macro, you can skip over the next few paragraphs, down to "Caught your rabbit..."
For those who were NOT comfortable, here's a recap and more details...
From the main menu of any of the ooBasic windows, invoke "Tools | Macros | Organize Macros | OpenOffice.org Basic...."
Create or access the macro as part of the database. If you've used the name I instructed, in the "Macro from" pane you will see "fdb3casc.odb". Double-click on that. If you downloaded the database, it already has a module called "Standard". Double-click on that, and you'll find a module called "TKB" (my initials). If you haven't downloaded the database, or you want to be sure you can make your own macro, then (with fdb3case selected), click "Organizer"... a bit confusing... you are going into the organizer when you are already in it... but Just Do It.... Click "New". Give your module a name. Click "Edit"..... and you should be at....
... a window with "REM ***** BASIC *****" at the top. You fill the macro given above into this window. (Get rid of the "Sub Main...End Sub" that was there if you were not working from an existing macro module).
So! You've "caught your rabbit"... I mean macro.
Now we'll use it. I will again state telegraphically what you need to do, and give experienced users a way to skip over the "click- by- click" help.
You need to assign the "Reload" macro to the "Item status changed" event of the ListBox.
That doesn't sound so bad, does it? If you can do that with help, you can skip over the next few paragraphs.
If what you are doing is a complete mystery, you really ought to study my "using macros with ooBase" tutorials. But if you just want to know what button to press....
Use the Form Navigator to access the properties window for ListBox in the usual way. Go to the Events tab. You haven't been there with me before, at least not in this tutorial.
Click the {...} button to the right of the box to the right of "Item status changed" (third line).
That will open the "Assign Action" window, full of lots of Good Things, but not the one you need. Click the "Macro..." button in the window's upper right.
Drill down into the fdb3casc library until "Reload" appears in the "Macro Name" pane. Click "Okay", which takes you back to the Assign Action window. Click "Okay" again, and you should be back to the Properties- of- ListBox window, with a great long complicated "thing" to the right of "Item status changed"... something with "Reload" buried in it.
Now that you have created the macro, and arranged for it to be triggered whenever you click on an entry in your listbox full of surnames, try your form again.
(You can delete the navigation bar from your form now.... it no longer has any role to play.)
An annoying little "rough edge" remains. Sometimes when you go to close the form you are told "The content of your current form has been modified. Do you want to save your changes?". Don't worry... it is just talking about some data in the table "Dummy" (I think). You can say "yes" or "no" to the question... no harm (or good) will be done either way. That problem shouldn't arise... I leave fixing it as an exercise for the student! (It may involve a new macro to save the "Dummy" record as soon as the user clicks in ListBox. It may be as simple as changing which ListBox event our existing macro is assigned to.)
A note on doing this "properly"... starting with a review of what was wrong with how it was done here, and why it was done that way.
There was nothing wrong with the forms created in this tutorial. (Bold claim!) What was "wrong" was seriously wrong because it was in the design of the underlying tables. Unless the project is started from scratch, with a different schema, it is forever doomed. "A house built on sand...." and all that.
The big flaw is expecting humans to deal properly with "ID codes". In the schema we have, when, say, Fred Bloggs picks up a citation, the data entry person has to put "0" into the record along with the description of the incident. It is MUCH too easy for the data entry person to accidentally put, say, "4", which would link the citation to George Brown.
But that isn't really a problem with the tables, it just highlights a fault with the provided data entry forms.
Less easily overcome is the fact that in our schema we do not have a table for the incidents giving rise to citations. Only as long as no more than one person is involved in any specific citation-generating incident, we can get away with this. But a table of incidents, or their analogue, is going to be a necessary part of any real world database along the lines of the one in the teaching exercise.
Once that table exists, each incident will be assigned an ID. And that ID will be an extra field in the Citations table. Then all sorts of things become easy.
So how could the form and other things be done better for our limited "citations tracking" objective? I'm speaking of during the time while our system still requires the data entry person to look up the ID codes for people.
Hmmm... I wrote something Brilliant below here.... and then realized it too was fatally flawed. (I had some circular logic which was going to create self fulfilling prophesies.) I've adapted what I'd written... but the result is strained. Just be aware that I am aware of its shortcomings. I leave it in not as a serious proposal of a "good solution", but as more "grist" for your "learn ooBase mill."
One bit of good news first: The name in brackets which we were including at the start of each Citations.Nature entry would be removed. So, some sample Citations data would go from.....
Citation ID    PersID      NATURE
     0                 0          (FredB) parking
     1                 3          (ChasBrown) litter
     2                 0          (FredB) speeding
     3                 1          (FredR) eccentric
     4                 2          (LucyB) smile
     5                 3          (ChasBrown) kite flying
     6                 3          (ChasBrown) parking
... to....
Citation ID    PersID     NATURE
     0                 0          parking
     1                 3          litter
     2                 0          speeding
     3                 1          eccentric
     4                 2          smile
     5                 3          kite flying
     6                 3          parking
Bit of bad news: We're going to add a field to the Citations table. We'll call it "PersonsInitials". (Or "InitialsOfPerson", if you want to avoid failing to use the possessive apostrophe.) It will hold two letters: the first letter of the cited person's surname plus the first letter of the surname. Not fool-proof, but a tripwire that will help sometimes. For instance, if George Brown, correct ID 4, were erroneously put in the citation table under ID 2, Lucy Bloggs's ID, then the mismatch in the citation between the ID (2) and the "gb" might be caught at some stage. It would be possible, of course, to build in automatic checking between these field values.
Now... we still need a check to help us be confident that the data entry person entered the right codes, but here's how we could do it....
First we build a query with a record for each entry in the Citations table. However, the query pulls together into one table the following....
Citations.PersID
Citations.Nature
Citations.PersonInitials
People.Surname    (Using the record from People where
                                    PeopleID matches what's in
                                    Citations.PersID for this line of
                                    the query result)
People.Firstname   (Ditto)
Once we have the results of that query available, we modify the form that this tutorial was about. In the final data sheet, instead of just displaying Citations.Nature, we display, from the query result, the records (selecting for display, as discussed long before here, just those records in the query where the PersID is right for the person designated by the ListBox plus the further narrowing of the selection achieved from the selected line in the Firstnames data sheet.) We display not only the nature, but the Citation.PersonsInitials. It might even be possible to set up some programmatic checking that the PersonsInitials are not in conflict with the Surname and Firstname. (There would be no reason to fetch them from People into the query result, otherwise. I've figured out the fetching... you figure out the checking? :-) And the reporting of discoveries of invalid data!)
Another part of the Right Answer, of course, is a data entry form similar to our "List Citations" form. Users would click on a surname, click on a firstname, and then enter a new record in the table, as opposed to merely viewing previous citations recorded against that person. The computer, behind the scenes, inside the form, would take care of turning the surname+firstname into an ID number, fetched from the People table. Write in and tell me how you did it when you complete this exercise!
Well. That has been a bit of a marathon. Thank you for reading through the tutorial. Rest assured that most tutorials in the site are MUCH shorter, much better organized.
However hard reading it may have been, I can assure you that researching and writing it have been "interesting" experiences....
(As was the multi-day effort in July 2016 just going through it to check all was well with it in OO 4.1.1, polishing, expanding, fixing little things to match 4.1.1's defaults, etc, etc....)
Facebook "Likes", mention of the tutorials in forums, etc, much appreciated.
I dislike 'fancy' websites with more concern for a flashy appearance than for good content. For a pretty picture, I can go to an art gallery. Of course, an attractive site WITH content deserves praise... as long as that pretty face doesn't cost download time. In any case....
I am trying to present this material in a format which makes it easy for you to USE it. There are two aspects to that: The way it is split up, and the way it is posted. See the main index to this material for more information about the way it is split up, and the way it is posted.
PLEASE >>> Click here to visit editor's Sheepdog Software (tm) freeware, shareware pages <<< PLEASE
If you liked this ooBase tutorial, see the main index for information other help from the same author.
Editor's email address. Suggestions welcomed! - - - Want a site hosted, or email? I like 1&1's services, .
![]() Page tested for compliance with INDUSTRY (not MS-only) standards, using the free, publicly accessible validator at validator.w3.org
Page tested for compliance with INDUSTRY (not MS-only) standards, using the free, publicly accessible validator at validator.w3.org
. . . . . P a g e . . . E n d s . . . . .