Filename: s0MySqlDoInstMSWBuser.htm
This page is "browser friendly". Make your browser window as wide as you want it. The text will flow nicely for you. It is easier to read in a narrow window. With most browsers, pressing plus, minus or zero while the control key (ctrl) is held down will change the texts size. (Enlarge, reduce, restore to default, respectively.) (This is fully explained, and there are more tips, at my Power Browsing page.)
Page contents © TK Boyd, Sheepdog Software, 3/13-5/20.
A new version of this page is available at new 5/2020 version of what was covered here a long time ago, when screens looked different, etc.
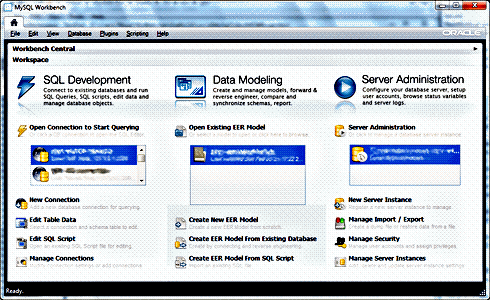
This is what you would have seen, ages ago, after a splash screen, when you launched MySQLWorkbench....
(The image is low resolution in deference to those with low bandwidth internet connections).
Note that there are three main activities which can be undertaken with the Workbench: SQL Development, Data Modeling, and Server Administration
The first thing you see under each heading is a box, which is probably empty, on your screen, if you haven't used MySQLWorkbench before now.
Those boxes are for holding, roughly speaking, "shortcuts" to particular working environments.
Thankfully, what I am going to explain in this section you only need to do once. You may want to come back to it, and make tweaks, etc... but what is described in this section should suffice for some time to come.
N.B.: There seem to be... I'm not entirely clear on this yet myself!... passwords in two distinct areas: Passwords to the MySQL server itself, and how it is configured, etc, and passwords to the databases served by that server. Of course, if you are going to successfully use one of the passwords to a database, the server has to be set up to let you in. But I think, as I tried to say, that there are passwords to the databases which give you, indirectly, limited access to services from the server, even though you aren't "fully" logged into the server when you are "merely" logged into the database to use it. Confused? Can't think why. Sigh. Executive summary: Be very careful to write down passwords as you create them, with notes on the context of what that password was for.
If you have already set up the server, generally, you can skip down to "Create User On Server".
Today, we are going to be doing some Server Administration, the work managed by the right-hand column of the top MySQLWorkbench screen.
Under the box under that heading, the first "link" is to "New Server Instance".
Make sure that your MySQL server is running(!)
Click on "New Server Instance", on the MySQLWorkbench page. You should see something that looks, in part, like...
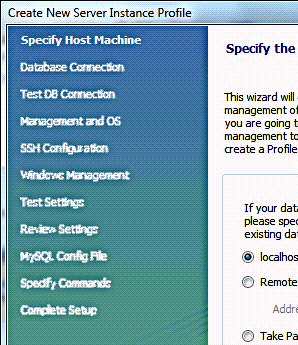
Okay... here we go. Very boring. But almost every item has to be exactly right. Sigh.
What we are doing is setting up, once and for all, everything we need to "get in" to administer a MySQL server. For the moment, you probably aspire only to administering one MySQL server, but the MySQLWorkbench has been designed to meet the wants of someone who is admin to many servers.
When we have finished the "Create New Server Instance" wizard, an entry should appear in the "box" below "Server Administration" on the top page of the MySQLWorkbench. In the future, we will just click on that box to re-connect to the server to do further admin work.
By the way... do keep in mind where we are going: Once we get the tedious details taken care of, we are going to be in a position to create new users of the MySQL database server this and other web pages at this site are all about creating, managing, using.
I will try to expand a little on what the various choices in the wizard mean, but will be concentrating on getting you set up to use a database called "tkb13mardemo", which is, in my scenario, running on a MySQL server which is on the same PC as you are running MySQLWorkbench on. Get something comparable to that simple case running... that's "crawling", before you try to "be clever", to "walk", or "run"?
(You have to have created a database called "tkb13mardemo" before starting the following for it to work exactly according to the plan below. You will have done this, if you are working through this page after doing the pages which precede it on my tutorial site.)
I think "local host" is actually the right entry for what we want to do. I also think that I sometimes have entered "Remote host: 127.0.0.1", which is, final "I think" just another way of saying "local host"... so I don't know why I used that instead of "local host". Go with localhost for now! (I may have to revise this later!)
I'm not going to say it again, but, now click "Next", to move to the next step in the wizard, which is....
N.B.: The word "connection" gets used in at least two different ways. Unless I am mistake, even MySQLWorkbench has trouble in keeping the terminology used consistent. The first "connection" you need, is a "connection" to a MySQL server. As a beginner, you will probably only have one MySQL server in your life... but many people use multiple MySQL servers, and need a way to quickly say "I want to work with that MySQL server today; I want to connect to that server."
Another sort of connection is the connection between a client and a particular database on a particular server. One server can host multiple databases. (And within each database there can be multiple tables!) Keep it all straight, as best you can!
(Server) Connection name: This can be pretty well anything. I wouldn't make it longer than you can help. It will not be the identifier for this set of parameters for connecting to the server which will appear in the box below "Server Admin" on the MySQLWorkbench top page. (We'll set that later!) For now, either use "tkb13mardemo", or something following that pattern. It isn't a critical setting. (Famous last words! "Isn't...."... as far as I know! I couldn't find a place where it was used!)
Connection method: Leave this "Standard TCP/IP"
Parameters tab properties: Leave Hostname and Port alone. With this server instance, leave the Username as "root", because your server has a user called "root" from when it was set up, but no other users, yet. (Creating another user is your first priority!)
Password: Leave the two buttons by "Password" alone. The root user should have a password... you created it when you set up the MySQL server, and if you don't remember it, you are toast, will have to re-install. By doing nothing with the buttons, you leave things so that anyone trying to go into your server's setting via this tool will have to know the password. If you use the "store in vault", they won't need to supply it. (You can click "Clear", if you are afraid you might have stored the password in the "vault" earlier.)
Default schema: Leave this blank. "Schema" is a term used much as I use the term "database", by which I mean a set of related tables, etc, pertaining to one data management task. There may be nuances, but if so, I'm not aware of them. I suspect that the authors of MySQLWorkbench were just trying to avoid the ambiguous "database".
Advanced tab properties: I'm delighted to say that you can just leave everything there alone, blank.
As soon as you clicked "Next" to finish the previous step, something like....
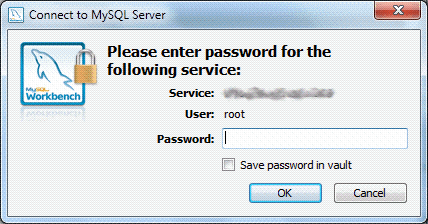
.... should have appeared on the screen. Enter your password for the root user of the server. You will be quite sick of passwords before long. Be very careful that you put the correct password in whenever supplying one. And of course: No typos, either. One slip... (Sigh)
If the server is up and running, and if you've got everything so far "just so", supplying the password should result in three ticked lines, each with information on your circumstances. (You don't need to worry about that information. In my case, in case it helps you follow along, or be confident that your system is near enough mine that there's a chance of things working the same way, my server version appears to be 5.5.29... at the moment. No doubt an invisible "update" will come along and upset things. But everything working at March 2013!)
Be sure the magic words "Database connection tested successfully" appear! (I'm not convinced, by the way, that this connection is primarily about connecting to a database I think this "connection" is primarily about connecting you to a MySQL server. Now... it may be that at the same time, you will connect to one of the databases on that server. But I believe we are talking about two things, and the second "connection" is not essential to making the first. Without the second... established sometime, somehow... the first connection is pretty useless. But keep the parts of the story clear in your mind.
When I clicked "Next" to go on from "Test DB Connection", because of the choices I'd made, the wizard skipped over the "Management/ OS" and "SSH Configuration" pages. Hurrah! That means that the next step was...
(The "Windows" in the above refers to the proprietary name of the operating system from Redmond, not to the generic basic element of a GUI, by the way.)
Select the service...: I can't imagine that for the novice reader, with a clean MySQL install, for whom this tutorial is written, there is anything to do on this page, nor more than one choice in the drop-down box. There ought to be something there! In my case, it was "MySQL55 (Running, Start mode: Manual)"
Although you will be told here where the server's .ini file is, play with it by hand at your peril! MySQLWorkbench and other tools will help you with the ini file. Far more reliably than you, as a novice, can tinker with it!
You're looking for "Testing host machine settings is done", and no error messages, no red "x"s. In my case, two of the tests appeared not to apply. There was a nice "okay" tick in front of the not- grayed- out "Check MySQL configuration file" line. (That would be the "ini" file we discussed briefly a little way back.)
At the end of "Test Settings", I clicked "Next" in the usual way. and something vaguely weird happened. Not worrying, just a little weird. I clicked "Continue" to answer a question, and jumped straight to the "Complete Setup" step of the wizard, skipping over...
Good. If I don't mess with things, I don't mess things up!
Server Instance Name: The final step in the "Create New Server Instance Profile" wizard was to specify a name for the instance.
The proposed name may look a little arcane to you, a little like an email address, but it will probably "do". There's probably a reason for the format. I think you can change the name if you don't like it, though. I added "-13mar" to what the computer proposed, when going through this to write your tutorial. Whatever you specify in this step will be how the "shortcut" to this path for administration will be labeled in the box under "Server Administration" on MySQLWorkbench's top page.
This would be a good time for a break, by the way. You've done a lot... and have a lot more to do.
Get the main MySQLWorkbench page showing on your desktop again....
Under "Server Administration", over on the right, there should now be an entry in the box... one making a bold blue block, like the ones in the illustration. It will be called something ending "-tkb13mar", or whatever you substituted in the last step of the New Server Instance window, a minute ago.
Double click on that. You should be asked for the root password for the MySQL server. Try to supply it. If you make a mistake with the password, you get a chance to retry. Get the password right, and you should see....
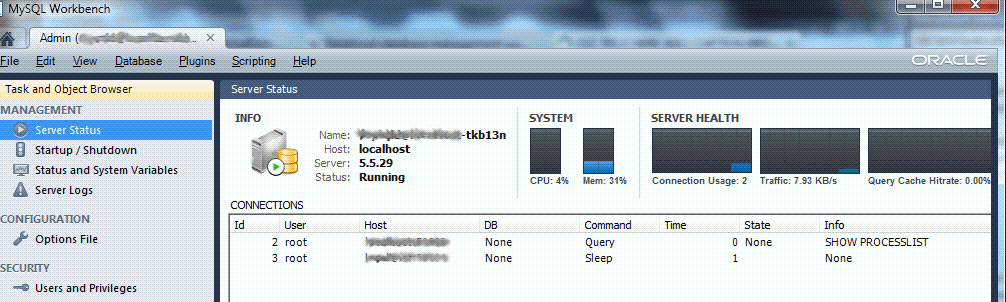
Take a moment to notice something in passing: MySQLWorkbench works like a browser. You can have multiple tabs open at a given time. In the illustration, and in the instance of MySQLWorkbench running on your system, I hope, you can see, upper left, just below the "My SQL Workbench" in the windows' title bar, a narrow tab. The icon on it is supposed to be a house, this tab holds the "home" page for the application. The page I have been calling MySQL Workbench's "top" page, the one with the three columns. Click on the tab to satisfy yourself that the "top" page is still there, that it was just "under" the Server Admin page we launched when we double-clicked on the server "instance" (connection to server) we created in the first part of this tutorial.
Go back to the Admin page.
On the left, there is a list of things we can use. A bit more than half way down is "Users and Privileges". Click that.
The right hand pane now has two tabs. The first one, "Server Access Management", down at the bottom has a button for "Add Account". Click that. (Don't worry... removing an account you set up is easy.)
By the way, don't be tempted to meddle with things... databases, users, etc... unless you know what they are, what the consequences of your meddling will be.
When you clicked "Add Account", you may have missed the slight changes to the screen in front of you...
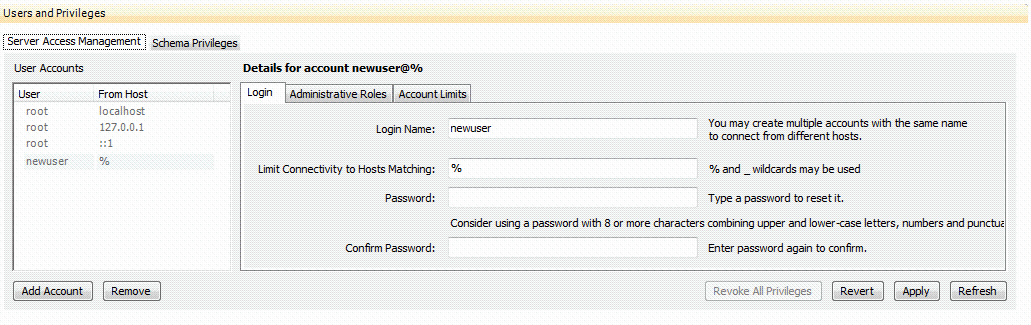
The "newuser" entry in the left hand box wasn't there a moment ago.
On the right hand side, in the "Login Name" edit box, you can enter a more sensible name for this user. Let's call the user "Simple-First"... we are going to make a "Simple" user, our first user, and this user will have just "ordinary" powers (privileges)... it will not able to do all of the things an administrator level user can do.
Also fill in the password edit box with whatever you want this user's password to be... it could be something quite mild, like "123", as we are only going to be "playing" with this user. You would, I trust, set a "good" password on any user with privileges over databases you care about?
Having revised the user name, and specified a password, click the "Apply" button... which can be a nuisance to get to, if your screen isn't at least 1024 pixels across. But it is there. (Slide the window to the left, if necessary.)
In the list of user accounts (left hand pane) you should now see "Simple-First" instead of "newuser".
The user now exists... don't be alarmed that the password fields have gone blank. (This is so you can change the user's password, should you wish to.)
But we aren't done yet. The user cannot "do anything" until we do some more work.
You might think that you want the Administrative Roles" tab. You don't. Not for this "simple" user. All of the boxes on that tab should be unticked... and there is a button to untick them for you... "Revoke All (admin) Privileges"
And you can leave the "Account Limits" settings all on zero ("impose no limit") for now.
What you need is not any of the tabs under "Details for account...".
You need the second tab at the top of the "Users and Privileges" pane, the "Schema Privileges" tab. Click it now.
Remember: In this context, "schema" is being used to refer to what I would call a "database", e.g. the one we created earlier called "tkb13mardemo".
So where is it? Why isn't it showing?
Patience!
So far, we have created a user. Now we are going to tell the MySQL server about what databases ("schema") that user is to be allowed to do anything with, and specifically what the user can do with each database to which the user is granted access.
Over at the left hand side of the right hand pane, click on the user we are giving powers to, Simple-First.
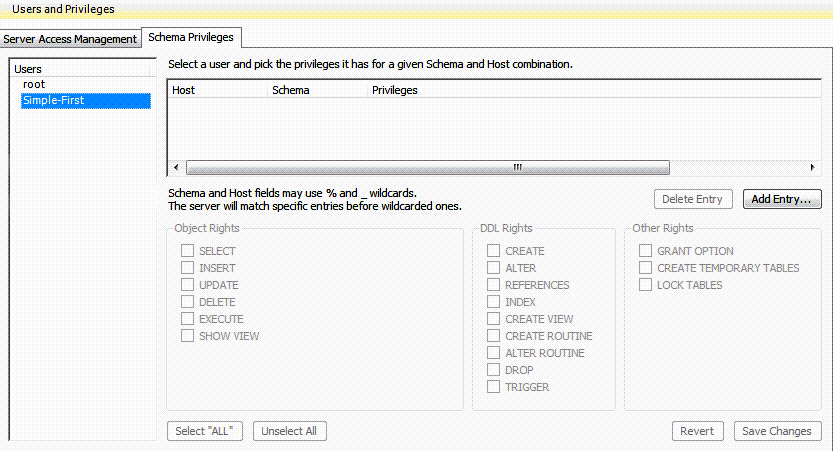
See that "Add Entry" over at the right? That's what you need. It will allow you to add a line to the box above. A given user can have access privileges to many databases, aka schemas. And the "Add Entry" button is how we set up those access privileges.
The window that opens, "New Schema Privilege Definition will be quite daunting! For now, set things up as follows:
Host: Opt for "Hosts matching pattern or name", and enter "localhost".
For Schema... for now... opt for "selected schema" (you have to first click on that option's radio button).. and then select "tkb13mardemo", and click the "OK" button at the lower right.
(It will probably not be long before you are making other choices on this page, but for now, we just want a simple user without too much power to wreck things!)
Clicking "OK" will drop you back at the page for specifying the power of user "Simple-First". Now we have a Host/Schema combination, admittedly a very limited one, and we can grant right for "Simple-First" for that schema, accessed by that host, i.e. over that channel.
Because we have limited the scope of user's "play", I think it is save to click the "Select All" button, and give "Simple-First" enormous power over tkb13mardemo. That database is just going to be for some simple testing, after all.
Note the slight oddity: When you say "select all", all of the boxes are ticked.... except one. The "Grant Option" box does not get ticked. I suspect there is a reason for this, so I would suggest that you not add the tick to this box too, for "tidiness"'s sake.
Be sure to click the "Save Changes" button, lower right.
Feel like you've done a lot?
You have!
But I'm afraid that I have to tell you that you have a lot more to do before you've "done your first MySQL database". Doesn't seem possible, I know, but it is true!
You have a database (tkb13mardemo)... but that database doesn't even have its first table yet.
You have a user.
But! You don't yet know how to use your user to create a table, put data in it, edit the data, fetch data back, etc... do you?
But you are more than half way there!
We are coming to the end of this tutorial. We have accomplished two things in the course of our first "play" with MySQLWorkbench. We've set up a connection to the MySQL server, so that the next time we want to make changes to it, we can get connected simply by clicking on the relevant item. And we have created an "everyday" user, to be used (most of the time) instead of the too- powerful- for- everyday "root" user.
Not too shabby! If you've got that far, the remaining skills are not going to stop you finishing the course!
Either no one is reading these pages... and if you don't protest "not true", I will assume that's the answer and not take them further... or people need to complain more.
For a long time, this page ended with...
Old: No longer true...

From here, I will try to point you to "the
next tutorial"... once I have it written!
What you do next HAS been written up. Has been online for some time. Apologies for the lack of a link before now.
What you need is at how to use a MySQL database via Open Office's database, 'Base'. That page sets up a demo database called tkb13mardemo.
I dislike 'fancy' websites more concerned with a flashy appearance than for good content. For a pretty picture, I can go to an art gallery. Not everyone has fast broadband.
I present this material in a format aimed at to helping you USE it. There are two aspects to that: The way it is split up, and the way it is posted..
Please remember the material is copyright. (TK Boyd, 2006 and later) The procedures in the page just cited are suggested only for convenient personal use of the material, however, also....
Feel free to use this information in computer courses, etc, but a credit of the source, quoting the URL, would be appreciated. If you simply copy the pages to other web pages you will do your readers a disservice: Your copies won't stay current. Far better to link to the original pages, and then your readers will see up-to-date versions. For those who care- thank you. I have posted a page with more information on what copyright waivers I extend, and suggestions for those who wish to put this material on CDs, etc. (There is at least one prison using Sheepdog Software/ Sheepdog Guides material for inmate education. Situations do exist where good internet connections are not possible!)
Translations are welcomed. Tell me about yours, so I can post links to it. (More information at the page about copyright waivers.)
PLEASE >>> Click here to visit editor's Sheepdog Software freeware, shareware pages <<< PLEASE
If you liked this tutorial, see my main webpage for more things from the same author.
Editor's email address. Suggestions welcomed! - - - Want a site hosted, or email? I like Ionos's services. (Previously known as 1and1.)
![]() Page has been tested for compliance with INDUSTRY (not MS-only) standards, using the free, publicly accessible validator at validator.w3.org. Mostly passes.
Page has been tested for compliance with INDUSTRY (not MS-only) standards, using the free, publicly accessible validator at validator.w3.org. Mostly passes.
AND passes...

. . . . . P a g e . . . E n d s . . . . .