You may find that the database included in LibreOffice / OpenOffice delights you as much as it has me. This page tries to help you use it.
Remember that Libre Office, including its database app, "Base", is free. Don't let that fool you, though. Big organizations, governmental and civilian, have adopted it as their standard office suite... and saving million$, but still Getting The Job Done. And making things easy for users on different platforms... Linux, Mac, Windows all spoken here!
There's more about Base in the main index to this material..
This page is "browser friendly". Make your browser window as wide as you want it. The text will flow nicely for you. It is easier to read in a narrow window. With most browsers, pressing plus, minus or zero while the control key (ctrl) is held down will change the texts size. (Enlarge, reduce, restore to default, respectively.) (This is fully explained, and there are more tips, at my Power Browsing page.)
Update, October 2025: I'm afraid I've lost confidence in Firebird, and no longer advocate its use.) See my main LibreOffice Database Tutorials table of contents for more on this.
Page contents © TK Boyd, Sheepdog Software, 2/06-10/20.
Overhauled 25 Oct 20 to make it right for LibreOffice Base using embedded Firebird. (Do switch to Firebird, when and as you can!) Not every graphic was updated.
In this tutorial, we will set up a database for keeping a personal address book, including telephone numbers. I will sketch a very, very, basic one, with just two frills. The obvious extensions are not missing because they can't be done, but just to keep the example concise.
This tutorial is aimed at novices. As such, not all of your options will be mentioned. If you have some LO or OO Base experience, you may know of other ways of doing things, which may be perfectly acceptable alternatives to the ways suggested here.
In various forms, this tutorial has been on the web since February 2006. At some point, with ooBase 3.0, I went through the instructions from scratch, using a machine with Windows XP. They were tidied up, but everything basically "worked". That process was repeated again in September 2011 with ooBase 3.3.0, again using Windows XP (SP3). So things really should work!
I will try to avoid distracting frills. The first I can't resist is that the user will be able to flag some records(ShrtDef) as people to whom a Christmas card should be sent, while other people in the address list will be Christmas- card- less.
The second frill: The user will be able to flag some phone numbers as ones which are called frequently.
ID: A unique record identifier. It will be a number.
LastName: E.g. "Smith"
RestOfName: E.g. "Mr. Joseph E."
Addr1: First line of address, E.g. "Apt 57", or "123 Main St"
Addr2: Second line of address. E.g. "772 River Rd". For some records, it will be blank.
City: E.g. "Detroit"
State: E.g. "MI"
Phone number: E.g. 1-860-555-1212
Phone rank: This will be a number from 1 to 10. It will the user's best guess about how often he/ she is likely to need the phone number.
Cmas Card: Blank for "No Christmas card". Anything else says "Yes, this person gets a card."
Some "tricks" are possible in your use of the last field. If you wanted to put 2003 in it to say you've sent this person Christmas cards since 2003, you could. If you wanted to put R2005 in it to say you received a card from these people in 2005, you could. Etc! As far as the database I will build is concerned, though, the rule is simple: If this field is empty, don't prepare a Christmas card mailing label for this person, otherwise, do.
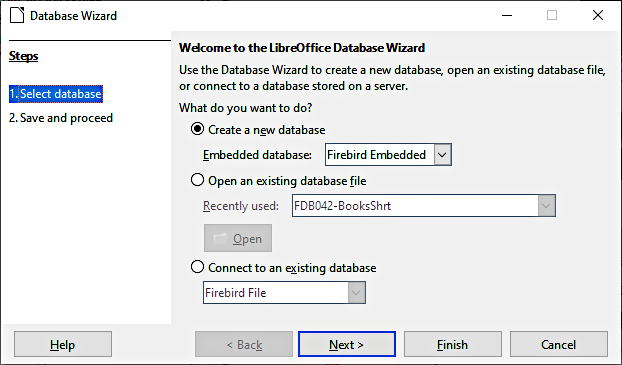
Start Base. Typically, the Database Wizard will launch itself. If it doesn't use File | New | Database.
Choose to create a new database, using an embedded database, preferably Firebird.
Make these choices...
Before I say more about what to do next, I want to talk about this "register" business.
First: It is NOT registering your database with anyone or anything outside of your computer. It is not giving the Libre Office people access to your work.
What it IS doing is making an entry in the registry-like data structure which Libre Office maintains. That data structure is GOOD in that different parts of Libre Office (Writer, Spreadsheet, Base, etc) are more "aware" of things done by other parts of Libre Office. It is BAD (?) in that it means you have to be a little careful about where you store things. You have to be careful and skillful, sometimes, if you want to rename or move them. Don't let me frighten you! A simple Writer document is a standalone entity, and you can move, rename, etc, its file as you see fit. This is not as true for the files associated with Base work, but the problems won't affect you until you are doing more advanced things. Don't worry about them. (Similar problems may arise if you do advanced things with ooWriter, ooCalc, etc files, and are cavalier about renaming or moving them. Still: don't worry!)
For the moment, create Base files with good names, in the right places... i.e. Chose path and name with care, so that you won't have to move or rename them. They can be moved without too many tears, but let's try to avoid creating any need to move things, for now.
Right. That's "register". You should still be on the "Decide how to proceed" page. Click the "Finish" button.
You will get a "Save As" dialog. (If you don't know it already, you should be delighted to learn that you can create new folders and move around the file structure of your backing store from within the Save As dialog. Careful use of folders is one pillar of support for the sanity of computer users.)
For my work with Base, I long ago set up a folder called FDB ("Free Data Base") in my "My Documents" folder. While you are getting started, it will probably pay you to create a folder within that for each project, although this extra level of nesting isn't really unnecessary. The project I'm building as I write this is being created in a folder called FDB004. We will also call the database we are creating "FDB004". (Yes: Database called FDB004, within a folder of the same name.)
Work with the Save As dialog to create the folders. Fill in the "File Name" edit box with FDB004, and click the "Save" button.
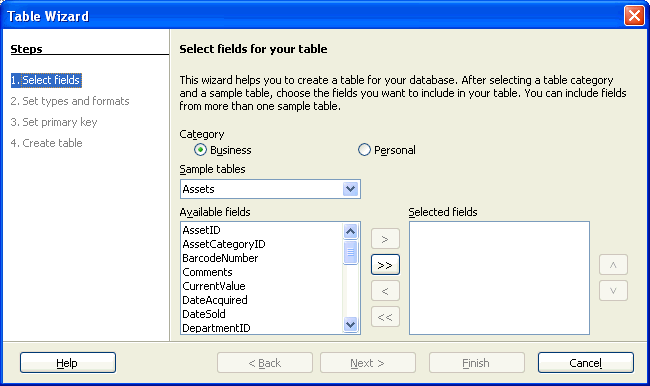
The Table Wizard should launch.
(If you don't get the Table Wizard immediately, you didn't tick the box I told you to... naughty you. Just click "Tables" in the left column of the screen you did get, then "Use Wizard to Create Table" in the upper right panel to get back onto the page the rest of us are on.)
Select the category "Personal", and then (from the pull down list) the sample table called "Addresses". Don't be alarmed if what we do for the next few paragraphs seems wrong... we're going to start by merely roughing something out, and then clean it up.
Scroll down the available fields to "LastName", double-click on it, and you should see "LastName" (Or "Surname", if your Libre Office speaks English, not Amurican). When you've done that, LastName (or "Surname"... I won't say that again) should appear in the right hand stringlist, which was empty until now.
Using the same procedure, add the following, in the order shown. If your version of Libre Office doesn't have exactly the fields shown, just substitute something else which seems likely to be for holding a bit of text.
A few comments about field names....
These are the fields to add to LastName (Surname)... Remember: Do it this way... not in something that may (at the moment!) seem to make more sense, or be "how you want it".
FirstName (Forename)
Address
Nickname
City (PostTown)
StateOrProvince (CountyOrRegion)
PhoneNumber
Title
ChildrenNames
If you miss one out, you can put it in now... and then use the "^" and "v" at the right-hand edge of the dialog to move things around until you have the order I've specified.
Click "Next" (NOT Finish... yet... even though it is available!)
You should now be on Step 2 of the Table Wizard. Don't try to edit anything here at this stage... you should be able to... but long ago, with earlier versions of ooBase, I had some trouble with the database creation process if I did. You can easily change things in a moment. Click the "Next" button....
... which will bring you to Step 3, "Set Primary Key". The "Create a primary key" and "Automatically add.." box and radio button are probably already ticked, which is what you want. Also tick the "Auto value" box. Click the "Next" button.
Step 4: Change the name of the table to NameAddrPhone (The default "Addresses" would do, but I like my name better.) Make the radio button selection "Modify the table design." In a moment, you will click the "Finish" button. (The "Next" button is grayed out, anyway, at this point.)
But first... and this has tripped many readers... be sure to click on the "Modify The Table Design" radio button. Once you've done that, click the "Finish" button.
You should see....
If you did get that... Well done! We'll say what to do with it in a moment.
Maybe you got...
That would happen if you didn't see the instruction to select "Modify The Table Design". No problem. You are looking at the main LO or OO Base project manager window.. something important we will come back to often. To get to where you ought to be...
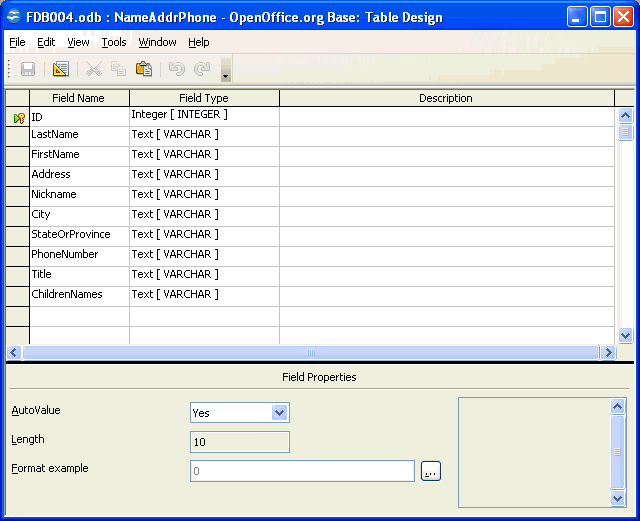
One way or another, you should now be seeing a string grid with familiar information in it. The first line will be a field called ID. This field is your primary key. We'll talk more about keys another time, but for now, a warning: Don't try to make changes to this one! With an older version of ooBase, I tried to rename it "RecID", and wrecked the auto-increment function. Almost certainly it is possible to call the field "RecID", but let's save that battle for later, shall we? "ID" will do! ("RecID" may be a reserved term.)
Change some of the field names. Don't worry about the "new" one, "ID" that has appeared at the top. It's the "primary key" thing you asked for. (You will hear more... lots more... about this field in due course. (Every base table must have a primary key.))
Whatever version of English you speak, make the names just like what you see below.
By the time you are finished, the list should be as below. Notice that I've not put any spaces in any of the names. I think you have to name things this way. (If you really, really "need" a space, use an underscore: Like_This. That works. But its a Bad Idea in the Base environment.)
One of the less obvious changes is the change of "Nickname" to "Addr2".
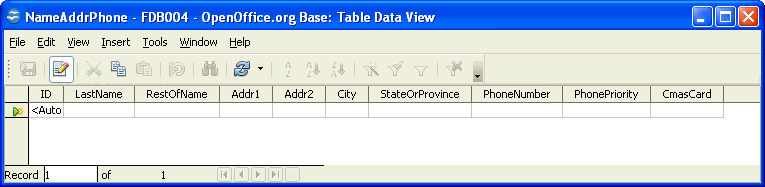
ID
LastName
RestOfName
Addr1
Addr2
City
StateOrProvince
PhoneNumber
PhonePriority
CmasCard
Select the "Field Type" column on the "PhonePriority" field's line. Change the Field Type to "Small Integer[SAMLLINT]". (You do this with the drop down list that you open by clicking on the field type entry for the field you want to modify.)
Before I go further... at some point you may be told "[this or that] could not be changed. Should the column instead be deleted and the new format appended."
In the first place that is badly worded. (Among other things, it should have used "field" where it used "column".) But don't worry about it. Just say "yes". To "the same" question several times, if necessary... it may take as many as ten "yes"s! Don't worry that the order of the fields will no longer be the order we started with.
Click on the "LastName" row. At the bottom of the window, you should see various things starting with "Entry required". The next one is length, and probably says 50 at the moment. Make that 35.
Adjust the length properties of the others as follows. We are setting a limit on the length of what can be put in each of the fields. (You'll have to select each row, one after the other, to access the field's length property.)
LastName: 35
RestOfName: 35
Addr1: 40
Addr2: 40
City: 30
StateOrProvince: 10
PhonePriority: (The length can't be changed, it will be 5, which is fine).. PhoneNumber: 30
CmasCard: 8
(Digression- sorry... Long ago (2011?) I wrote "If you leave the table editing window and return to it later, don't be alarmed if the order of the fields changes. Odd... but it seems benign." I don't recall seeing that happen in the years that have followed. However: Do note the following: While you can add or delete fields from the record design, you can't (easily, if at all) change the order of the records in the table. But this doesn't matter! You shouldn't (although many of us do!) work directly with the table, day to day. You should view what is in it, add/delete records, etc, via a form... and you can arrange the fields in whatever order suits you, on a form. Digression ends. Back to work....)
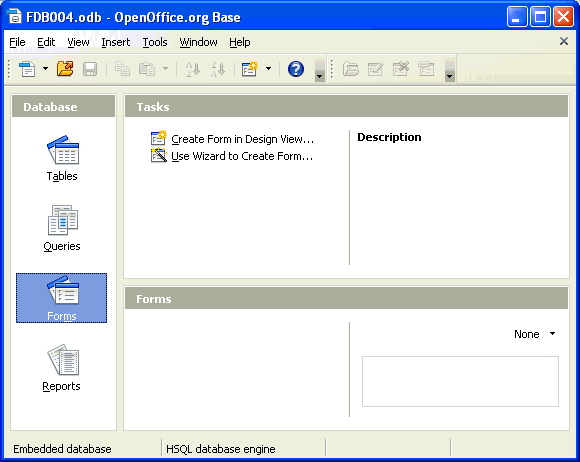
Click File | Close. If you get it, say "Yes" to the warning that says "Your table has changed, do you want to save the changes?" The table design window should close, and you should see the main LO or OO Base project manager window...
... which probably won't look quite like that at the moment. Click on the "Forms" icon in the left hand pane, if you want your screen to look exactly like the above.
The main LO or OO Base main project manager window is something you will become very familiar with. It is your usual "point of entry" to any LO or OO Base work. You got wizards the first time you launched LO or OO Base, but once you are "up and running", you will open at the LO or OO Base main project manager window. I've done a little page about the LO or OO Base main project manager window, if you want to review the basics.
In the Base main project manager window, in the pane labeled "Database" (left column) click on the "Tables" icon, if that is not already selected. (Yes, you are probably just going back to where you were a moment ago! I had you switch to the Tables view for a moment, just so you could see this "switching" thing in action!)
The lower right hand pane should be labeled "Tables", and a table called "NameAddrPhone" should be listed. (If you have an extra table, called "addresses", right click on it, delete it.) Double click on the "NameAddrPhone" entry, and a window should come up with columns headed with our field names.... possibly not in your original order....
Doing it here, now, this way won't be as easy as doing it will be eventually, and it isn't the right way to do it, but just to see that you can, put some data into the table! The computer should automatically fill in the ID field with a unique number for each record. If you want to delete a row, right click on the gray area just to the left of the row's "ID" column. The list of options you get should include "Delete rows". Click it. ("RowS" because if you can select multiple rows (shift-click, or ctrl-click) before right clicking, so you can delete many rows in one operation.)
If you delete rows, the previously assigned ID numbers do not get re-used. These numbers are for the program's internal purposes, and you are advised to pay little attention to them. They aren't even very important in our first table, but you should know how to create an ID field, and you should include one in most tables.
We've done it! Congratulations!
You have a table set up which will hold contact details of your friends. That table is the foundation for as much work as you want to invest in a system that will serve you. Once the table is right, you can build on the foundation by adding forms, queries and reports to the database. We will look at these in future tutorials. Forms are the right way to put data into a table... and they are easily configured to make the job more convenient. Other tutorials in this series show you how.
Just before finishing this tutorial, let me tell you about the "PhonePriority" field, about which I've so far said little.
My own list of phone numbers currently runs to nine pages. Obviously, there are many numbers in that list which I rarely call. By adding the "PhonePriority" field, and marking numbers I call often with a "1", and numbers I rarely call with a "9", I can print two phone lists: One gives just the numbers I call frequently, and the second is a complete list of all the numbers in my system.
That solution could be accomplished with a field called "ShowOnShortList", which would have a "Y" (for yes) for the numbers I wanted on the short list, and nothing, or an "N" for the numbers I want left off of the short list. My solution using a field called "PhonePriority" seems more powerful, more capable of extra features, without any attendant extra effort for the user.
One more important point: It is not a good idea, in general, to work directly with your tables... but you can get away with it for now. Eventually you should learn to create forms, and use forms when you want to look at or to edit the contents of a table. When you are ready to tackle forms, this set of tutorials includes a quick introduction to forms, and a more comprehensive discussion.
Now that you have a basic database, you can return to the main menu for my LO or OO Base tutorials, or just jump to the tutorial on printing labels, which uses the database you just created.
I dislike 'fancy' websites more concerned with a flashy appearance than for good content. For a pretty picture, I can go to an art gallery. Not everyone has fast broadband.
I present this material in a format aimed at to helping you USE it. There are two aspects to that: The way it is split up, and the way it is posted. Details at my page about how the material is split up and how it is posted.
Please remember the material is copyright. (TK Boyd, 2006 and later) The procedures in the page just cited are suggested only for convenient personal use of the material, however, also....
Feel free to use this information in computer courses, etc, but a credit of the source, quoting the URL, would be appreciated. If you simply copy the pages to other web pages you will do your readers a disservice: Your copies won't stay current. Far better to link to the original pages, and then your readers will see up-to-date versions. For those who care- thank you. I have posted a page with more information on what copyright waivers I extend, and suggestions for those who wish to put this material on CDs, etc. (There is at least one prison using the material for inmate education. Situations do exist where good internet connections are not possible!)
Translations are welcomed. Tell me about yours, so I can post links to it. (More information at the page about copyright waivers.)
PLEASE >>> Click here to visit editor's Sheepdog Software freeware, shareware pages <<< PLEASE
If you liked this LO Base tutorial, which should also be valid for OpenOffice's Base, see the main index for information other help from the same author.
Editor's email address. Suggestions welcomed!. Please cite page's URL in subject line: "fdb1TableOne.htm".
![]() Page has been tested for compliance with INDUSTRY (not MS-only) standards, using the free, publicly accessible validator at validator.w3.org. Mostly passes.
Page has been tested for compliance with INDUSTRY (not MS-only) standards, using the free, publicly accessible validator at validator.w3.org. Mostly passes.
AND passes...

. . . . . P a g e . . . E n d s . . . . .