You may find that the database included in LibreOffice / OpenOffice delights you as much as it has me. This page tries to help you use it.
Remember that Libre Office, including its database app, "Base", is free. Don't let that fool you, though. Big organizations, governmental and civilian, have adopted it as their standard office suite... and saving million$, but still Getting The Job Done. And making things easy for users on different platforms... Linux, Mac, Windows all spoken here!
There's more about Base in the main index to this material..
This page is "browser friendly". Make your browser window as wide as you want it. The text will flow nicely for you. It is easier to read in a narrow window. With most browsers, pressing plus, minus or zero while the control key (ctrl) is held down will change the texts size. (Enlarge, reduce, restore to default, respectively.) (This is fully explained, and there are more tips, at my Power Browsing page.)
Page contents © TK Boyd, Sheepdog Software, 2/06-10/20.
Overhauled 25 Oct 20 to make it right for LibreOffice Base using embedded Firebird. (Do switch to Firebird, when and as you can!) Not every graphic was updated.
In theory.. and it is a good theory... you should interact with the tables in your database via forms. That's not to say that users never cheat, never work directly with a table, but doing so is Not A Good Idea. It is very easy to set up a form which looks very like the ordinary view of your table, if that's what you want. And many other good things become possible when you know how to make forms. And some bad things are avoided.
While you could just return to that database and extend it, I suggest you set up a new database, or clone the old one. We're going to cover a lot of ground in respect of what you can do via forms. Once the "how" is out of the way in the course of this (tedious?) tutorial, the stage will be set for more interesting future tutorials illustrating why we would want some of the functions.
Once we are looking at our data by means of a form, powerful sorting and filtering tools become available. What they are an how to use them are discussed in this tutorial too.
If you have been working your way through my tutorials, you will already have a copy of a very basic address (and telephone number) book database. If you haven't done that tutorial yet, you don't actually need to, to understand much of what follows... but if you want to try things, you'll need it. It shouldn't take you long to set it up... and if you can't set it up quickly, doing that tutorial will help you to strengthen some important skills.
At this stage, you can, if you wish, clone the database. Then if you make mistakes, you won't have to set it up again from scratch. But it probably isn't necessary. (If you decide not to clone the database, treat all references below to "FDB007" as a reference to "FDB004"... assuming you used the name I suggested for the address/phone book.)
Now I'm going to show you the creation of a form using the Form Wizard. I'm not a fan, in general, of Wizards, and hope you will soon go on to the alternative "Create Form In Design View", but for getting started, the advantages of Wizards outweigh their limitations and annoyances.
Start Base; open FDB007, select "Forms" in the "Database" pane of the program manager. Click on the task "Use Wizard to create form...." (Note that you can check which step you are on in what follows if you look in the left hand pane of the wizard's window.)
Step 1: Often, you will start step one by selecting the table the form is to display. As our little database only has one table, you don't need to change the source table.
Use the >> button to move all of the "Available Fields" to the "Fields in Form" list. Then select the field called ID, and move it back to the Available list with the < button. (The "ID" field has its uses, but you don't need to see it, and can't edit it. Yes: You could have populated the "Fields in Form" list differently.) Click Next.
Step 2: Skip over Step 2 by clicking Next. We don't need sub-forms. Not adding a sub-form will cause steps 3 & 4 to be skipped, too.
Step 5: Select for Arrangement of the main form the layout that looks like a spreadsheet... the third option, the one that is the simplest... just a rectangle of contiguous rectangles. You'll see "As Data Sheet" for the layout's description when you have the right one selected. Click Next.
Step 6: Select "Form is to display all data", but do not tick any of the "Do not allow..." boxes. Do take a moment, though to imagine the different circumstances which would benefit from one or another of the alternatives. Remember that you can have many tables available for acting on a single form. You can even have several like the one we are creating, differing only in their modify/ delete rights. Having the multiple forms would meet the needs of a situation where there were several users of a database, users with different responsibilities and authorities. Click Next.
Step 7: Just go with the default by clicking Next again, unless you really, really want to "play" with the options. There's no harm in doing so, probably.
Step 8: Call this the "Basic Table Form", or "Data Entry Form". (Not "Basic Table View Form", as "view" has a special meaning in database work.) Leave the "Work with the form" selection unchanged.
Click "Finish"!
Give the program a moment, and a window should come up with your table displayed looking a bit like a spreadsheet, much as it looked when you accessed the table directly.
Note that you are looking at a Libre Office (or Open Office) Writer document. Cool. Note also the "Read Only" in the title bar. This refers to the layout of the form. (We'll fix the size and position of the table and its window in a moment.) As long as you proceeded as advised above, you should find that you can change, add or delete records in the database. A record is saved to disc as soon as you move out of that record. If you try to close the form with unsaved information, you will be asked if you intended to discard the last record edit, and given a chance to save it.
To delete one or more records: Select it/ them by clicking in the empty rectangle(s) just to the left of the left-most field. Then either use the red X in the toolbar at the bottom of the window, or right click over one of the empty rectangle(s) just to the left of the left-most field in the selection, and click "Delete Row(s)", the only option in the right-click menu.
Note that across the bottom of the spreadsheet-like table of data there are "VCR" style controls which let you move around the database.
If you change the number in the "Record [number] of [number]" edit box, as soon as you press enter, you will go to that record.
Now we'll change the size of the table, and the initial state of the window in which it opens.
Close the Writer window displaying the form. In the Base project manager window, right-click on your form's name, "Basic Table Form", if you took my suggestion. You should get a number of choices: Copy, Delete, Rename, Edit and Open. If you only get one or two of those, then be sure you haven't got the form open already. If that doesn't prove to be the case, close Base, exit the Quickstarter, reopen Base. If that doesn't fix things, close all open applications, re-start Windows, try again. Isn't necessary often, but the need used to arise once in a while. (I haven't seen it crop up recently.) I had the "edit not available" problem when I was doing some things wrong.
Once "Edit" is an option, select it.
You'll see your form again, but now you can do things to it, and the things on it. Click on a corner of the grid which displays your data. The grid should acquire 8 small green squares, drag handles. (If you don't get them on your first try, click again in a slightly different place.) You can use them to re-size the grid. You can re-position the grid.
Once you have the grid at a sensible size, in a sensible place, adjust the size and position of the window that it is in. Save the form. (File | Save, or use the icon.) Close the window with the form in it. Once again, double-click on the form's name in the Base project manager window to re-open it, and it should come up as you wanted it... but, sadly, getting the whole window where you want it on the screen is more difficult, and not something to go into at this time.
It is possible, but sometimes not easy, to rearrange the order of fields in the table underlying your forms, etc. But it is not necessary. If you use forms to work with your data, rearranging the order the fields are listed in on the formis really easy.
Open the form for edit. Drag one of the column headings left or right. You should see an arrow before you release the mouse button, and when you release the mouse button, the column you were dragging should appear in the place you asked for it to occupy. Easy!
Not that you're likely to need to do the following, but just so that you know that you can:
Re-open the form for editing, right click on the grid, and select "Control properties" from the menu. The resulting properties editor has two tabs... go to the "general" tab, if you aren't already there. Within that you can alter both the row height and the font of the data you are displaying. I couldn't find a way to change the font of the column headings.
(If when you come to try to use the form, it seems to be "read-only", check... did you base the form on a table (good) or a query (bad)? (You can display the data from a query with a form, but you won't be able to edit it.)
Once you have opened a form for editing, you can flip back and forth between editing and testing with the button on the bottom of the window which features a set-square, a horizontal ruler, and a diagonal pencil. It's tool tip says "Design Mode". If you can't find that icon, use the window's main menu View | Toolbars item to be sure that the "Form Design" toolbar is ticked for display.
(You may want to take a moment to read about playing with toolbars. If you click that link, that short page will open in a new tab. Just close that, and you will be right back here!)
The button for turning the design mode on and off appears on a number of toolbars. It is the one marked "2" on the "Form Controls" toolbar discussed in my "Naming of Parts" note about it. (That note will open in a new tab or window... just close it, and you will find yourself back here.)
Play with the form a little bit, to get the idea of what you can do, but don't try to make it perfect.
Note the icon in the bottom of the window, near the Design Mode On/Off, which gives you access to the form's properties. (The grid must be selected to enable the "Form" (properties) icon. The second tab, "Data" has some useful items on it. (The form's properties are also available from the same right click menu that gave us access to the grid's properties.)
Remember that the form is "just" a Writer document, albeit with some fancy "stuff" on it... In the design mode, don't be shy about putting some ordinary stuff on the form, outside of the table of data, for example a title. A version ID is always a good idea, if only the date the form was last altered.
Lets' leave the topic of the form's design for a bit, and look at using features of the form. Take yourself out of design mode, if that's what you're in. The grid should fill with data. (The following material was NOT edited in January 2010... do let me know, if you encounter things that are out of date, or unclear, please?)
Generally speaking, I prefer to work with the main menu bar of any application. With Base, to work with the data in the grid on your form, you do most things with the grid's toolbar buttons, which I sometimes refer to as icons. They are across the bottom of the window.
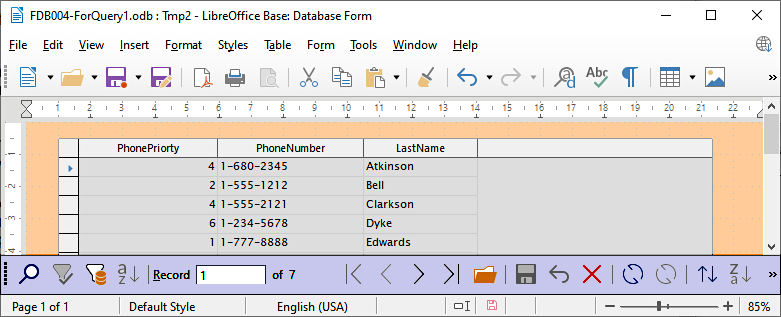
The following is about a specific case... the case of when you are looking at the data in your database with a form. (Although there are general points involved, too. Similar toolbars... the same one, maybe, is available when you are in the "Tables" module.) When the form is not in design mode. The toolbar they are on is called the "form navigation toolbar". Highlighted with mauve in the image above. Well... the toolbar starts there. You can move it. (Remember: I do offer my playing with toolbars note!) If you lose a toolbar, use the main menu item "View", select the Toolbars option. The toolbar that seems to be missing will be unticked if it is "missing" for a simple reason. (If ticked, look again... it's there somewhere!) If unticked, click on it. The menu window should close and the toolbar should reappear.) I'm not going to explain all of the buttons on each toolbar... experiment (carefully, with "science". Don't just click randomly!) The first ones to master are as follows...
Things you can do....
Insert a new record. Beware: If you have the shift key down when you hit the space bar, "funny" (but unwelcome!) things happen. New records will be inserted at the bottom of the table, but can be moved by sorting, which we'll come to. The icon is a green right-pointing triangle with a yellow "new" star. Tool tip: "New Record".
Sort the data. For something simple, like sorting it according to the "Last Name" in each record: a) select a cell with a Last Name in it. Click the sort it icon: And A above a Z, with a red arrow beside it. Tool tip: Sort Ascending. (Note: You cannot sort if you have selected the whole of a column. Select just one field in one record.) (Also note: You are sorting the records as displayed on your form. The underlying table is left untouched.)
For a complex sort, say Last Name first, and sort the Smiths out by first name, e.g. Adam first, Zara last, click on the sorting icon that consists just of an A above a Z.
Once you have done a sort, or a filter (we'll come to filters in a moment), if you add records, they will be at the bottom, not in their proper place. Click the "Refresh" icon- the blue semi-circular arrow. (The Refresh button is even more important in a multi-user environment.) The data will only re-sort if you have not clicked the "Remove Filter/Sort" icon: The funnel with the red X on it. (When no filter or sort has been established, the red X is gray.) Removing a sort is generally pointless. Re-sorting, with different criteria might make sense. Removing a sort (pointless) will have the possibly unwelcome side effect of removing any stored filter rule, even if the rule is not currently in action.
Filters. These can be a little scary at first. To see one in action, first enter at least ten records into the database, making sure that you have two and only two people called Brown. Also have someone called Browning.
Select the LastName field of one of you Browns. Click on the "AutoFilter" button. It is a funnel with a diagonal blue line and an arc of blue stars. (A "magic" wand). Help! All but two of your records are "gone"! No they aren't. Base is filtering what you see, showing only the record which match the one you had selected when you clicked "AutoFilter". It isn't so much the filtering that is automatic, as the setting up of the filtering rules. After AutoFilter creates some rules, it applies them, true.
The button with a simple funnel on it is not like most of the others. It isn't a "click here to do...." button. It is an "on/ off" button. (The "Design Mode On/Off" button on the form design toolbar was another.) After using the AutoFilter button, you will see the "Filter On/Off button has acquired a background, filtering will be turned off again, and your "missing" records return. Whew.
Your filter rule is still in the system. Click the simple funnel button and it will be re-applied.
If you click on the button with the funnel and red X, the filtering is turned off, and your filtering (and sorting) rules are erased.
Remember the complex sorts that were possible? Something similar is possible for filters, but I couldn't seem to get into the right dialog unless the form was in design mode... but see the next few paragraphs. Anyway... with the form in design mode, right click on the data table, select "Form", go to the data tab, click the "..." to the right of the "Filter" edit box. You may well have "LastName" like 'Brown' in that at the moment. If you make it "LastName" like 'Brown*', your filter will show not only the line for Mr Brown, but also for Mr Browning, Brownlow, etc, etc.
My thanks to the kind reader who sent me an email, with a clear indication of which of these pages ("fdb1form1.htm") she was speaking, giving me the basis of....
Here's what you do when not in form design mode to edit the auto filter, e.g. change "Brown" to "LIKE 'Brown*', which causes the filter to pick up things like "Browning". (Note the punctuation marks you need: the * wildcard, and ' , not " around the string to match.)....
Click on the "form-based filters" button to the right of the "toggle the filter on and off" button (looks like a funnel with a window floating over it) in the tiny toolbar that appears.
Click on the "filter navigation" button (funnel with a compass on it).
In the filter navigation pop-up, right click on "LastName: LIKE 'Brown'", select "edit", change to "LIKE 'Brown*'" and press enter (or click elsewhere in the pop-up) to make it to save your change. Close that window.
In the tiny pop up toolbar click on "apply form-based filter" (a funnel)" ... and lo! Browning appears!
My thanks again to Gemma for this help! And to Richard S, who wrote in January 2010 to alert me to a serious typo.
The button with binoculars on it lets you search your data for specific records. Note that there is another button with binoculars on the windows main toolbar. This is for finding things in the other parts of the form, which may be mostly empty at the moment, but this won't always be the case.
So! There you have it. You've seen how to create a Data Sheet style form for accessing the data in a table. (The other layouts allow you to see all of a big record easily, at the price of only being able to see one record's data at a time. See "Part Two" of "A Simple Form" if you want help.)
You're "an expert" (well, becoming one!) on the reasons for using a form, how to set one up, how to adapt it to your precise needs. In particular, you can present as many or as few of the records fields as you need, and in any order you prefer.
Along the way, you learned about cloning a database and working with sorts and filters.
Good Job!
I dislike 'fancy' websites with more concern for a flashy appearance than for good content. For a pretty picture, I can go to an art gallery. Of course, an attractive site WITH content deserves praise... as long as that pretty face doesn't cost download time. In any case....
I am trying to present this material in a format which makes it easy for you to USE it. There are two aspects to that: The way it is split up, and the way it is posted. See the main index to this material for more information about the way it is split up, and the way it is posted.
PLEASE >>> Click here to visit editor's Sheepdog Software freeware, shareware pages <<< PLEASE
If you liked this Libre Office/ Open Office Base tutorial, see the main index for information other help from the same author. Please cite page's URL: fdb1form1.htm
Editor's email address. Suggestions welcomed!
![]() Page has been tested for compliance with INDUSTRY (not MS-only) standards, using the free, publicly accessible validator at validator.w3.org. Mostly passes.
Page has been tested for compliance with INDUSTRY (not MS-only) standards, using the free, publicly accessible validator at validator.w3.org. Mostly passes.
AND passes...

. . . . . P a g e . . . E n d s . . . . .