 Bookmark this on Delicious
 Recommend to StumbleUpon
I wrote my first computer program in 1968. I taught computer studies for 12 years.
And I say: For about $25 (£11): Give the BBC Micro:bit a try!
(Assuming you have a computer, and a standard USB cable, such as you might charge an Android with, that ALL you NEED!.. unlike some alternatives!)
Okay... I've used similar things in the past, but how cool is this?....
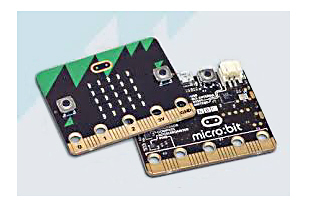
I received my Micro:bit (available online from many sources. I happened to use Proto-PIC.co.uk, because I was in the UK, and they had some neat other bits... not "needed"... but when was enough ever enough? For human nature. For a taste of the Micro:bit you only need what I've said.
Plugged it in to a USB charger. (A port on a PC would have done, too. At this point, I only needed the power, though.
And the demo program it comes with sprang into life! "Hello" scrolled across the array of 25 bright red LEDs. Then a "game" of sorts ensued, with me having to figure things out, like that I should press one or the other of the on-board buttons, tilt the device this way and that, etc.
(Don't worry... you can get it back to that "as delivered" state later, if you want to, after trying your own programs.)
So! Five minutes after opening my new computer, I knew it worked! When was the last time that happened for you?
There seem to be several options. This is good and bad... but not very bad!
In both of the ones I tried, I went to a website, "played" a bit, then clicked a button on the webpage. That button caused a file to be transferred ("downloaded") to my PC. I was using a Windows 7 PC with Firefox. The download went like any other download- by- browser... and ended up, accordingly, in the folder Firefox always downloads things to for me.
Somewhere along the line, I'd plugged my Micro:bit into my PC. To the PC, it looked like a memory stick, aka thumbdrive.
I simply dragged the file that had been put on my PC by the web-page to the Micro:bit, and, presto! It (the Micro:bit) started doing the things my program said it should.
(My first program put "1", then "2" then "3" on the 5x5 LED matrix over and over. Took about 10 minutes to figure out how to operate the page, and build my tiny program.)
I'll say a brief bit about the ways you have to do the coding... programming... and then turn to the "stuff" built into the hardware of the Micro:bit, and then talk about stuff you can hook up to it.
I'm told there are also ways to program the Micro:bit from a development platform installed on your PC. You have to fetch the software from the internet initially, of course, but once everything's set up, you don't need the internet any more.
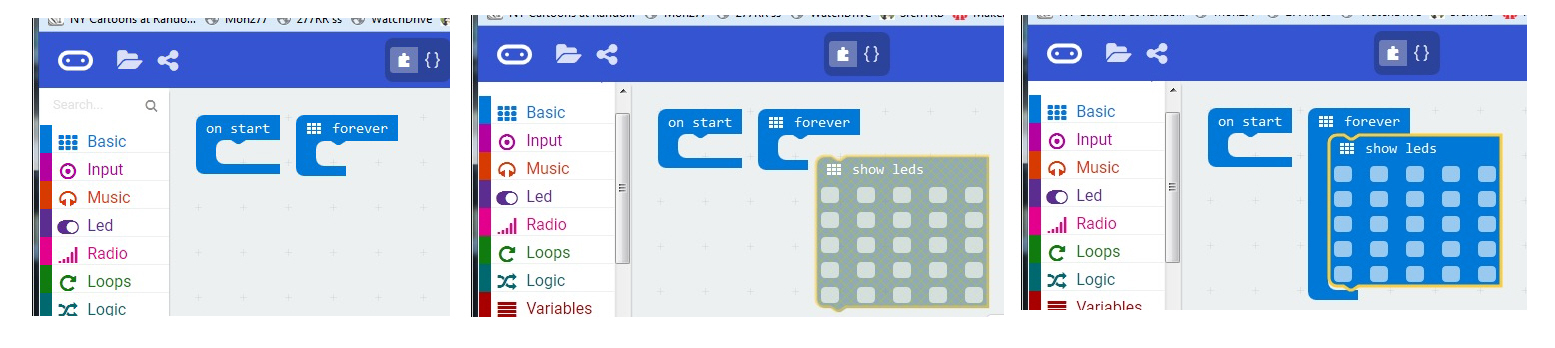
The first programming environment I used was fun! And easy to use... a graphical programming environment, where you "build" programs almost as if you were playing with Lego. That's to be found at
(Once what you see had been done... 3 steps... all I had to do was click on the little squares in "Show LEDs"... that switched them, individually, between the color you see and red, and when the program ran, the corresponding LEDs came on.) What you see is the start of my 1,2,3 program. I added two more "Show LEDs" blocks, put a delay after each one, and I was done.
That's the "JavaScript Blocks Editor (PXT)", available via the "Let's Code" link off of microbit.org/code
If you prefer a more traditional programming environment, in which you type text into an editor to create the code, that's available too. I wanted to run something I'd fetched from the web which came looking like....
#http://www.getmicros.net/microbit-neopixel-examples.php
#Tweaked
from micro:bit import *
import neopixel
from random import randint

#Neopixel with 10 LEDs
neo = neopixel.NeoPixel(pin0, 10)
bBright=48

while True:
    #Iterate over each LED in the strip

    #Original follows...
    #for pixel_id in range(0, len(neo)):
    #TKB Alternative...
        pixel_id = randint(0,9)


        red = randint(0, bBright)
        green = randint(0, bBright)
        blue = randint(0, bBright)
        neo[pixel_id] = (red, green, blue)
        neo.show()
        sleep(450)
... and the Python Editor link, also from another "Let's Code" link on microbit.org/code takes you to that. (Also, the JavaScript Blocks Editor can be switched to a "show code as text" mode.)
I found a good site where documentation of keywords is a big part of what the site's tutorials is doing. (I used them without using the "mu editor" they commend. (I know nothing about it; I don't have a view for or against.))
It should be stressed that the two ways ** I've ** programmed the Micro:bit are deprecated, "old fashioned" ways. Sigh. How quickly things fall by the wayside. Go ahead... invest time in the (current) latest, greatest. How long before you join me? (Better yet, go to the Arduino, where there's been some stability for a LONG time!)
In both cases: You build your code "on" the webpage, across the internet, and then download the "stuff" to go into the Micro:bit, as described earlier. And yes, you can save locally the code you've written, for further development later.
Built in hardware:
In general, I am a great fan of the Arduino. And for other needs, the Pi. (I've written about the pros and cons of these well established "little" computers, the Arduino and Pi.)
But I have to admit: Neither, "out of the box" gives the learner so much built in. The BBC Micro:bit comes with...
Power! You don't have to be tied to a USB charger, or computer. It will run on two 1.5v cells, like a pair of AAA cells... or use bigger if you want it to run for longer. And you could probably run on Lipo, but I haven't seen that stated as a fact.
The previous section told you about the built in sensors and output devices. But that's not all that a Micro:bit can handle.

The five big pads, with the associated holes (which will accept standard banana jacks, or give easy purchase to alligator clips) let you tap the board's Vcc and Ground, and give you places to connect three inputs/ outputs. Which can be configured as analog outputs, if you wish. I haven't pinned it down as fact, but I would be very surprised if you couldn't run serial data in or out via one or two of these connection points, too. (Not all at the same time, of course!)
If you can send or receive serial data to a device, a world of standard, "black box" devices opens up to you. I've written pages on using serial devices with microprocessors. Mostly in the context of using them with Arduinos, but what you see on those pages would also apply to a system built around a BBC Micro:bit. The device won't know or care where the serial data is coming from/ going to. (You do need to be careful about voltage levels... but they are manageable.)

See the little pads, between the big ones?
They bring 15 more signals off of the board.
For breadboard work, Proto-PIC.co.uk... for whom I do not work, with whom I have no connection, by the way!... offer a good solution, for less than £6 (c.$8)
Once you start down the road of connecting things, you'll find the following supplied-as-standard interfaces useful...
I've given up enough "play with my new toy" time, for the moment!
Click here to visit editor's Sheepdog Software (tm) freeware, shareware pages.. Material on this page © TK Boyd March, 2016
Click here to visit the homepage of my biggest site.
Click here to visit the homepage of Sheepdogsoftware.co.uk. Apologies if the "?FrmAht" I added to that link causes your browser problems. Please let me know, if so?
![]() Page tested for compliance with INDUSTRY (not MS-only) standards, using the free, publicly accessible validator at validator.w3.org
Page tested for compliance with INDUSTRY (not MS-only) standards, using the free, publicly accessible validator at validator.w3.org
....... P a g e . . . E n d s .....