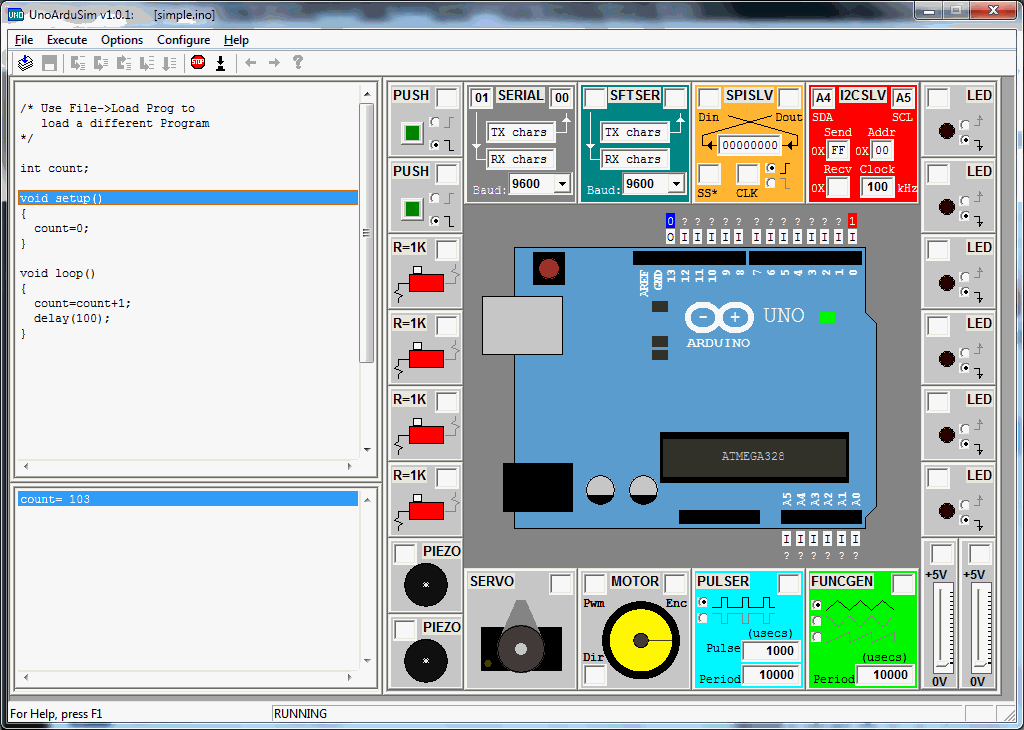
A full "virtual playground": A simulated Arduino Uno, which you can program with the ordinary Arduino language (very like C++), and simulated LEDs, switches, sensors, servos, analog inputs to connect to it!
This page was created in early 2015. And reviewed for currency Sept 2017.
I'm delighted to say that there is a free simulator of the Arduino Uno out there! Anyone with a Windows computer can "play with" an Arduino. Teachers can show one to pupils, and let pupils play with it. No expense. No "barrier to entry" in the form of mastering the fiddly bits of hooking up hardware. No danger of damage to equipment. This splendid, major, contribution to us all comes from Stan Simmons, formerly of the Department of Electrical and Computer Engineering at Queen's University, Kingston, Ontario, Canada. And is now very mature, having been refined for years.
Now... get "excited", but not "all excited". It WILL let you play with switches, sliders, buttons, LEDs, etc. I won't, alas, let you set up an Arduino hosted webserver for environmental data logging or home security!
But for the beginner and educators this is a great opportunity.
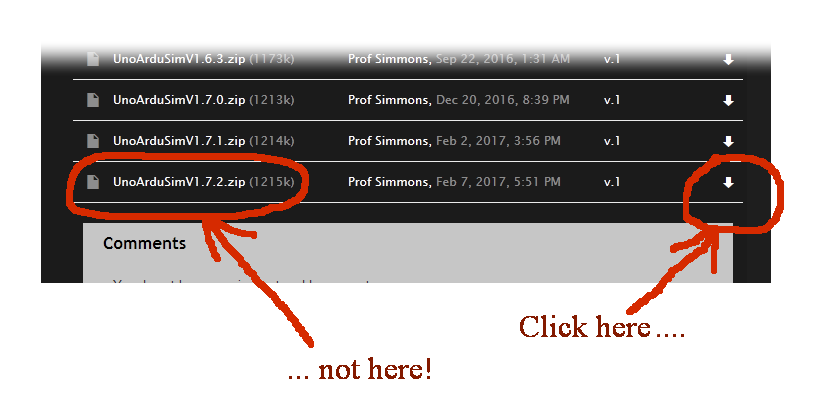
Go to https://www.sites.google.com/site/unoardusim/. There's Good Stuff you could read there, but what you "need" is on the "Simulator Download" page which you get to with the menu at the upper left of the unoardusim page.
Once there, intuition and experience may get in the way of doing the download. The following may help. (Of course, by the time you are reading this, the most up-to-date version of the simulator may be later than the one you see below. I'd go for the latest available version. I can vouch personally for version 1.7.2 on a Win7 machine, 27 Sep 17.)
(A historical note: thanks go to Graham Leach, Visiting Lecturer, Hong Kong Polytechnic University, who, back in 2015, posted something like the above in the relevant thread at the Arduino forum... ending a long "I can't download the simulator" discussion!
-->The following "How to" is virtually unchanged from 2/15 to 9/17... hurrah for people who make things better without moving too much cheese!
Create a folder where ever it suits you.
The download is a single .zip file, with no sub-folders. Unzip the contents of what you downloaded into the folder you created.
Double-click on the "UnoArduSim.exe" you should find there... and, presto, your simulator will be up and running! (The UnoArduSim.exe file is the program, not a "setup" program. You will have to create your own shortcut for launching it, if you want one.)
(I did a full system scan with my standard eSet anti-malware protection in late Sept 17 after running the simulator (vers 1.7.2... no problems reported.)
If you modify the code that the simulator is running, I would do a "SaveAs" straight away, so that you don't corrupt the demo. I'd put anything by me in a separate folder. I can't, 9/17, recall exactly what I did 2/15 to achieve this. But I was delighted (9/17) to find that even though I had installed a new version of the simulator, it (the new install) "knew" where --I-- liked to save my code.
Go play!... or struggle on through the rest of this which is neither well written, nor heavily edited. It merely recounts some of my experiences playing with the simulator, and mentions a few things I "stumbled" over. None of them were serious problems.
It works! Hurrah! At last... a simulator for Arduino for those times when the real thing isn't ideal. And free!
Once I had the simulator running, I....
"Hooked up" a push button to input 3 by filling in 3 in the edit box in the "Push" box, upper left of the "hardware" half of the screen.
"Hooked up" a piezo element to input 13 by filling in 13 in the edit box in the "Piezo" box, lower left of the "hardware" half of the screen.
(I put the piezo on input 13 because the Arduino often has an LED on that pin, onboard. The one in the simulation does too.)
Discovered two things...
a) The piezo element isn't a self-oscillating buzzer... it is a more basic device. If you want a buzz, you have to send a train of high/ low/ high/ low... to it. About 10ms cycle will do. If, as I did (see below) you assume it to be self-oscillating, you WILL at least get a "click".
b) The "Push" (button) element is more than just a button, and not necessarily a...
normally open...
    button...
       to ground...
          with a pull up resistor
(And you don't need to enable the internal pull ups.) The radio buttons in the push element box let you take care of everything necessary to connect something which when pushed (put mouse pointer on it, hold down mouse's button) will drive the input high or low, depending on radio button choice. And the input will go to the other state when you release the button. (I don't know, by the way, of a way to press more than one PUSH button at the same time, but there are some toggle switches, called "slide" switches... the red rectangles with white square, and legend "R=1k")
I then modified the code as necessary....
(If you come across the bit at the bottom of the code boilerplate talking about the implicit main(), which was present back in 2/15, don't be distracted by it! (If you know a bit about Arduinos and C, the note may interest you.))
Note: You need to "go into editing mode"... use "File|Edit/View".. or just double-click on the listing of the current code in the upper left.
(You can't access "Copy" with a right-click... but ctrl-c works)
Use the "Adopt" button to get out of the code editing window.
Once you are back in the main window, note that instead of tooltips, there is a label in the status bar, bottom of screen, to tell you what the various buttons do, e.g. the "Step Over" button.
After you've "connected" a "Push" to 13, and a piezo to 13, the following will make a pretty obnoxious noise in a rapid on/off cycle. "Press" the button called "Push", and you can stop the noise until the button is released again.
int count;
void beep()
{
  for (int c1=0; c1 < 21; c1++)
   {
      digitalWrite(13,HIGH);
      delay(10);
      digitalWrite(13,LOW);
   }
}

void setup()
{
   count=0;
   pinMode(13,OUTPUT);
}

void loop()
{
   count=count+1;
   if (digitalRead(3)==HIGH)
     {beep();}
   else
     {digitalWrite(13,LOW);}
     delay(100);
}
Gotcha 1...
It won't "just start" after a code edit... you have to click execute again. Not a "flaw", just something to remember.
Gotcha 2...
If there is a syntax error in the code, the message doesn't scream at you... but it is there, lower left... and an error will make "execute" unavailable. The simulator hasn't crashed!
And it Just Worked!
The features which caught my eye were...
Input...
The normal Arduino serial monitor is implemented as a pane at the lower left... hurrah: This is a much under appreciated tool. (Well, ** I ** don't use it as much as I should do. Maybe you do?)
I've given the serial monitor a SLIGHT test. It is enough to learn a lot about using the serial monitor, do useful debugging, and play with "traditional" programming, but in an Arduino context.)
Output: (mostly untested by me at this time... I had to write this for you, didn't I?)
The simulator also gives you a "watch" window, something you don't have available to you with a real Arduino!
All in all... a great tool for Arduino teaching!! Or for general teaching, with a look at something "a bit different", without the need for investing all that it would take, in money and time, to give your kids a taste of working with microprocessors.
Facebook "likes"/ "shares" always welcome, too, of course.
Like the Arduino? More Arduino tutorial material from the same author. (Also available as http://bit.ly/ArduHowTo )
Considering alternatives? Pi? BBC:Microbit? (Thoughts on...)
Use this to search THIS site.... (Go to my other sites, below, and use their search buttons if you want to search them.)
|
|||
| search engine by freefind |
The search engine merely looks for the words you type, so....
* Spell them properly.
* Don't bother with "How do I get rich?" That will merely return pages with "how", "do", "I"....
![]() Page has been tested for compliance with INDUSTRY (not MS-only) standards, using the free, publicly accessible validator at validator.w3.org. It passes in some important ways, but still needs work to fully meet HTML 5 expectations. (If your browser hides your history, you may have to put the page's URL into the validator by hand. Check what page the validator looked at before becoming alarmed by a "not found" or "wrong doctype".) Mostly passes.
Page has been tested for compliance with INDUSTRY (not MS-only) standards, using the free, publicly accessible validator at validator.w3.org. It passes in some important ways, but still needs work to fully meet HTML 5 expectations. (If your browser hides your history, you may have to put the page's URL into the validator by hand. Check what page the validator looked at before becoming alarmed by a "not found" or "wrong doctype".) Mostly passes.
AND tested for

....... P a g e . . . E n d s .....