(Filename: roy-base-then-now.htm)
Here we have a bit of England. Parts of it are shown as drawn on a map from 1784. Parts are from a modern map. Parts are modern aerial images. But all the "bits" are arranged to reflect their relationships in the real world. You an see a Roman road running up and down the map. The top is near the word "Base" in the old map's legend. The road is straight. It ends up to the left of where it started. You can follow the line of the road in all three depictions, can't you?
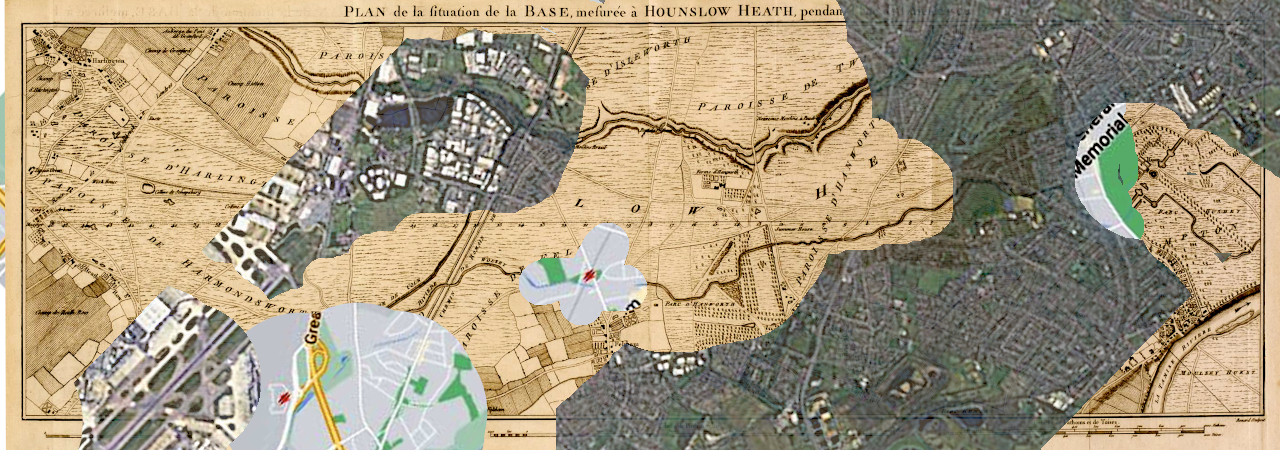
(The above isn't very pretty. Fear not... you'll see the separate maps in all their glory, before you are through.)
This page will give you a way to closely compare how a corner of England was in 1784 to how it is today. In particular, I think you will be surprised at changes in the routing of roads, or delighted to find places where the road we travel today has been there a long time. There's one that has been there since early in the time when it only took three digits to express the year in the system used in England today... but there are others with interesting stories, too.
This page will also introduce you to the marvelous photo manipulation tool "Gimp"... a free piece of open source software that runs on Linux, MacOs... and even Mr. Gates' monster.
If you don't want to bother with using Gimp, I will understand... it is not a trivial application. Riding a tricycle isn't hard. Mastering a fighter jet takes a little more effort. And Gimp is a (magnificent) "fighter jet". Getting started will reward you for years to come.
(It can't do what we need, for our "history research", but if you want a really handy image manipulation tool with less effort, check out Irfanview. I use it almost every day. It's color correction tool in particular is superb.)
"Words" can be a little daunting. There's also a YouTube of the heart of How Gimp Can Help, if you prefer. Read the description below alongside watching the YouTube... the words have some details, and images of bits of the screen.
Even without Gimp, I hope you'll take a little time to look at the images below, and on my page about William Roy's measurement of the Hounslow baseline, near Heathrow Airport (England), 1784. That was "the foundation" of all maps used in England until roughly the 1970s. The story is told, with the images you "need" at the page the link takes you to.
(If you want to skip past my interpretation of some of the differences, you may!)
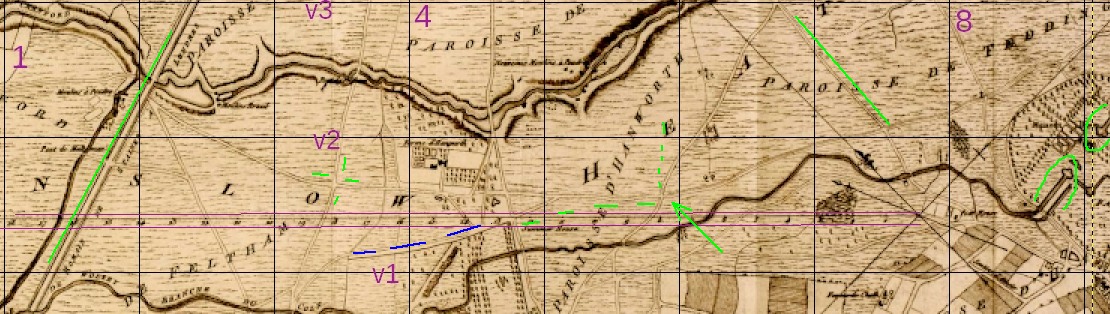
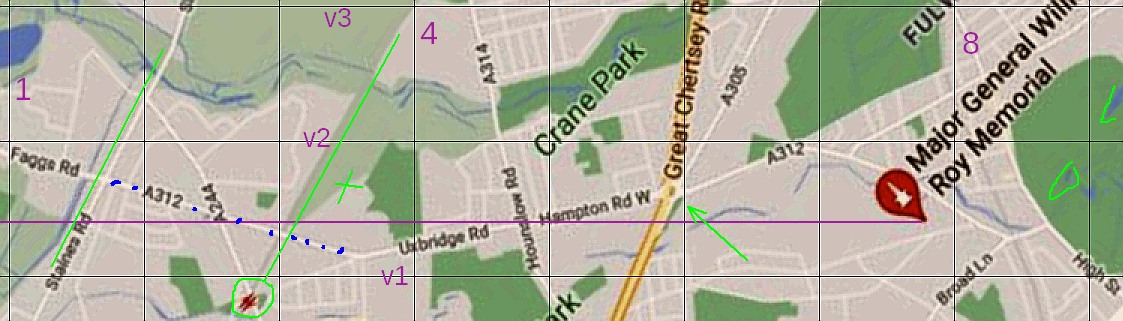
Both images show a bit of England, just SE of Heathrow Airport. The top of the maps are to the SE of the areas shown.
Near the top, you will see "1","4","8". These are ID numbers for the vertical lines. And between the VERTICAL lines "3" and "4" you will see "v3", "v2" and "v1". Those labels SHOULD have been "h3", "h2" and "h1". I messed up. I "should" go back, rework that. Do you know how much work that would be? Sorry. "v3" marks the top HORIZONTAL grid line. See "Crane Park", near the middle of the lower image? By my reference system, that is in "square 5/v2. Again... sorry about the v / h mistake.
The top map was drawn in 1784. It was part of a huge leap forward in the evolution of maps for Britain, William Roy's Great Triangulation. The bottom map shows the same bit of England again, as it is in our day.
The green lines are annotations to bring things to your attention.
Now those things are out of the way, we can delve into the maps!
Over on the left side, there's a diagonal green line. In the lower image it runs along "Staines Road". This road dates back to Roman times. (The remarkable straightness is a feature of such roads. It is clearly visible in the upper, older map... but of course, the road was already old in 1784.
Find the green arrow near grid line 6, and between the horizontal grid lines v1 and v2. It points to where a number of roads meet, one of them marked "Great Chertsey R".
Note how in 1784 this was a simple crossroads. The modern "Great Chertsey Road didn't exist. Hampton Rd wasn't straight, it dog-legged to the junction with Hounslow Rd (A314). And notice the blue dots on the modern map... that road didn't exist, either! The bit marked Uxbridge Road is marked on the old map with three short blue lines. It seems to have run along the wall of a big estate. If you go to Google Streetview, "visit" Uxbridge Road, "on foot", I wonder if you can see traces of the wall today.
Important? No! Of course not. But it amuses me, and I hope it gives you a bit of fun, too. What other instances permanence and change can you find? (My main page about the Roy map goes into detail about the area at the right hand edge of these small maps. Very interesting(?) stuff there!
Other curiosities: In the middle of the square to the left of line 3, and above line v1, there's a crossroads in 1784. Modern day? Gone! I wonder if the railway running through there was a factor?
Lastly, on the old map, look in the square to the right of grid line 7, and above line v2. See the road marked with the green line, leading from the crossroads? Where is it in the modern day? Gone! an note all the extra roads in the area below the road running left/right to the right of the crossroads. And how the A312 bends sharply, diverting traffic from the left before it reaches where the crossroads was. There must be stories in those changes.
When you've learned a few Gimp skills, you will be able to have a LOT more fun!
If you have/ when you have Gimp on your machine, click here to download the images, in a layered, lined-up form. That's a 14 MB file, by the way... but it does give you...
If you load that into Gimp, it will give you the same maps, but a separate layers, one on top of the other. You can turn each layer "on" or "off". You can change the opacity of any layer... so you end up being able to look at the modern map "under" the old map, with the old "drawn on tracing paper".
It is very, very cool! And you can find all sorts of fun stuff. Well... fun if you found the examples above a bit fun, anyway.
As I mentioned before, learning to use Gimp is not an undertaking for people with short attention spans. But it gives you a wonderful tool, once you begin to master bits of it.
I am very much a beginner... but I still get great benefits from using the parts of Gimp I've become a bit skilled with.
The first essential, for playing with maps as we can here, is to understand the concept of layers. (They are key to many splendid things you can do with Gimp. The lack of layers in Irfanview is the things that most often drives me to Gimp when working on something.
Start up Gimp
Grab copies of the two little fragments used above. Save them, separately, on your system as .jpgs (Right-Click/ Save Image as... in Windows).
Open one of them with Gimp. Save what you have so far. (As an xcf file)
Still in Gimp, invoke File/ Open as Layers, and specify the other file.
Now you have the two images in Gimp, one on top of the other as separate layers.
You should have a tab... in my case it came up at the lower right... like...
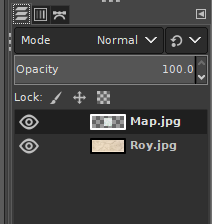
Click either "eye" to hide a layer. (At the moment, hiding the Roy layer will not seem to make any difference... it is hidden by the "Map" layer at the moment, so you won't see that it's been turned off. But if you clicked on both eyes, you'd get a black screen. Click again where the "Roy" layer's eye was, and it will re-appear... and this time, if the "Map" layer's eye is "shut", you'll be able to see it! "Open" Map's eye, and click on the thumbnail, to "select" that layer, and play with the "Opacity" slider.... and the transparency of the Map layer can be adjusted to whatever suits you.
Very simple... but nice to know: if you hold down the control key, then turning the mouse wheel zooms you in and out.
So. You have two images in Gimp at once, stacked on top of each other. Make the upper one partially transparent.
If you loaded the old map and the new map... do they line up?
Here's how you MAKE them line up.
Find something that appears on both maps. Preferably something near an edge.
Make sure that it is the upper layer that you have active.
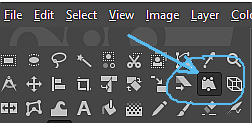
Select the "Handle Transform Tool".
Click on that feature that appears on both images. On the instance on the top layer. A circle should appear.
Put the mouse pointer inside the circle, and drag.
A "box" should move. Release the mouse button. Press enter. The layer should move to where the box was when you released the mouse button. Wow!
Do that again, so that the common features are lined up, one on top of the other.
Now... unless the layers were "made for each other", they line up in one place. Can we "spin" the top layer around that place? And, without distortion, re-scale it? Yes. WOW!
Here's how.
Start as before...
Find a second feature that appears on both maps. Select the Handle Transform tool. Click on the point where the images are already lines up. (You may have to click the layer's eye, if it has "gone hidden".) Then Click on where the second shared feature is in the upper map. This will create a second circle on the screen. This is a really cool too... behaves one way if there is one circle, differently if there are two. And differently again if there are more!
Again, with the mouse pointer inside the circle... the second circle... drag it to where the second common feature lies on the first map. Release mouse button. Press enter. Job done!
Gimp is amazing. Someday I will be a master of 10% of what it can do. For the moment, I am struggling through that famous "10,000 hours". "Struggling" happily! I get useful work done. More or less quickly. But I'm a long way from being fluent. Sigh.
I wonder what was happening in this area during World War II. It wouldn't surprise me to learn that some of the re-routing of roads arose from "starting fresh" in some areas, if bomb damage had wiped out old roads. Just a thought.
Search across all my sites with the Google search button at the top of the page the link will take you to.
Or...
Search just this site without using forms,
Or... again to search just this site, use...
The search engine merely looks for the words you type, so....
*! Spell them properly !*
Don't bother with "How do I get rich?" That will merely return pages with "how", "do", "I", "get" and "rich".
I have other sites. My Google custom search button will include things from them....
One of my SheepdogGuides pages.
My site at Arunet.
![]() Page has been tested for compliance with INDUSTRY (not MS-only) standards, using the free, publicly accessible validator at validator.w3.org. It passes in some important ways, but still needs work to fully meet HTML 5 expectations. (If your browser hides your history, you may have to put the page's URL into the validator by hand. Check what page the validator looked at before becoming alarmed by a "not found" or "wrong doctype".)
Page has been tested for compliance with INDUSTRY (not MS-only) standards, using the free, publicly accessible validator at validator.w3.org. It passes in some important ways, but still needs work to fully meet HTML 5 expectations. (If your browser hides your history, you may have to put the page's URL into the validator by hand. Check what page the validator looked at before becoming alarmed by a "not found" or "wrong doctype".)
AND passes...
