You may find that the database included in LibreOffice / OpenOffice delights you as much as it has me. This page tries to help you use it.
Remember that Libre Office, including its database app, "Base", is free. Don't let that fool you, though. Big organizations, governmental and civilian, have adopted it as their standard office suite... and saving million$, but still Getting The Job Done. And making things easy for users on different platforms... Linux, Mac, Windows all spoken here!
There's more about Base in the main index to this material..
This page is "browser friendly". Make your browser window as wide as you want it. The text will flow nicely for you. It is easier to read in a narrow window. With most browsers, pressing plus, minus or zero while the control key (ctrl) is held down will change the texts size. (Enlarge, reduce, restore to default, respectively.) (This is fully explained, and there are more tips, at my Power Browsing page.)
Page contents © TK Boyd, Sheepdog Software, 2/06-10/20.
Overhauled 25 Oct 20 to make it right for LibreOffice Base using embedded Firebird. (Do switch to Firebird, when and as you can!) Not every graphic was updated.
This page describes how Libre Office can be used to produce sheets of address labels from the database set up during the course of my "First Table" tutorial. Complete that first, if you want to try the things described below. It also shows you how to apply filters to the records on display in a table, and how to sort them.
It is fairly typical of my tutorials. If you want a more concise exposition, you might prefer my other page about printing address labels. But it doesn't cover sorting or filtering.
Libre Office takes an approach to database work which was not intuitive for me. There's nothing wrong with the approach... it is better than what I'm used to, in some ways, but if you've used databases before, beware assumptions you may make!
First "oddity": Libre Office maintains a list of "registered" databases... database about which it "knows". You'll want to learn more about this another time. For now, if you're carrying on from the "First Table" tutorial, your copy of Base should "know" about the database it needs. The list of what's registered (and the name it is registered under) can be found via Tools | Options | LibreOffice Base | Databases. You'll probably see some strange things there in places I wouldn't have put them, e.g. C:\My Documents\230am.odb. These things arrived along with Base, when you installed it. You should also see FDB004: C:\My Documents\FreeDB\FDB004\FDB004.odb
Second "oddity"... which is a delight, when you've mastered it: Base's reports are actually Libre Office Writer documents. Pretty fancy ones, perhaps, but Writer documents, none-the-less.
So let's make mailing labels from FDB004 ("Free Data Base"... my name.)
Get Libre Office Writer running, but with no documents open. Invoke File | New | Labels. A wizard will start up.
The labels tab may have scraps of things you've tried already in the "Label Text" box. If so, get rid of them.
Do not tick the "Address" box... that's for filling the box with your return address, as stored within Libre Office.
Over in the "Database" listbox, select FDB004, if that is not already selected, and NameAddr for the "table". (In Libre Office terms, the database is (quite rightly) all of the tables, forms, reports, etc, associated with the data you are using.)
When you've done that, if you click on the "Table" drop down, you should see the tables in that database. At 27 Oct 20, when I tried this with a database that "should" have "worked", no tables were admitted to. Sigh. But I found another database that DID have suitable material! (The FDB004 did seem to be "registered". That would be a first suspect.) Just use a different table, if you too, are having problems with FDB004 as a source.
Digression: I subsequently figured out the problem over my "FW004" "registered" database.
I'd moved the .odb file, "by hand", after it's initial creation.
Cure: In Libre Office (any module!) Tools/ Options/ LibreOffice Base/ database, I deleted the old "FDB004", and then used the "New" button.
All "new" needed was for me to browse to the .odb, choose it. In a later step, you even get to give the "registered" database a name of your choosing.
Now begins a somewhat tedious exercise.
For "Database Field" select "RestOfName" (Or some other field, if you too are not working with FDB004), and click the right pointing arrow to the left of that listbox.
You should see <FDB004.NameAddr.0.RestOfName> in the Label Text box, and the insertion point should be just after that.
Press the spacebar once.
Change "Database Field" to "LastName", and click the right pointing arrow to the left of that listbox again.
You should see <FDB004.NameAddr.0.LastName> in the Label Text box, and the insertion point should be just after that.
Press the enter key once.
Change "Database Field" to "Addr1", and click the right pointing arrow to the left of that listbox again.
Press the enter key once.
Change "Database Field" to "Addr2", and click the right pointing arrow to the left of that listbox again.
Press the enter key once.
Change "Database Field" to "City", and click the right pointing arrow to the left of that listbox again.
Press the comma key once, and the space bar once.
Change "Database Field" to "State", and click the right pointing arrow to the left of that listbox again.
Whew! Done. We have built up in the "Label text" box the definition of what we want printed. (It has become a bit hard to read along the way, but with it's scroll bars you can see what is there.
Note that you can insert things like line feeds, spaces, commas, etc, etc, besides the references to fields. More on this later.
Still on the "Labels" tab, Under format, you would typically select sheet, and do that now, for the sake of our exercise. Select a brand and label type suitable to your needs. (Clicking on the format tab will show you the layout of your selected combination, or, if you are very hard working, you can enter the specifications for a label by hand.
Now we come to a choice.
On the Options tab, there's a box marked "synchronize contents".
If you don't tick it, then you won't be able to do something you might want to be able to do. More on that in a moment. However, you are also creating a situation where users of the database may be alarmed by something that can happen, looks "bad"... but is no disaster.
The thing that looks bad, is that if, late in the day, a user clicks the "synchronize labels" button, then all of the labels will be filled with whatever name and address is in the first label at the time. It looks bad... but it isn't. When you come to print the labels, they will all be filled with the correct data.
If you do tick the "synchronize labels" button, then you will be able to fine-tune the layout of the data on the label after initially creating it. This, I think, but it is only a matter of opinion, makes it worth living with the disadvantage explained above.... depending on who is going to be using the system, of course. We'll talk about the fine tuning process later.
The Bad News: If you decide that you don't want to tick the "synchronize contents" box, and subsequently come to regret the decision, I don't know how to enable the "synchronize labels" button after the fact. I had to start again, and set up a "new" set of labels to get the button when I needed one. Not a major chore, admittedly.
That's enough about that! On the Options tab, you also want to select the "entire page" radio button. (I think that "single label" prints one label per page..... not that I can imagine why you would want to do that!)
Click "New document" (At last!)
Before going further, do File | Save. It makes sense to store the document in the same folder as the table is in (MyDocs/FDB/FDB004), and to give it the name "Mailing Labels". Note that you are saving a Writer document, not creating a report within Base. Not a big deal, and I'll say more later.
At this stage, you should be looking at an Libre Office Writer document. It may be more complex than any you've used before, but an Libre Office Writer document it is, none-the-less.
You should see a page of labels, but instead of seeing your data on the page, you will see, over and over again, in gray, the field names which make up a label, e.g. (they will be in < and > brackets)...
RestOfName LastName
Addr1
Addr2
City, State
That's okay!! We're on course to success.
The contents of this excursion may be of interest. Note that there is a serious flaw in this approach: It will only generate one sheet of labels, no matter how many records you select. I've only left this material in so that you can play with some of the elements. That play may help you with other things later.. or may not.. I don't know! I wrote what is in the excursion before I learned of the flaw, and before I learned the right way to get a complete set of labels! Feel free to skip the excursion if you wish.
Now, holding both the [Ctrl] and [Shift] keys down, press [F4] to open (or close) the Data Sources window. (The route via the menu is View | Data Sources.)
A new pane should open in your window, with your data showing in it.
Select more than a few rows of your data... it can even be all of them. (I'm afraid you can't use ctrl-A.) Select by clicking in the cell just to the left of the "ID" field cell. You select more than one the same way you do in many lists, i.e. use ctrl-click or shift-click to select more, after you've selected the first.
Once you have selected a number of rows, click on the "Data To Fields" button in the "Table data" toolbar which should be present just above the data. The icon was once a green rectangle between four black lines, two above, two below. At 10/20, on my Libre Office machine, I'm not sure the icon was showing properly... but the tool tip DID say "Data to fields", and did WORK! (It was one of the icons that look like a sheet of typing paper, upper right corner turned down, "(-)" in the middle of the "sheet")
NOW your sheet of labels should look as you would have expected them to look! "File | Print" would turn the screen into ink-on-paper.
Remember: You do not need to press ctrl-shift-F4 for printing labels.... even if you want to be selective.
Once your tables and labels document are properly set up, printing a set of labels is quite easy. Just select File | Print from the labels' window's menu.
You should be asked "Your document contains address database fields. Do you want to print a form letter?", and you should answer "Yes". Slightly odd, perhaps, but that's the right answer anyway!
A rather busy dialog box should pop up, titled "Mail Merge". This is your control panel, in which you specify what records should be printed, and in what order.
Before going on, a detail: In the database list at the top left, it might look like the wrong database is selected. Don't worry about that, as long as the grid view of the relevant table is showing across most of the rest of the top of the dialog.
For now, we'll content ourselves with just sorting the labels by LastName. To do this: Click on the column heading, then click the icon made of an A over a Z, with a down-pointing red arrow to its right.
An annoying "quirk" (bug, I think!) exists in the table's vertical scrolling. If, after sorting, you use the scroll tab to scroll down to the "bottom" of the table, you will not always be seeing the last record. To see that, scroll up a record or two, and then scroll down. You will be able to reach the last record now.
If you want to print all of the records, you simply click OK now.
If you want to select just a few records, I'll show you how now. If you want to use a more clever selection technique, we'll cover that in a moment.
If you click in the gray rectangle just to the left of the left-most column of a record, you will select that record. If you then scroll to another record, and click in the corresponding rectangle while holding shift down, then the second record, and all those between the two you selected, will be selected.
You can also add or remove individual records from the set of selected records simply by ctrl-clicking on the gray rectangle just to the left of the left-most column of a record.
A kind reader helped you by sending me a note, suggesting that I add the following...
Notice the bit of text below the data table that will have something like...
Record 10 of 42 (18).
Here 10 is the number of the currently selected (highlighted) record, the 42 tells you that are 42 records in the database, and that 18 of them have been selected for printing.
Once you've made your selection, click on OK.
Remember that our challenge was to produce an addresses database which held many addresses, only some of which were to be put on labels for Christmas cards? We decided that if the CmasCard field was empty, that person should not receive a card. If there were anything in the field, a mailing label should be printed.
Be sure that your data has some records with empty CmasCard fields, and some which are not empty!
The labels spec we created earlier will do fine for this, our selective printing of some of the records in our database. You do not have the "CmasCard" field on the label do do selection based on what's in the CmasCard field.
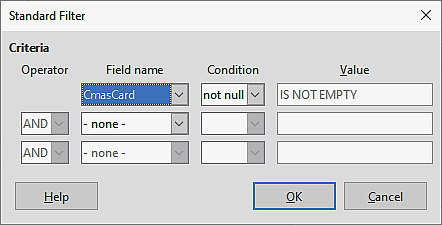
Request that the labels be printed in the same way as before. Say "Yes" to the ".. form letter...?" question. In the mail merge dialog, you'll see four icons based on funnels. The pale, plain one will identify itself as the "Standard Filter" tool if you hover the mouse pointer over it. Click it to define what the "Standard Filter" is for this data at this time.
Use the listboxes to say that the Standard Filter should be that field CmasCard is "not null". Click Okay to close the Standard Filter dialog box. (Beware... if there is a space character in the CmasCard field, that will not count as "not null".)
We've created the filter, but we haven't (yet) told the database to APPLY the filter. To do that, we need to click on the funnel icon with a "tick" mark. Tooltip: "Apply Filter". This is a toggling icon. Click it once, and it acquires a background, to say "Filtering is on". Click it again, the background and the filtering go away again. As you click and re-click it, you will see that the number of records displayed changes. Rather than having to pick through all of the records, checking the CmasCard field of each, you can use the filter to hide all of the records with blank CmasCard fields, select all of the records that remain visible, do "Data To Fields", as before. And you are nearly ready to print your selected addresses onto mailing labels!
Before you do that, you might want to put them in alphabetical order.
Click on the LastName column heading, and then click on the A-over-a-Z-with-an-arrow-next-to-it icon. That will sort the table according to LastName.
Digression: But what if you want your various Smiths sorted with Adam first and Zack last?
Click on the "up arrow" by a "down arrow" icon (tooltip: "Sort") for more complex sorting.
Note that when you've created either a sort or a standard filter, the specifications are not retained in the dialog box you used to create it. Try putting a "CmasCard <> blank" filter on your data. Note that if you click the "Standard Filter" button a second time, it will be empty again, even though the data is still properly filtered, as long as the "Apply Filter" button is "pushed in". A similar situation applies to sorts.
The funnel-with-a-red-X icon removes the filtering and sorting rules that you've put in, if that's what you want to do.
Another digression:
Sadly, the filters you specify are not remembered... but if you set up a query, that would accomplish the same thing. Set up the query first, then run the New | Labels wizard. Somewhat ambiguously, your query will be listed as one of the database's "tables"... but that's not completely daft as a table does result from the running of a query. I wonder what happens if you try to give a query a name you are already using for a table?)
Congratulations! That covers the basics. Don't go off and celebrate just yet, though. There's one more thing to cover.
If you selected the "Synchronize Contents" option, you can edit the labels. For the sake of an example, we're going the alter the first line so that every label starts with "TO:", and so that the name is in a larger typesize than the rest of the label.
Working with the Writer document that all that has gone before has created, use the scroll bars to get the upper left hand label into view.
Click near the start of the first line. If you are lucky, you will place the insertion point within the label, and you can press "Home" to move it to the start of the line.
If you were unlucky, when you clicked on the label, you selected the frame the label is built within. If this happened, you will have selection handles (little green boxes) at the corners of the frame, and in the middle of each edge. No problem. Just press escape to deselect the frame, and try again to click within the label.
When you've got the insertion point in the right place, type "TO: " (Without the quotes, but with a space after the colon.)
You should see the first label now changed. To propagate that change across the whole sheet of labels, click on the Synchronize Labels button which you should see floating somewhere on the screen. No Synchronize" button? You forgot to tick the box on the options, tab, didn't you?? See above!
Don't be alarmed when you see the sheet fill with many copies of one person's label, or just with the field names.
Our next trick is merely re-using the one we just performed, to give you practice, and to reinforce the skill.
Get the insertion point at the right hand end of the first line.
Hold down shift, and use the arrow keys to move the insertion point to the beginning of the name on the label. That should leave the name selected.
Using the window's main menu, "Format | Character | Font", or the quick alternative on the toolbar, change the typesize for the name to something larger.. 16 pt, say. Play around in other ways, too, if you're so inclined. Maybe change the color of the text.
When you've got the first label as you want it, click on the Synchronize button again. Again, the sheet fills with duplicate labels.
One last thing... the document which you created, the one that produces the labels, isn't a Base report. This is no big deal... unless you look for it in the Base project manager, and become alarmed that it isn't there! Or if you have come from some other RDMS and assume that just because they would call such a document a report, Base will!
Once you have set up a "Labels" document, and saved it, you can subsequently open and use it quite independently of "Base". Base doesn't need to be running to print the labels.
When you open the Labels document, you may be asked: "Update all links?" I think you should always say yes... it seems to do no harm!
You are welcome to use the material here free of charge. But if you want to show your appreciation, you easily can make a gift to me or contribute to a charity I would like to help... I've listed several to choose from. (The link will open in a new tab or window.)
Now that you've learned to print labels, you can return to the main menu, or just jump to the tutorial about linking multiple tables. Among other things, it introduces you to the reasons why you would want to undertake the chores involved!
Visit my other sites if you want to see some more polished efforts, on non- Libre Office topics.
If you want an ad hoc address labels application, I sell LunhamLabels as shareware! It is a bit of a pain to set up, but once you are there, it does a good job of doing labels, and can be selective, i.e. print just the labels you've flagged, say for Christmas cards, from your comprehensive addresses list. The latter, for Lunham Labels, is just a text document. Libre Office isn't involved.
I dislike 'fancy' websites with more concern for a flashy appearance than for good content. For a pretty picture, I can go to an art gallery. Of course, an attractive site WITH content deserves praise... as long as that pretty face doesn't cost download time. In any case....
I am trying to present this material in a format which makes it easy for you to USE it. There are two aspects to that: The way it is split up, and the way it is posted. See the main index to this material for more information about the way it is split up, and the way it is posted.
PLEASE >>> Click here to visit editor's Sheepdog Software freeware, shareware pages <<< PLEASE
If you liked this ooBase tutorial, see the main index for information other help from the same author.
Editor's email address. Suggestions welcomed! - - - Want a site hosted, or email? I like 1&1's services.
![]() Page has been tested for compliance with INDUSTRY (not MS-only) standards, using the free, publicly accessible validator at validator.w3.org. Mostly passes.
Page has been tested for compliance with INDUSTRY (not MS-only) standards, using the free, publicly accessible validator at validator.w3.org. Mostly passes.
AND passes...

. . . . . P a g e . . . E n d s . . . . .