This is one of a series of essays I have planned (not all written yet!) on connecting Arduinos to other devices over a serial link. In this essay we will do something very simple, rather crudely, but it illustrates some fundamental concepts. We will have nothing more than an Arduino connected to a host PC via the usual "programming" cable. The host PC will be running the normal Arduino IDE software. The Arduino will have an LED which will be winking slowly or quickly, depending on whether the last thing sent to it from the host PC, which I will just call "the PC" from now on, was an "s" (for slow) or an "f" (for fast).
"Serial" and "RS-232" are NOT just two ways of saying the same thing. RS-232 comms do use serial data, so you might think that you can hook up the serial "stuff" I'm going to talk about... including your Arduino... to RS-232 devices. Or to the RS-232 port of a big PC. NOT SO!!
All the ins and outs of that are beyond the scope of this tutorial. I've inserted this warning just in case someone is tempted to "extend" the ideas here, hook an Arduino directly to something RS-232... and fry their Arduino! (Connecting to RS-232 is discussed in other tutorials in this group.)
You may be puzzled by how we can send things to the Arduino other than the basic program ("sketch") that we want it to run. All will be revealed!
Set up your Arduino with an LED and resistor on pin 12. (See my page about LEDs, if you are new to these things. It will open in its own tab.)
Put the following program into your Arduino. Or the alternative solution set out at the end of this. Start it running.
//FrmSer1
//ver 28mar2010+tweaks

//For http://sheepdogguides.com/arduino/
//               art4SeSimpFrmIDE.htm

//Much of this, of course, I don't pretend otherwise,
//  comes from examples in the Arduino reference pages.

const int Out0=13;//pin LED is connected to.
//   Change if you wish. Many Arduinos have an
//   LED and resistor on pin 13 on the PCB.
//   LED should go through resistor to ground.
//   Set pin high to turn LED on.

boolean boFast=true;//created as global variable because
  //value in it must persist from call to call of "loop"

void setup()
{
Serial.begin(9600);//For access to serial monitor channel
pinMode(Out0,OUTPUT);
Serial.print("Enter s or f on serial terminal ");
Serial.println("to make wink fast or slow");
//Two lines used just for readability on
//a web page that explains this program.
};

void fastwink()
//Do one quick off-on... this is called many times as
//the function "loop" executes repeatedly, thus the
//Arduino appears to have a "wink quickly" function,
//even though the quick winking is a combination of
//two ingredients
{
digitalWrite(Out0,HIGH);//HIGH turns LED OFF.
delay(80);
digitalWrite(Out0,LOW);
delay(80);
};

void slowwink()
//Similar to fastwink. See rem there.
{
digitalWrite(Out0,HIGH);
delay(900);
digitalWrite(Out0,LOW);
delay(900);
};

void loop()
{
int incomingByte=0;//create and initialize a local variable

//The "then" part of the following will only execute
//  after you have sent something to the Arduino
if (Serial.available() > 0) {
		// read the incoming byte:
		incomingByte = Serial.read();
		// say what you got:
		Serial.print("I received: ");
		Serial.print(incomingByte, DEC);
        if (incomingByte==102) {boFast=true;
                Serial.println(", code for f. LED will wink fast.");};
        if (incomingByte==115) {boFast=false;
                Serial.println(", code for s. LED will wink slowly.");};
        if ((incomingByte!=102)&&(incomingByte!=115)) {
             Serial.println(". Only lower case s and f do anything.");};
     }

//The following happen every time you pass through "loop"
if (boFast)  {fastwink();};
if (!boFast) {slowwink();};
};
Once that is in the Arduino and running, the LED should blink quite rapidly... about 6 cycles per second.
But how to "send an s to the Arduino"??
Have you used the serial monitor hidden in the IDE?
Across the top of the Arduino IDE window, you should see the following icons....
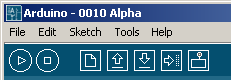
Once your program has been uploaded to the Arduino, click on the right hand icon, the one like an upside down window shade. That should change what you see at the bottom of the Arduino's IDE's window. You should now be looking at the IDE's "serial monitor". In it, you should already see the "Enter s or f on serial terminal to make wink fast or slow" message. Press the "s" key, and then press the Enter key... and an s should then be sent to the Arduino, and so the LED should flash slowly until further notice. You should also get the "I received: 115, code for s. LED will wink slowly." message as soon as the Enter key has been pressed after the "s".
Wow! The same cable which a moment ago was used to program the Arduino (and set the program running) is now providing a serial link between Arduino and host PC. It is so easy to become blase about things. Just try making a system with these features, over a connection that is by USB beneath the surface of the software. Then you'll see why I said "Wow". Don't forget to include re-programmable EEPROM, with in situ programming. And a big community of users who can help when mysteries arise.
So far we have only used messages from the PC to the Arduino. Fear not... we can do things in the other direction, too. That's a story for another time. Before you go off to that, be sure to consider the following odds and ends.
The Arduino's serial link does not provide hardware handshaking. What? You want it all? Sorry. But, for the basic serial port we are using here it does provide a buffer and asynchronous receiving, as long as you don't fool around with the Arduino's use of its interrupts.
What's all THAT mean? It means that your program doesn't have to ensure that it is always "listening". The serial data can arrive at any time. The Arduino's operating system "tucks away" things as they arrive via the serial port. You can then deal with them when it suits you. That's what the....
if (Serial.available() > 0) {
... is all about. Serial.available() will return 0 if nothing has been "captured", i.e. if nothing has been put in the serial buffer. If some incoming byte has been "harvested" for you from the serial port, then Serial.available() will return something more than zero, and calling Serial.read() will fetch whatever it was that arrived via the serial port.
N.B. The OTHER serial port, which we will talk about in future essays, does not have Serial.available() in the standard- at- March- 2010 SoftwareSerial library... but there is a new library you can use which does have the function. Whew.
Other details....
Note that the "loop" function is in two parts. The second part is the last two lines.....
if (boFast)  {fastwink();};
if (!boFast) {slowwink();};
They are executed every time you pass through the loop. (Yes, they could be merged into one statement by using an "else", but the way I've written them makes it really, really easy to see what is going on, doesn't it? (Just in case: I will mention that "!=" means "does not equal".)
All of the "stuff" above the two lines just cited boil down to "If something was sent via the serial port, have a look at it, and do things in certain cases. "Do things" will sometimes include making changes to what is stored in the boolean variable "boFast". (Boolean variable: Something that can hold "true" or "false".)
Another detail:
if ((incomingByte!=102)&&(incomingByte!=115)) {
... says "if the byte in that variable does not equal (!=) 102, AND (in the logical sense) (&&) it does not equal 115, then....
Well. That's a start. Pretty pedestrian, so far, but not if you haven't done this sort of stuff before, and it also lays the groundwork for what comes next... Doing similar things, but using different pins on the Arduino. The virtue of using different pins is that it is a stage upon the road of connecting things other than the IDE running in a host PC.
I forgot I'd written the above! And wrote "the same" program again. The following is better in some ways (more clear) and worse in others (unnecessarily complex "get_line")
Exercise for the sudent: combine the best of both into one program!
//PCtoArd
//ver 26Jly10

//#include <avr/pgmspace.h>
//#include <sensor_pff.h>

//SENSOR_PFF sd;
//byte sensor_start = 0;

#define LEDpin 13 //no ; here
char buff[128];	/* i/o buffer, for get_line */
boolean boFlashQuickly=false;

void setup()
{
	  pinMode(LEDpin,OUTPUT);
	  delay(300);//let system settle
	  Serial.begin(9600);

	  Serial.println("\n\nDemo of control of Arduino from PC\n");
	Serial.println("See http://sheepdogguides.com/ardino/ahttoc.htm\n");
	  Serial.println("for latest details.\n");
	  Serial.println("\nPress the enter key after pressing s or q.\n");
	Serial.print('>');
}

void loop()
{
  char *ptr;

  if(Serial.available()==true){//Cmnds waiting

	 get_line(buff, sizeof(buff));
	 ptr = buff;

	 switch (*ptr++) {//switch

	 case 'q':   // Quickly flash
	    //Serial.print("\nWill flash quickly\n");
	    boFlashQuickly=true;
	    break;//end "q"

	 case 's':    // Slowly flash
	    //Serial.print("\nWill flash slowly\n");
	    boFlashQuickly=false;
	    break;//end "q"

	 default:
	    Serial.print("Unrecognized. Only s and q recognized\n");
	    break;//end default

	}//end "switch..."
    Serial.print('>');
   }//if, cmnd waiting
  else {//1 no cmnds waiting
   if (boFlashQuickly){//2
	  QuicklyFlash();
	  }//end if "2"
	else {//2
	  SlowlyFlash();
	  }//end of else(2)
    }//1 end of level 1 "if" clause, no cmnds waiting
}//end "loop()"

void QuicklyFlash(){
    LEDOn();
    delay(100);
    LEDOff();
    delay(100);
}

void SlowlyFlash(){
    LEDOn();
    delay(900);
    LEDOff();
    delay(900);
}

void LEDOn(){
digitalWrite(LEDpin,LOW);//Yes- LOW for ON
};

void LEDOff(){
digitalWrite(LEDpin,HIGH);
};

//Treat "GET_LINE" as a black box, for now.
//Nothing to change in it.
//Press the "enter" key after entering your 1 letter command
static void get_line (char *buff, byte len)
{
	byte c;
	int idx = 0;

	for (;;) {//1 Start infinite loop... will only exit via "break"
		if(Serial.available()){//2
			c = Serial.read();
			if (((byte)c >= ' ') && (idx < len - 1)) {
				buff[idx++] = c; Serial.print(c);
			}//3
		}else break;//2
	}//1 (ends "for...")
	buff[idx] = 0;
//	Serial.print(c);
	Serial.print('\n');
}
//  === END OF GET_LINE ===
Here is how you can contact this page's editor. This page, and the software it references, ©TK Boyd, 1/2010.
Page tested for compliance with INDUSTRY (not MS-only) standards, using the free, publicly accessible validator at validator.w3.org