This page is an attempt to take a beginner on a whirlwind tour of some basics of using the database in LibreOffice or the very similar one in Open Office.
For many years, page delivered an introductory lesson at the start of tutorials by me relating to Open Office's "Base", which I usually refer to as "ooBase". Spring 2020: I am "making the switch", migrating to LibreOffice's Base. This essay has been editied to reflect that.
It was written in September 2014, with Open Office version 4.1.1, running under the Windows XP operating system.
The May 2020 review was done using LibreOffice Base on a Windows 10 machine.
It is atypical of most of the tutorials I write, in that it moves along, taking no prisoners, and explaining little about options, ways to go wrong, why things are the way they are...
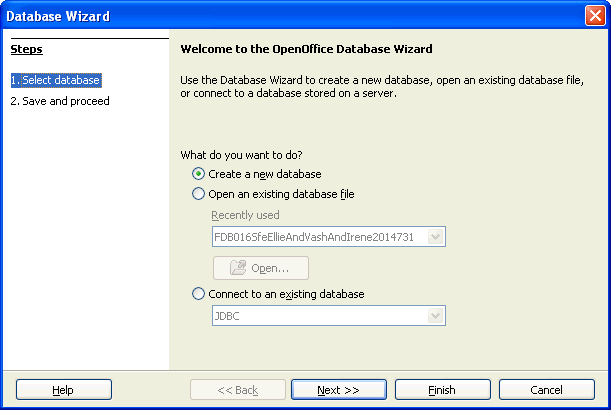
Start up the Libre Office database. That should give rise to...
... which is a general entry point, allowing you, as you want to now, to create a new database... or to open a previously created one for more work.
So... leave "Create New" selected, click "Next".
Tell Base to register it, and open for editing. Click Finish.
You'll get a normal "Save As" dialog. For even a relatively complex Base database, you get a single file. But probably best to create a folder called "Databases" (or somesuch), and within that a folder for everything associated with THIS database. I'm calling mine FDB2014908. ("FreeDataBase yyyymdd"), and putting it in a folder of the same name. (Name from 2014, September, 8th.. day this was first drafted.)
You should now be looking at the Libre Office Base project management window. (The link will take you to help with that.)...
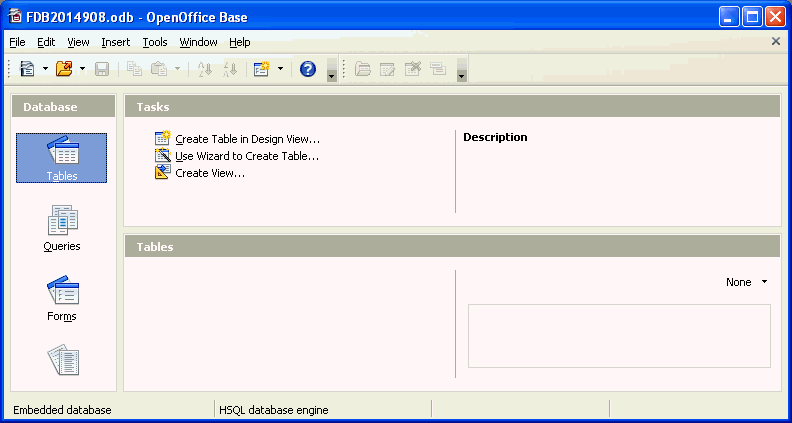
... What you select in the left pane affects what you see in the rest of the project management window. Having "tables" selected, as in the illustration, is what you need just now.
Sometimes using "Create in Design View" is best; other times use the wizards . For creating tables, I recommend the former,
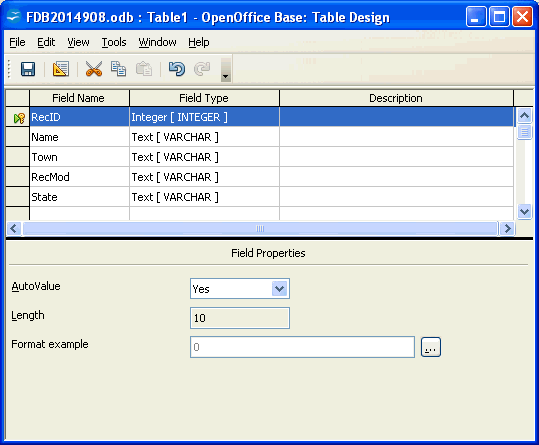
I invoked "Design View" and did some filling in, leaving me with....
A few comments....
You can just download the database... but where's the fun in that? More importantly: Where's the learning?
(The download gives you a single file. Save it on your PC. Once you have Libre Office installed on your PC, double-clicking my file will fire up the RDBMS called "Base", part of Libre Office, and show you the tables, etc, of my "NameState" database, discussed in this tutorial. In the version you can download, I've added some more records, AND a data entry FORM.
Each line in the table at the top is a FIELD in the TABLE. (Both important concepts. See other pages in my site to become solid on how database software uses those terms.)
The panel at the bottom lets you alter the properties of the fields. Change the selected field to change what is shown in the bottom panel.
Except for the first field, I just used default values for the different field's properties. When you know more, you will need to do more than that, but it will do for this quick tour.
However, for the first field, which I named "RecID" (for "RECord IDentifier"), I....
To set a field as primary key: Right-click in the first column of the design grid, select "Primary Key" from the menu. The green arrow/key icon in that first column in the illustration above tells you I've made RecID the primary key for this table.
1) Every table must have one.
2) Every RECORD must have a different value in the primary key field.
3) It is good if you can make the primary key mean something. A mere "serial number", as used in this table, is inefficient. But will do for now. The nice thing about an integer type primary key is that you can leave assigning the value to the computer.
Do not, by the way, assume that the number in the primary key in our table will be of much use to US. It is "for the computer". Don't imagine that the numbers will be entirely "logical". But you will find, for what it is worth, that no two records have the same value in the RecID field. (If you try to create that situation, you will find that you cannot leave the record until you have changed the number to some number not already in use.
My just-concluded "discussion" of primary keys is an example of something. In this essay, I am going to skip many, many details about many things. I am not going to tell you about all your choices, all the pros and cons. I AM going to get you a small working database, and do a few things with it.
When you have filled in the Table Design grid as in the illustration, save your table. Call it NameState because it is a table with names and states in it. ("State" as in "California", "Mississippi", "Vermont", etc.... this is an incomplete contacts list database we are building.)
You can then close the window in which you have been designing the table, and go back to the main project management window.
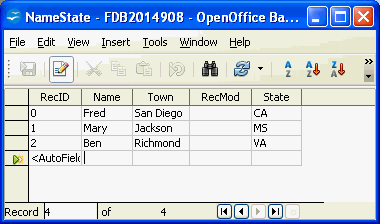
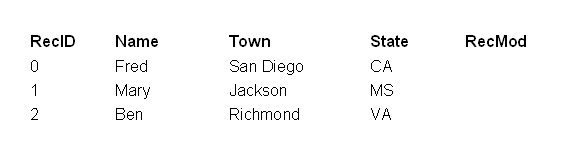
There... if you have "tables" selected in the left pane... you should see and entry for NameState. Double-click that. Fill in the table, as follows. (Don't worry about the RecMod field yet. And let the computer fill in the RecID column. It won't matter if your numbers are different from mine.)
Be sure to "leave" the last record's line when you've entered the data for it. Until you leave the line, the data is not "in" the database.
In the previous we HAVE left all three of the lines with records. In the following we have NOT left the 4th line; we haven't yet (actually) entered the record for Sarah.

The "pencil" in the left hand column, and the fact that we haven't yet received a number in the RecID column tell me that this record is still only pending.
If you are in the last column, and the insertion point is to the right of the "VT", then just pressing enter, will tell the database to make the record part of the "NameState" table. The insertion point will be in the right place to start entering a new record.
You can also "leave" a record with the "arrow keys", or by using the mouse and clicking someplace outside the record.
... so good! We have a table with some data in it.
In doing work under Libre Office's database package, "Base", there are two sorts of saving: You need, when changes have been made, to save the design of tables, forms, queries, reports.
You should also, from time to time, also save "the whole thing". That will include the saving of your data, which isn't saved when you "merely" save a design. To save the whole thing, use the save that is part of the main project management window.
Don't worry... if you try to exit without doing one or the other of the necessary "saves", you will be prompted to do them.
Onward.
In the real world, with small databases, people often work with their tables directly. Not a Good Idea.... you ought to create a FORM, and work with your data from there.
But for now, I want to press on to reports.
Click on the "Reports" option in the left hand panel of the main project management window, and then invoke "Use Wizard To Create Report". That should throw up....
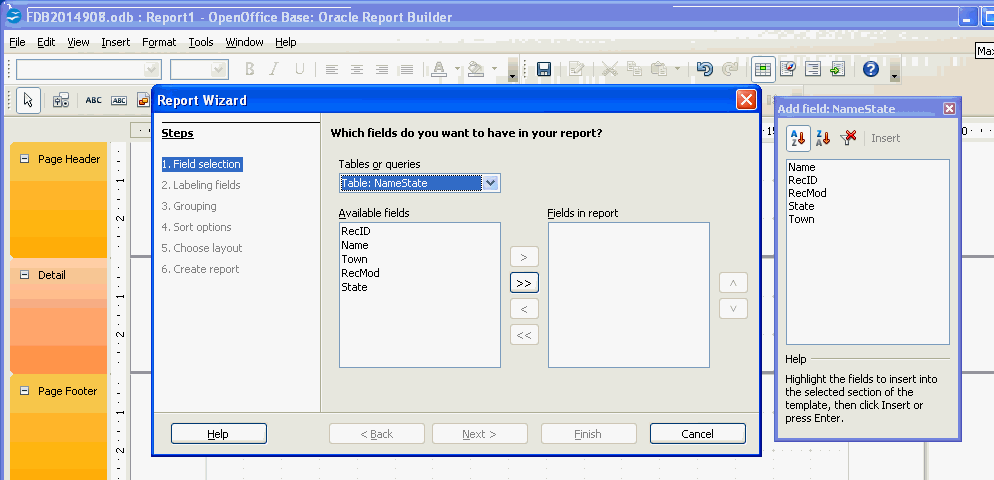
Click the double- right- facing- arrows button to get....
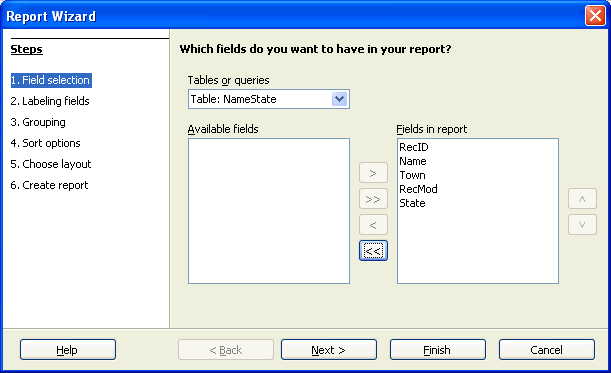
... and click "Next".
Don't make any changes to the properties shown for Labeling, Grouping, Sorting or Layout... just click "Next", except, in Layout, change the layout of the report you are designing to make it use "Portrait" orientation.
In the final step of the report wizard, you will usually want to give the report a better name than that which the wizard comes up with... but for this one, "NameState" is nearly good enough. It would be best to prefix that with "R-", to prevent any chance of confusing the NameState report with the NameState table. (So make that little edit, and then...)
You want a dynamic report, and at this stage, let the wizard go ahead and "create report now", by clicking "Finish".
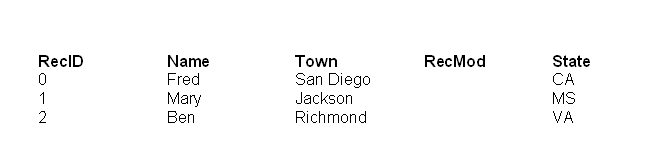
And you should see a simple little report of the data in our database....
Where do you go from here? You've made a table, the basis of all database work, and you've created a report to "spit out" your data.
You might want to re-arrange things on the report.
Close the report you generated a moment ago, if it is still on the screen.
In the main project management window, be sure the "reports" icon is selected, left hand panel, then right-click on "R-NameState", invoke "edit". You should get....
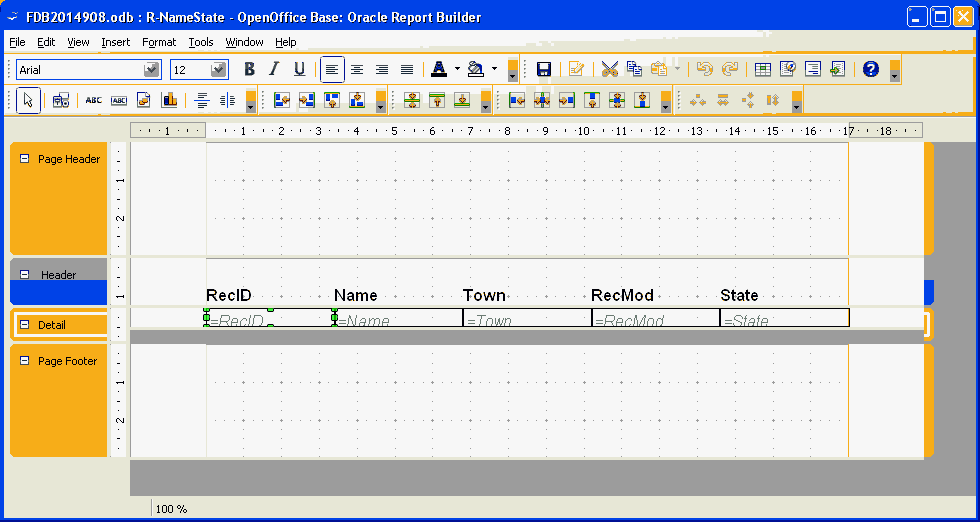
.. well. Nearly that. You need to, as I did, click on the =RecID field to get the 8 green squares at the corners and middles of the field's box.
Use these to re-size the box. Make it more narrow, left- to- right.
Working with report layouts may be frustrating at first... but you will get the hang of it before long. It is just tedious, at best, and very tedious until you discover some of the short-cuts. Try to achieve the following. Be careful not to move anything out of whatever section it began in. To achieve the new layout, you don't need to use the "General" and "Data" tabs at the right of the report diagram... you just use selecting and corner dragging and object dragging. Save your work often! Remember that Ctrl-Z will often undo whatever your last edit was. And Ctrl-Z again, immediately, may undo the one before, etc.
I set up the "RecMod" field as a place to enter a "code" to say when the RECord was most recently MODified.
Any decent database can "do" dates... but they are often the source of headaches. I do almost all my dates as simple strings in the form yyyymdd.
Under my scheme....
2013125 Jan 25, 2013
2013501 May 1, 2013
2013508 May 8, 2013
2013521 May 21, 2013
2013c06 Dec 6, 2013
2014130 Jan 30, 2014
That's almost self explanatory, I hope. But note that the month is done with a single character. 1-9 for January to September, a, b, or c for October, November, December. It works. It has advantages. Trust me! (And yes, OO will, by default, put 13a... after 139...)
N.B.: You must supply a leading zero for any dates in the range 1-9, as in the second and third records.
N.B.: You must supply a leading zero for any dates in the range 1-9, as in the second and third records.
Really- this system does work well in practice. One of the prime benefits is that although the date entries are "just text", if you sort on that column, the records will be sorted into chronological order.
I've added a few more records, and given everyone RecMod data to bring the data along to....
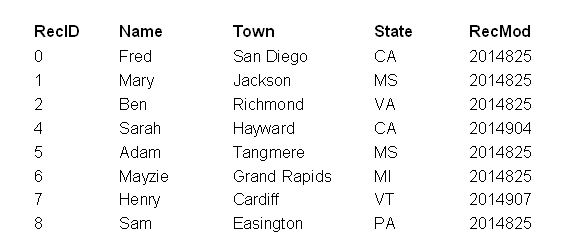
That table asserts that most of the data was entered on August 25, 2014 (2014825), but the records for Sarah and Henry were added, or changed, a few days later, in early September.
That's it, for this quick start tutorial. It certainly begs many questions... questions I hope you will find answers to if you work through the other tutorials I have put up on my site. If you are a beginner, go thought the "Level 0" and "Level One" tutorials.
But I've felt for a while that something fast paced like this might have a place in helping people get started?
(Yes, of course, there are ways to arrange for the records in the report (and on the screen at other times) to be sorted into whatever order you need. Or, say, to select just the records for people living in California. Etc, etc, ETC.... but those are stories for another day...)
Unless you are very new to Libre Office Base and databases in general, I think you could easily absorb what is in fdb3repsortsub.htm my tutorial about producing a report listing a subset of your records. (You'd have to put some more data in the simple database we created in the course of the present tutorial.) And the records in the report are sorted. You could, for instance, do a report of the people you know in MA, sorted by name. The tutorial I am suggesting you try uses a QUERY (something you should get to grips with before long) to extract the required records. The report is based on the result ("output") of the query, rather than being based directly on the NameState table, which is the simple answer we used in the tutorial you are reading.
Don't forget... You can download the database. (That gives you a single file. Save it on your PC. Once you have Libre Office installed on your PC, double-clicking my file will fire up the RDBMS called "Base", part of Libre Office, and show you the tables, etc, of my "NameState" database, discussed in this tutorial. In the version you can download, I've added some more records, AND a data entry FORM.
Don't let the significant "hump" at the base of the learning curve defeat you!
For other material, see the main page for my Libre Office database tutorials.
![]() Page has been tested for compliance with INDUSTRY (not MS-only) standards, using the free, publicly accessible validator at validator.w3.org. Mostly passes.
Page has been tested for compliance with INDUSTRY (not MS-only) standards, using the free, publicly accessible validator at validator.w3.org. Mostly passes.
AND passes...

. . . . . P a g e . . . E n d s . . . . .