 Bookmark this on Delicious
 Recommend to StumbleUpon
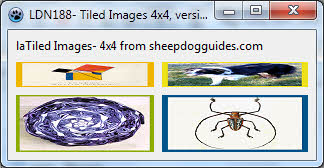
Nothing "profound" in this. Nothing that you "need", generally. It does illustrate the cleverness of the Anchor Editor. It creates "a pretty".
In the illustration, we can see three screenshots of the application in action. In each, a window has been created, with four images in it. You can resize the window, and the size of the four images adjusts accordingly... as I hope the three examples of the application in action show.

There are many ways to do this. Here, we will use a simple method. One consequence of our simple approach is that the program will only cope well with a 4x4 grid of images. Different techniques will be necessary for other grids.
As usual with SheepdogGuides tutorials, you can download a zip with the sourcecode. (549kb)
Unusually, I haven't included the exe as part of that zip... it came to 14,000kb. But you can download the app, almost ready to run. That will download as "ldn188.RenameExe". You have to rename it "ldn188.Exe". (The rename step was incorporated because some computers get all upset if you try to download an .exe file.)
Start a project in the usual way. Put a label on the form with author information, etc. You'll see my usual answer to version documentation if you search on "vers".
Put four image components on the form. Name them imUL, imUR, imLL, imLR for "image... upper/lower... left/right".
We're nearly done! All we need now is to arrange for some images to appear in the image components, and to arrange for everything to rearrange nicely.
You could write a book on putting images in image components. But for today's wants, all you need to do is...
Put four .jpgs into the same folder as your app. I've called them ImageUL.jpg, ImageUR.jpg, ImageLL.jpg, ImageLR.jpg. (I'm not clever enough to be clever.)
In the FormCreate handler, just insert...
imUL.picture.loadfromfile('ImageUL.jpg');
(You may see suggestions on the web that you should add "jpeg" to the Uses clause. With Lazarus vers 1.0, at least, you don't need too any more.)
That will "work"! (I'm sure you can extend it to deal with the other three image components)... sort of.
In my case, imUL had just a small area from the .jpeg I'd loaded to it.
No problem... we just need to tweak some of the properties of the component. You can, of course, do this in the Object Inspector. However, if you put code in the application to invoke non-standard properties, you are less likely to have a hassle when you come to try to derive something from the application later. But the Object Inspector is a great way to see what properties are available, and "try" various settings.
The one we need to change for our wants is "Stretch". Should be set "true", so, OnFormCreate...
imUL.stretch:=true;
Another property of any TImage object needs mentioning here: "Proportional". It is false, by default, and it was left "false" for my wants in this application. If it is set to true, then the images retain their aspect ratio, they don't "stretch out" or "squash up". They WILL get bigger or smaller, but only as far as they can without having to introduce distortion to fill the available area horizontally and vertically. If you set the Proportional property to "True" in this application, without making other changes, the layout of the four images, relative to one another, will get, to my eye, "messy".
A detail: All of the images have borders which are just part of the image itself. The borders you see are not cleverly provided by the program.
Fill in the code for all four images, and we're ready to move on to...
There are aspects of what we're doing next which are not unlike trying to pat your head and rub your abdomen.
Don't worry too much as we go along about WHERE we are going. We WILL get there! We're going to tackle "bits" at a time, and it is only when all the bits are in place that the full "answer" emerges.
Have you played with the Anchor Editor? It is WONDERFUL... but you can get yourself into all sorts of tangles.
Before you invoke that, get yourself to the same starting point I had. Just use simple dragging to arrange things roughly like...
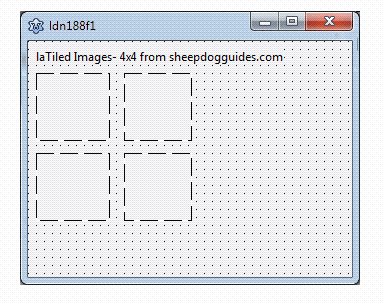
Run the program. Change the size of the window. All should be "well", but very boring. The images maintain the same size and position, regardless of the app's window's size.
Now select the lower right hand image component, right-click, and invoke the Anchor Editor....
Here it is, with some shading supplied by me, and tweaks to the default settings... the tweaks I want you to make for imLR....

The Anchor Editor has 5 sub-sections, which I have picked out in color. Forget for the moment the central section. Look at the four around the edge.
Each controls where one edge of the component will lie.... IF the "enabled" box for that sub-section is ticked.
Each has a "Sibling" property. ("Parent" would, I think, have made more intuitive sense to me, but what do I know? And yes, using "parent" could well introduce a different confusion.) We've set Sibling for the right and bottom anchoring of imLR to ldn188f1, the main form of our application, because we want the edge positioned relative to the whole form.
In each sub-section, there are also three radio buttons. They determine how the component we are configuring "lines up" on its "sibling".
I must admit that I don't fully understand exactly what each of the radio buttons mandate. But, for our wants, the ones I've used WORK. (Middle radio button in each case.)
Good news! You can play with the effects of different configurations directly in the "edit" mode of Lazarus.... but don't do that JUST yet...
In addition to the three (if you include the "enabled" tick-box) things in each of the four "anchoring" sub-sections, the numbers in the central sub-section, the magenta one, "Border Space" matter! (Remember I called it "patting head/ rubbing tummy"?)
The numbers in the Border Space sub-section are "global"... they don't change, as you change to different "Anchoring" sub-sections.
We'll start with the four numbers at "north", "east", "south" and "west". I think they specify how much space will appear between the corresponding edge of the component you are anchoring, and the relevant reference point (RRP!) of the sibling you have designated.
I "got fancy" and introduce RRP because things get a bit obscure (to me, anyway) when you use the non-obvious choices with the three radio buttons.
With the settings we're using, there ought to be an 8 pixel space between the bottom edge of the form and the bottom edge of imLR, and an 8 pixel space between the right hand edge of the form and the right hand edge of imLR.
If you were, say, to change the radio button for the Right Anchoring to the right hand one, components centered on a line, the component would center on the form. (With that radio button selected, none of the possibly relevant numbers in Border Space have any effect.)
Moving on: The central number in the Border Space sub-section works as follows: If the anchoring mechanism is paying any attention to any of the other numbers, then it will be added to what is there. E.g., if you aren't using "center the component", but have it anchored to an edge, if you put, say, 5 in the center box of Border Space, and zero everywhere else, you will have a 5 pixel space on all sides of the component you are anchoring. Leave 5 in the center, make the "eastern" number 4, and you will have 5/ 9/ 5/ 5 to north/east/south/west, respectively.
Whew! A wonderfully flexible tool... but hard to describe comprehensively. But I hope you now have the beginnings of an understanding.
In all that we do in this project, we will anchor things to the overall form, and we will leave the middle number in Border Space at zero.
I hope you can anchor the upper right hand image easily enough? Remember: Tick the enable buttons just for top an left, set sibling to the form, set the "west" space at 8, and the "north" number high enough to uncover the label at the top of the form....
AND select the right radio buttons. For imUL, we need the first in each sub-section.
Now set the anchoring for imUR and imLL.
Having done all of that, run the app again, and do some re-sizing.
The four images should "stick" to the corners of the window... but they always stay the same size. Pity. If the app is running in a big window, the images aren't using the area available.
So far so good. Now we will also use the Anchor Editor to arrange that the image components re-size as well as re-position themselves within the app's window.
Start with the upper left component. Re-activate the Anchor Editor, if need be.
Set imUL's RIGHT anchoring enabled, with imUR as the sibling, and select the first radio button. (Two components separated by a vertical line.). Set the "east" border space number to 8.
See what happens when you run the app like that.
It sort of works! Now the upper pair of images use the full width of the window, but the one on the right never changes width, and the one on the left is usually ridiculous.
Wouldn't it be nice if you could tell imUR to use imUL's right hand edge as a sibling, and somehow have things "just work out." You can't, though.
So... Baldrick would be so proud... we're going to use a little trick.
(All of the following can be done with the Object Inspector, unless you'd rather put them in OnFormCreate.) Put a label on the form. Name it laRefPoint. Set AutoSize false. Set width and height to 8.
Use the Anchor Editor to set laRefPoint up as follows...
Top and left anchoring (only) enabled. Sibling the main form in both cases. The radio button with two components each split by a single line in both cases. (The last one, in the version of the Anchor Editor I have. "Center on it".)
Once that is set up, go back to the Anchor Editor settings for imUL and imUR. Enable right anchoring for imUL, and set the sibling as laRefPoint. Set the "east" border spacing to 4. (You'll get another 4 from the settings for imUR, so, to maintain our "border of 8" scheme, we use 4 twice.).
Do something like that, reversed, for imUR.
Run the app. Lots remains to be done, but you should find that the top two images now fill the width of the window, sharing it equally between themselves!
Pretty neat? If you don't think so, try programming that behavior by the "old ways".
Now change the anchoring of the bottoms of imUL and imUR, again making laRefPoint the sibling.
And so on. When all is working well, you might be tempted to change laRefPoint.visible to false, to get rid of the little "thing" in the center of the screen. Try it. Everything goes to pieces! You are left with the "top" image filling the window, blotting out everything... even the previously visible author/ version label material! Who would be a programmer? But you CAN get rid of the "little thing"... leave laRefPoint "visible"... but set the caption to... Nothing! Ha! I'm not clever... but I'm stubborn.
So... there you have it.
In a moment, I will explore some possible extensions of what we have done. First... an admission of a "cheat".
We cheated. The application doesn't actually distribute the images across the window "evenly". The "cheat" isn't normally visible, but in the extreme case below...
... the problem shows. We've arranged for laRefPoint to be in the middle of the window, without making allowance for the fact that a narrow band at the top is not available for the images.
While I haven't tested the idea, I strongly suspect that the problem could be overcome, if it bothers you, by putting a panel on the form, sizing it to cover the area to be used for displaying the images, and then putting laRefPoint and the four TImage objects on the panel.
If that works, and you are industrious, this project could be expanded to display 16 images (or more!) by setting up four panels on the window, each displaying four images.
There's no reason why you shouldn't invoke lines like...
imUL.picture.loadfromfile('ImageUL.jpg');
... as often as you wish, while the application is running. Of course, there'd be no point, unless what is in ImageUL.jpg has changed since the first time you invoked the line, or unless you use LoadFromFile to load a different file to the upper left (or other) position in the window.
You might use code very similar to what we've developed to display the latest images being FTP'd to a server from IP cams "watching" something.
And there the time I have for this runs out! Always interested in your thoughts... or even just a Facebook like, whatever.
Search across all my sites with the Google search...

|
|
![]() Page tested for compliance with INDUSTRY (not MS-only) standards, using the free, publicly accessible validator at validator.w3.org. Mostly passes. There were two "unknown attributes" in Google+ button code. Sigh.
Page tested for compliance with INDUSTRY (not MS-only) standards, using the free, publicly accessible validator at validator.w3.org. Mostly passes. There were two "unknown attributes" in Google+ button code. Sigh.
....... P a g e . . . E n d s .....