 Bookmark this on Delicious
 Recommend toStumbleUpon
Measuring is essential to any scientist.
Before I go further, I have to explain that this page still has some pretty dreadful rough edges. I hope you will find that it has enough Good Stuff to repay you your time.. but it is incomplete and in need of some editing. That said... onward...
You can't get very far in any science without measuring things.
The point of this page is NOT to have "the facts" of where the sun is in the sky memorized forever. But I hope you WILL come away from this page with your eyes more open in respect of HOW we can devise ways to measure things. And that you will enjoy the "quest" for a sun position measuring instrument. Hint: You'll enjoy it more, if you stop before you get to my answer to various elements of the problem. What's your answer? How is it strong? Weak?
From a fairly early age (in proportion to their distance from the equator, I suspect!) people grasp that winter and summer are different. Ask even a young child about the differences, and the child will probably say something about more sun, or longer days in the summer. With a little help, the child may recall that the sun is higher in the sky at noon. And maybe even that where it rises and sets changes with the seasons.
An aside: Please don't propagate the idea that we are warmer in the summer because we're "nearer" the sun! It is a combination of more hours of daylight, and the fact that the light is more directly overhead, and able to reach us more directly, without the attenuation arising from passing so obliquely through the atmosphere. Thus more of the energy reaches us, less of it goes to heating air and being reflected back into space. End of rant against bad science in primary schools!
So... even youngsters have some idea of the sun's progress across the sky.
Youngsters can tell a fat person from a lean person... but can the vary young give you a good estimate of the person's mass in, say kg?
How can we put numbers on where the sun is?
There's a simple answer... and like so many simple answers it isn't the best. But will start with it...
We could make something a bit like the gun on the bow of a frigate. It can be swiveled left and right, and it can be raised or lowered. Assume we are dealing with the HMS Belfast, moored in the river passing through London. The position of the ship's guns can be given with just three numbers:
(Those numbers, combined with the standard ammunition for those guns means that the southern-most motorway service station, 11 miles away on the M1 motorway would be in danger if the guns were loaded. Ah! the useful things you learn at the Flat Earth Academy!)
It would be easy to combine the first two numbers can be combined into "degrees clockwise from North", 305 degrees.
You could use the Belfast's guns, swing them to point at the sun, and then use the numbers of rotation and elevation to say where the sun is. Or something a bit like the Belfast's guns.
But this would be a Bad instrument for measuring the sun's position.
We want our instrument to be user friendly, and accurate. When the sun is in the same place, we want to get the same numbers. Easily.
How are you going to know that the Belfast's guns are pointed exactly at the sun? You don't want to look at the sun in any of this measuring stuff... it can hurt your eyes. (Yes... there are ways you could, indirectly, see that the gun was correctly pointed. I'll leave how you would do that to you.)
The two angles you are using to say where the sun is are not entirely satisfactory... but my "solution" uses something similar, on that front, so I can't complain too much, I suppose.
The instrument, even scaled down, wouldn't be particularly easy to build or operate... too many moving parts. The instrument I am going to propose is so easy to operate that it could automated.
Even a model of the guns would be quite a complicated thing to build... compared to what I am going to suggest. Complication means expense. And it means Ways To Go Wrong.
So... the guns make a reasonable starting point. I hope you have seen that they could be pressed into service? If you had grad students to sit with them, and take a reading, say once an hour, for a year, at the end of the year you could say "Where was the sun at 1pm on May 5th? And the grad students would swing the gun to the correct rotation, and raise it to the right elevation and say "There".
How about this for an answer? All you need is...
You'll need one more thing for really "good" numbers... but you can get pretty good numbers even without that.
Our instrument is not only going to let us measure... i.e turn into numbers... the sun's position in the sky, but it will even (easily) give us a way to diagram the path the sun follows across the sky.
Just a little farther down the page, I will show you how to set up the "stuff". But first take a moment to see if you can come up with the answer for yourself!
v
v
v .... answer shortly! Don't scroll down until you've seen how you can do on your own!
v
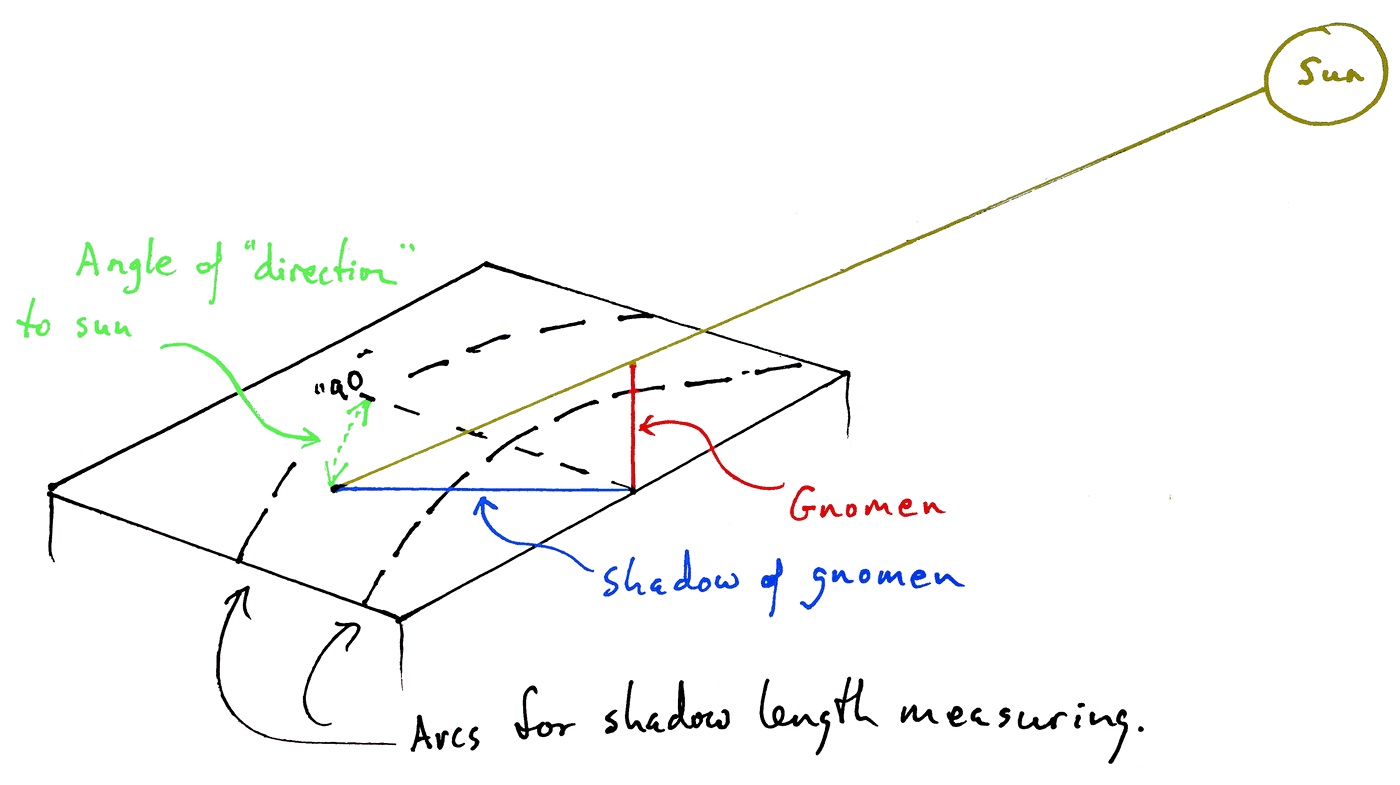
Here's a diagram of what I made....
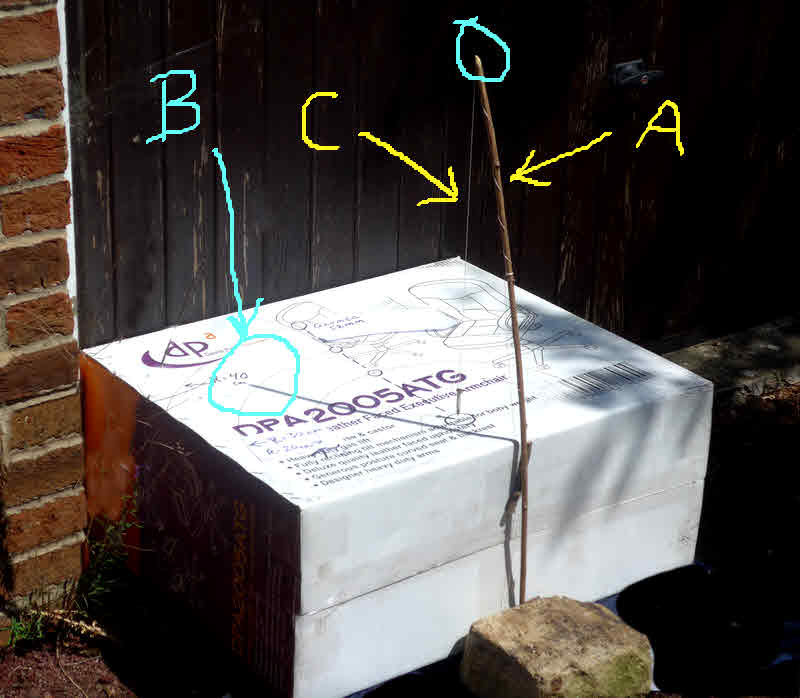
Here's a photo of the device. The sun is behind me, to my right, as I stand taking this picture... as you can tell, when you recognize the stick's shadow for what it is.
"Easy to use, accurate scientific instrument???", I hear you scoff!
But it is.
The stick (A) casts a shadow... most particularly, the tip (B) of the stick casts a shadow. A plumb-line (C) (hard to see) hangs from the tip of the stick. (Close up photos in a moment). Centered on the point directly below the tip of the stick, as found by the plumb-line, we have a number of arcs. (Also hard to see.)
The flat surface (top of box) is firmly wedged against the wall, so that the instrument can be taken in over night, or on inclement days, and yet set up again with exactly the same orientation when you come to take further readings.
In simple terms... we'll fine-tune them in a moment... all we need to say where the sun was at a particular time is....
What do you need, to say where the sun is in the sky? You need to know how far the tip of the stick, the "gnomen" is above the flat white surface. You need to know how long the shadow is, across the top of the box, from the point exactly below the tip to the end of the shadow. And you need to know the angle of the shadow. (More on that in a moment.) With just those numbers, and the wall, you can, months from now, say, "Back in... (date/time), the sun was where it needed to be to make (this) shadow."
If you use a compass or some other means to measure orientation of the wall... magnetic north would be one candidate... you can even relocate the instrument if need be, but still be able to say where in the sky the sun was. (True north is a better reference, but more difficult to determine. If you more the instrument very far, you will have to make allowance for the variation between true and magnetic north in different places. Happily, your instrument will let you find true north, if you take a day's worth of readings.)
That's about it, for the overview! Have you figured out what other thing you needed for best accuracy?
v
v .... answer shortly! Don't scroll down until you've seen how you can do on your own!
Yes! A level. If the top of the box isn't always level... or at least inclined as it was before... you won't get consistent readings.
We will discuss various details in a moment. Be thinking about what matters, and how you can make the whole thing easy to use. But first... details...
Is it almost poor science to try to make a bit of an instrument a particular size, or be in a particular place. Make the instrument. Take readings of what IS, and use mathematics to convert them to convenient units.
Suppose, for instance, you were trying to make a thermometer. Assuming you could manage the tube and bulb and expanding liquid (not easy!), you would then put it in boiling water (at sea level, on a day with "standard pressure"), and mark where the expanding liquid came to. That would be 100 degrees C. Then you'd put it in melting ice. (Not freezing water... and it matters) That would be your zero degrees C. Now you would be tempted to try to mark off the distance between your first two marks into 100 (or is it 99?) equal distances. And of course, if you were selling these thermometers, your customers would insist upon that. However, if you were making a thermometer, you might be better advised to find some high quality graph paper with even divisions of, say, 1mm each. Stick that on your thermometer. Let's suppose, by a VERY happy coincidence, you found that it was 200 lines from zero to "100".... each line stands for 0.5 degree C, doesn't it? Of course, it would probably be some awkward number... but it wouldn't be hard to prepare a conversion table to convert from graph-paper-lines to Celsius degrees. And you would have availed yourself of the graph paper manufacturer's ability to create something with precisely laid down lines.
In all instrument making, it is important to try to avoid going for an "easy to use" answer, when a "gives more precise answers" alternative is available. Knowing the difference involves careful thinking about what could contribute to imprecise readings.
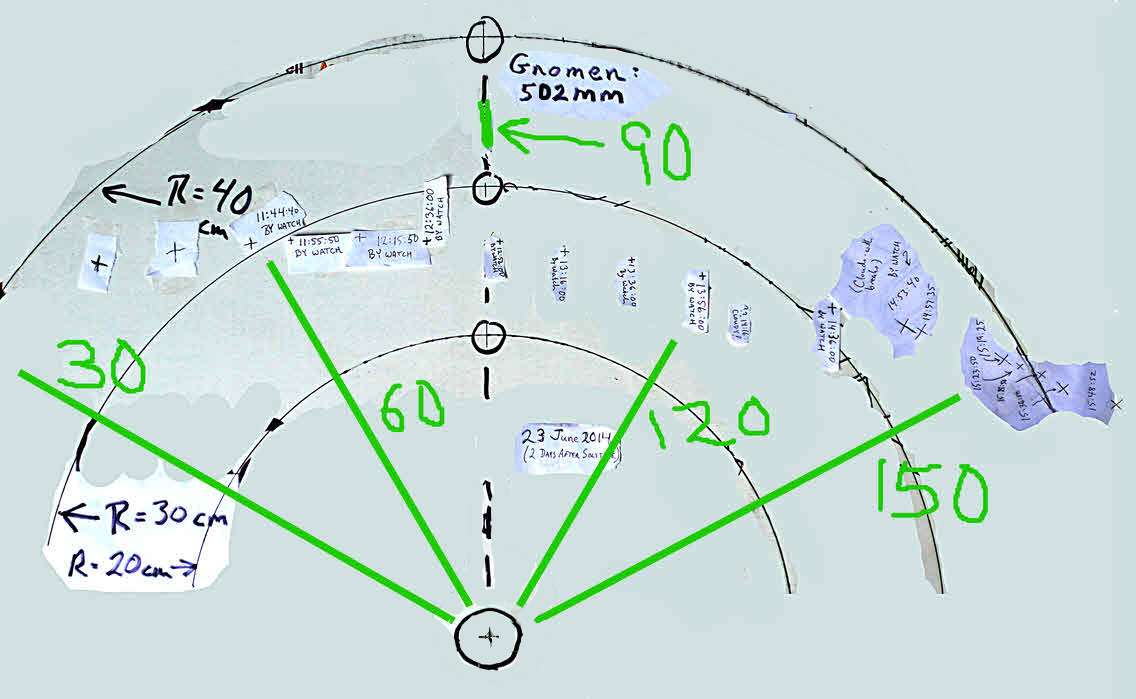
In most cases, we will respect the precepts just espoused while making our sun-position measurer. For example, the gnomen will be however tall it happens to be, and we'll deal with its length with some mathematics. (The height of the gnomen turned out to 502mm. Had I tried for, say, 500mm, extra ways to be "off" from the stated parameters of the instrument would have been introduced.)
However, I decided I would "cheat", and give myself some nice "round" numbers to work with in the part of the instrument which will tell us how long the shadow is.
I drew some arcs on the surface where the shadow will fall. They had radii of 20cm, 30cm and 40cm.
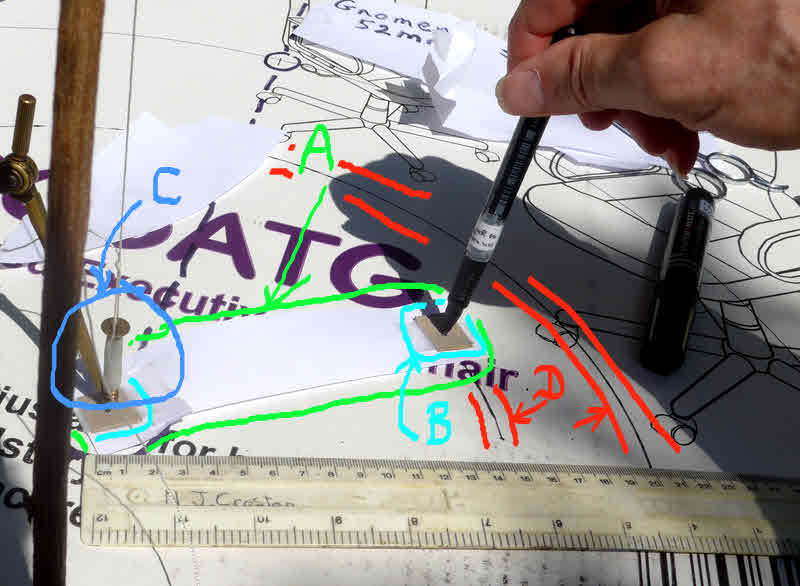
The image below gives details of how the concentric arcs were drawn. The red lines marked "D" are merely there to draw your attention to where the arcs have been drawn on the box's top.
These lines are for reading off how long the shadow is. (During the day's recording session, small "X"s are marked on the flat surface. In the evening, the length of the shadow can be read by using a ruler to see how far beyond an arc the "X" is. (Of course, if you think about it, that shortcut is a Bad Idea if you want a Really Precise reading. Fell free to measure how long the shadow was the harder-but-better way, if you wish!)
In case how the arcs were drawn isn't obvious: "A" is a piece of scrap paper, with two bits of stiff card "B" stuck to it, one at each end. There are holes poked in the card, carefully spaced. (The reason for the card: It will resist the tendency of the paper to tear, either around the pen at the right, or the "spike" from a normal compass at the left, which is being used to fix that end of the paper at the center of the arc. (The spike is in the circle "C", underneath the slightly displaced plumb-bob.)
N.B.: We are not trying to make the arcs center on where the plum-bob is. The stick will be carefully adjusted in due course. We will make the plumb-bob be over the spot which is at the center of the arcs.
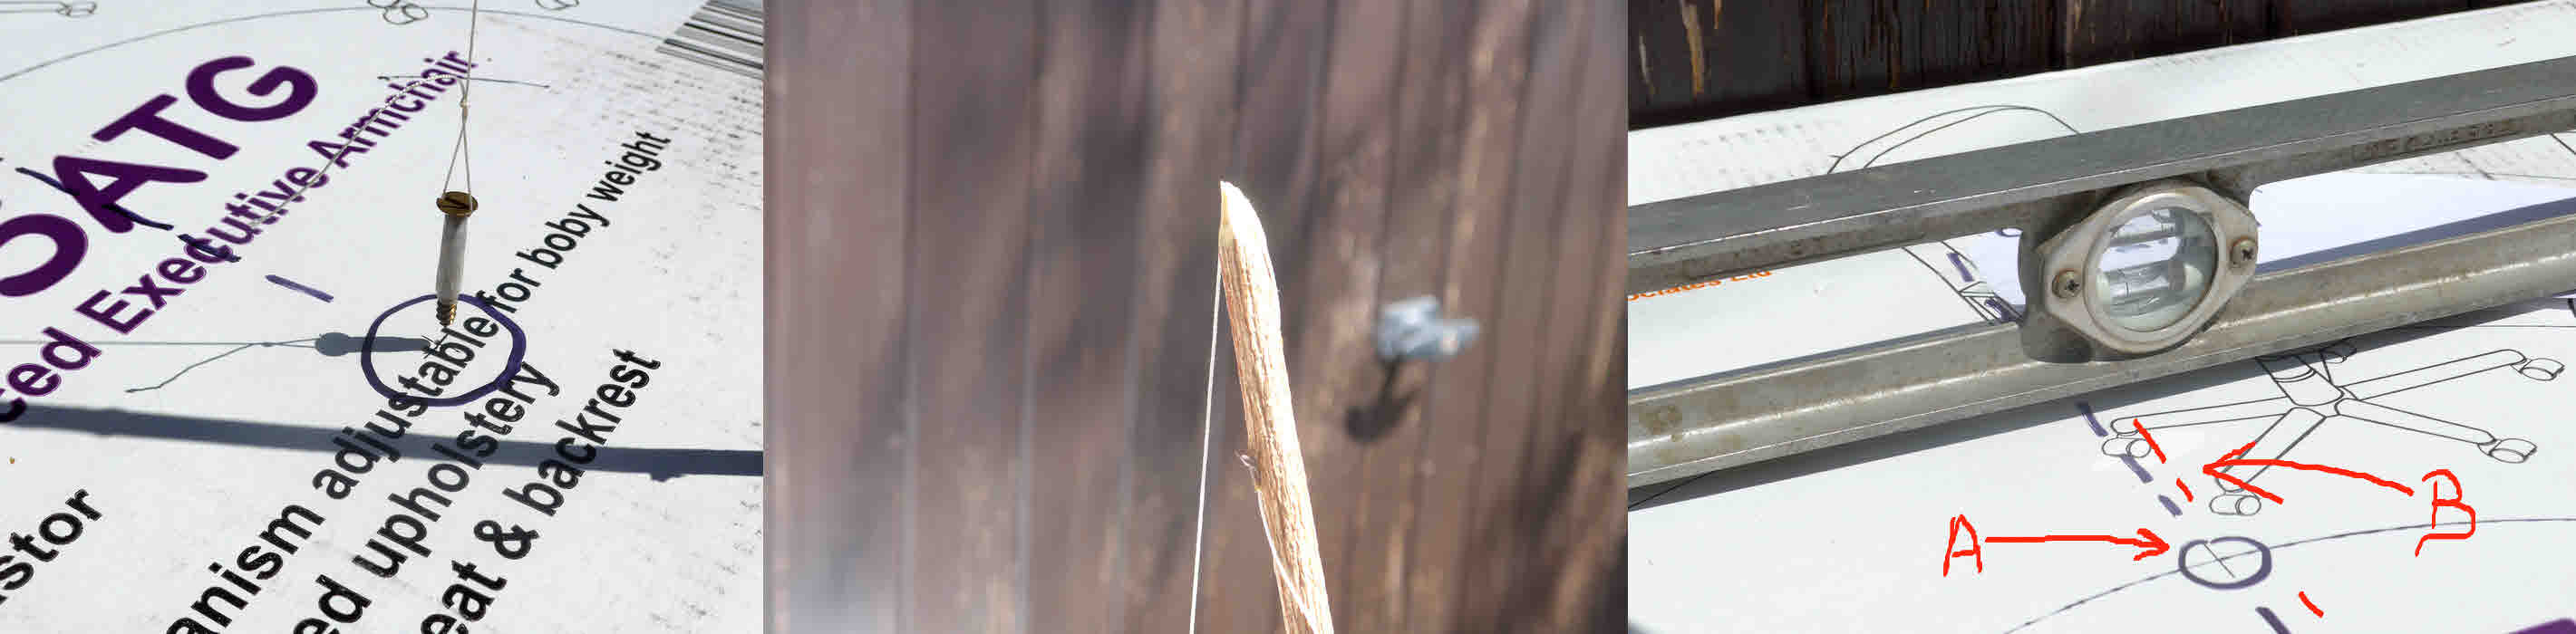
In the composite above...
On the left, we see the plumb-bob in detail, above the fine cross in the bold circle. The cross marks the center of the arcs.
The central photo shows how the string of the plumb-line falls from the tip of the stick. A shallow cut into the stick keeps the string in place.
The photo on the left tells two stories. It shows the level checking that the boxtop is level... in the first axis. It was then rotated 90 degrees, and the other horizontal axis checked.
You can also just see the fine line (A) which was drawn, in a more or less arbitrary direction, out from the center of the arcs. The heavy, dashed black line (beside red B's dashed line) is just to draw attention to the fine line. We can call that line anything we like, but calling the "rotation" a shadow along that ray "rotated 90 degrees" works well.
We are, as I hope you have gathered, if you know the term, using a polar coordinate system (WP) to specify where the shadow's tip lies.
The larger you make it all, the better, for accuracy. Obviously, at some point the inconvenience factor becomes paramount.
A different tip to the stick might yield a better shadow. A cone, point upwards, might be best. The angle of the sides will have to be carefully judged. Ensuring that the plumb-line is in line with the tip of the cone may be slightly tricky if you don't arrange things intelligently.
That's the basic instrument. Next I will show you the data I collected on 23 June, 2014... two days after the summer solstice. (I'd seen the solstice at the great meridian in St Petronius, Bologna... an important instrument in the history of astronomy, all about the sun's position in the sky.) I took my own sun position readings in southern England.
And I show you how the raw readings can be converted into some more generally useful numbers.
Here is a heavily processed image of the face my sun instrument at the end of the day. Although it looks surreal, only the green rays and their labels have been added to a real-world object.
Over the course of the day, I had stuck bits of paper to the top of the box. The little X's show where the tip of the shadow was at different times. I photographed it repeatedly, so even though I didn't write the times for the first two "end-of-shadow" markers, I have the time in the datestamp of the images taken when the shadow was where the cross is.
Overview...
Detail of the arc of "X"s...
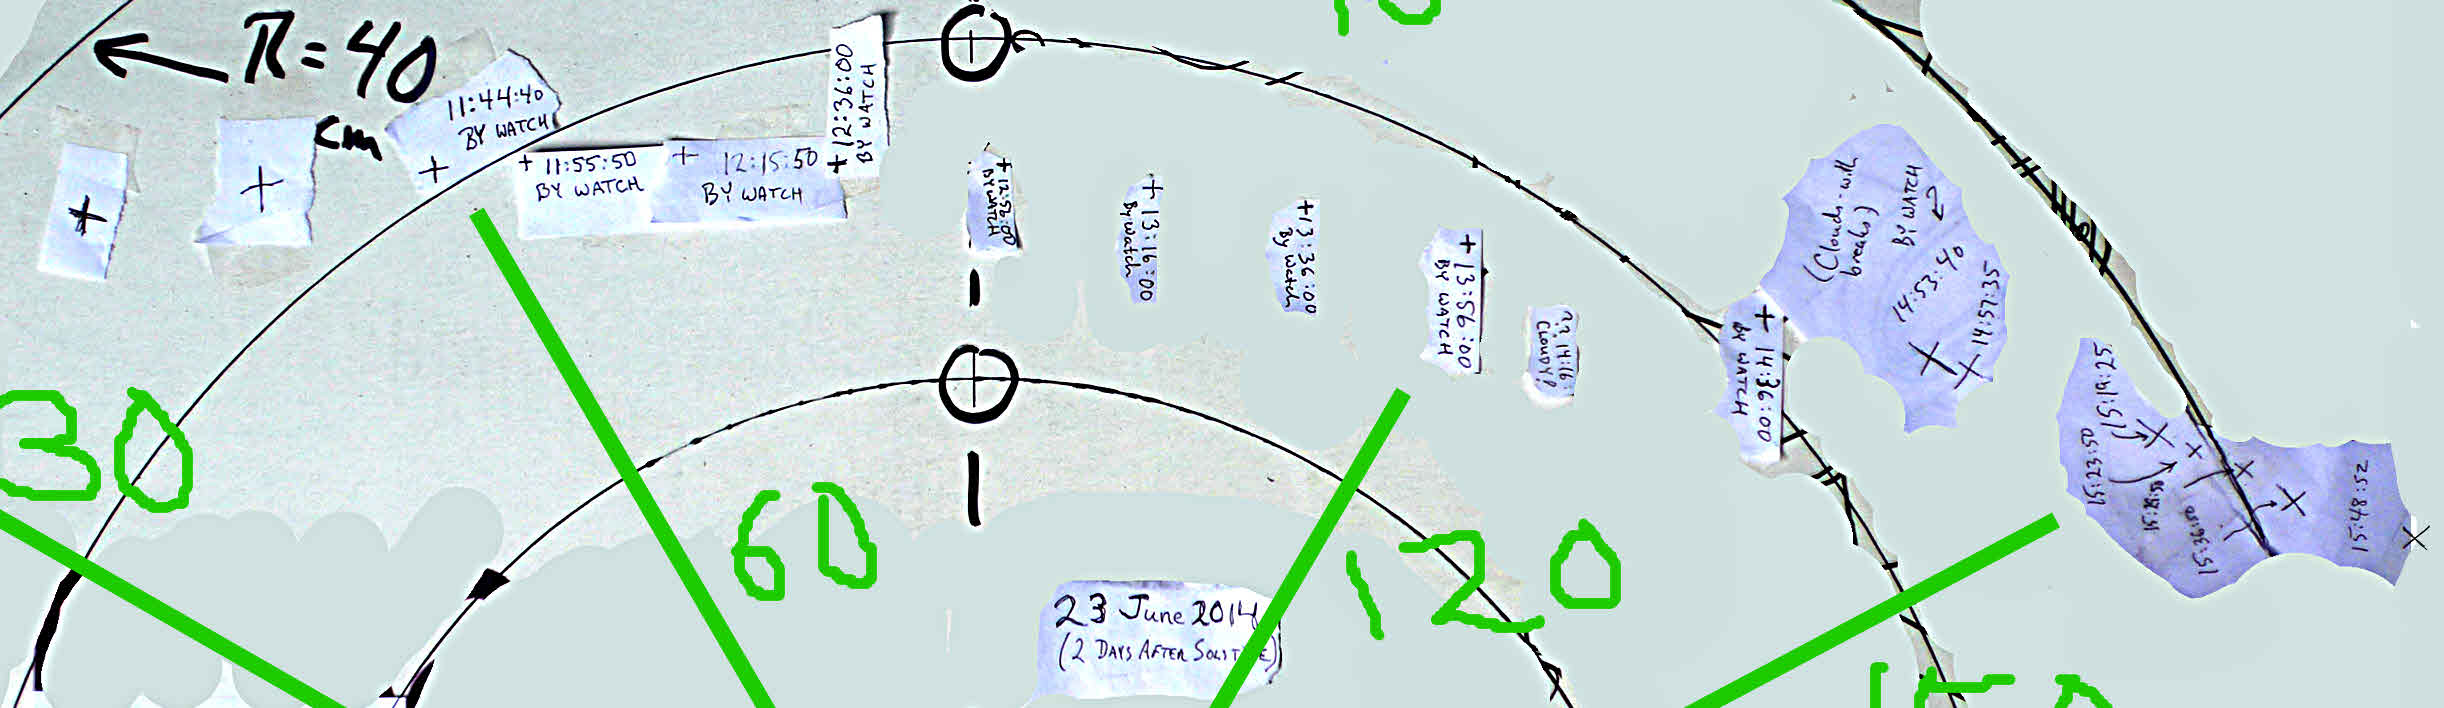
Fear not! I've transcribed the numbers into a spreadsheet... you won't need to read them from the above. But I wanted you to see where the numbers came from.
As I know the height of the gnomen, after I've used the inscribed arcs to determine the length of the shadow at different times in the day, I can do a fairly simple calculation to know the angle of elevation for the sun at different times.
Not shown clearly: I recorded, fairly carefully, the time each reading was taken. The GPS system is not only useful for finding out where you are, it also helps with when you are.... a precise time signal is supplied to your GPS receiver. Of course, once I had determined the discrepancy that day between my watch and the true time according to GPS, I could use my watch... which is a bit more convenient than feeding batteries to my GPS receiver.
The digital photos I took over the course of the day were, of course, date-and-time stamped by my camera, so I also took a picture of my GPS receiver, so I can work out the offset from "camera time" to GPS time. And I photographed my watch's face, so I can get that offset, too. And between them I can know the watch-to-GPS offset. Ah... measuring, measuring.
The data will also allow me to determining where (true) south is from the position I had the instrument in. You see that, don't you? (I'm teasing!.. and will explain... later.)
The data will also allow me to determine when "local" (by the sun) noon was.
All this from a box, a stick, and a bit of string!
It was an "entertaining" day. I'm having trouble with my eyes at the moment... too many hours making web pages?
One eye doesn't focus well, but is okay for "getting about". The one that focuses takes time to re-adjust to low light levels... such as those at my desk, and from my monitor.
So, about every twenty minutes, I was popping outside into the bright sun, to take a reading... trying to remember to keep the sharp-but-adapts-slowly eye covered. When I forgot, I "paid for it" with five minutes of difficulty typing! Helped me practice my sense of humor.
Anyway... doing the readings by hand could get old. All that I need to add to the equipment now is a digital camera on a bracket above the sun instrument, programmed to take a picture every 20 minutes. I will then have the day's sun positions "recorded" for me in the images, which can then be handled on my computer's screen....
So... for different times of the day, on that day, we have...
But if someone else takes readings, their gnomen may not be the 502mm tall that ours was. Different gnomen height, everything else the same: Different shadow length.
So much better to report the angle of the sun above the horizon... which is, of course, exactly connected to a combination of the height of the gnomen and the length of the shadow.... if the shadow is falling on a horizontal surface.
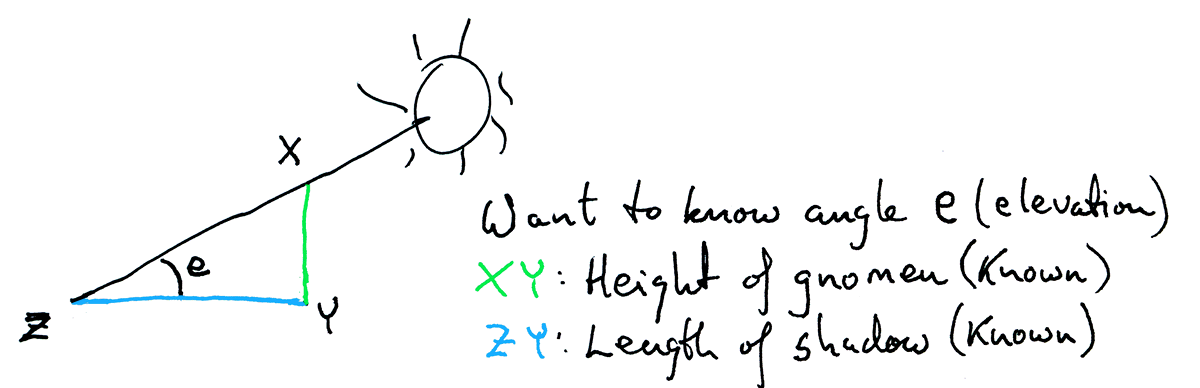
Let's take a nice simple example: Suppose the gnomen was 300mm long AND the shadow were 300mm long. That would imply the sun's elevation as 45 degrees.
Or, perhaps the shadow is longer, say 400mm, for the same gnomen... the sun is lower in the sky, isn't it? An elevation of less than 45 degrees.
Always work with examples like this, for which you know the answer (or at least have an estimate of the answer) when working out formulae.
Now... The Flat-Earth-Academy is supposed to be ten-year-old friendly.
I'm not going to expect any reader to have mastered trigonometry. But we can use it.
If you take the height of the gnomen, and divide that by the length of the shadow, you get "1" in the first case (300/300), and 0.75 smaller in the second (300/400)
If you use a spreadsheet or calculator to find the arctan of the numbers, you will get 0.46 and 0.64. (Don't be fooled by the 0.46... it isn't 0.45, and it is nearly 100 times too small to be the final answer, anyway.
The pain in the neck with arctan is that the answer comes out in "radians". To convert radians (e.g. 0.46) to degrees... we "should" get 45... we divide by pi (3.14...) divided by 180. Or use a spreadsheet to do the conversion for us. In Open Office's Calc (and probably many other spreadsheets) the formula =DEGREES(ATAN(300/300)) would give you the 45 you "need".
I've done a sub-page for you with the numbers from my session of 26 June 2014, and a spreadsheet with all the formulae to convert from shadow length to sun elevation. It also goes into the details of the next thing I am going to cover broadly here....
The sun rises in the east, sets in the west.
Roughly speaking.
Our sun position measuring instrument not only tells us how "high" in the sky the sun is at a particular moment, but it also measures which direction we need to be facing to have it exactly in front of us. But the "raw numbers" from the instrument don't measure direction as degrees from north. But we can get those numbers. Here's the story....
For a rough idea of the direction to the sun, we can use a protractor. If the shadow lay along the line that is 10 degrees short of the instrument's "90", then the sun's direction was 80 degrees... when the instrument is placed as it was when we took the readings.
But we usually express directions as "degrees around the circle from 'North'".
(To go here: A whole discussion of the TWO "norths", magnetic and true. That will have to wait for another time.
The correction for "how the instrument was facing" is easy. So easy I won't go into it here.
What I will go into here is that there is more than one way to measure an angle. I don't mean the different units you can use... we've already met degrees and radians, haven't we. I mean that we might use a protractor, but that is not the only option. Why bother? For a job like the one we are doing here, the alternative method will probably let you measure an angle more precisely, and with less trouble. The details are explained in the sub-page I mentioned earlier, the one with the numbers from my session of 26 June 2014, and a spreadsheet with all the formulae to convert from shadow length to sun elevation.
Just before we finish... the sun position measuring instrument also allows us to know when "local noon" occurs, and where true south is, from where we have the instrument set up.
It's like this...
"Local noon" is when the sun is as high in the sky as it is going to get. (Navigators were very interested in this after Mr Harrison's clocks became available. If you know the time somewhere else when local noon happens where you are, you can work out your longitude. Knowing this was a life and death matter for many, many years.)
At local noon, the sun is due south of your position.
So far so good. You just wait until the sun's shadow is as short as it ever gets during the day, and you've got it.
Not quite... sorry.
The problem is, around noon, the length of the shadow is changing very slowly. It is easy to misjudge or mis-measure the moment when the shadow is at its shortest.
So instead, we note a moment in the morning when the shadow is quite long. We wait until it is as long again in the afternoon. Noon was half way between those two positions/ times. (Sailors didn't use this "answer" by the way!)
If you visited the sub-page with the spreadsheet and calculations, and read about the alternate way of measuring angles, and want to read more on that, you might be interested in another of my pages.
I hope you will give making your own instrument a try. Or, if your time and energy don't quite run to that, that you have at least had fun considering my thoughts on the subject.
As I said earlier, this page is pretty rough just now. There are plenty of "why do we care?" "what does that mean?" etc things still to be brought out of the simple question of "How can we record the sun's position in the sky."... but I can't do it just now... sorry...
Have you heard of Flattr? Great new idea to make it easy for you to send small thank you$ to people who provide Good Stuff on the web. If you want to send $$serious thank you's, there are better ways, but for a small "tip" here and there, Flattr ticks a lot of boxes which no one else has found a way to do yet. Please at least check out my introduction to Flattr, if you haven't heard of it? "No obligation", as they say!
Search across all my sites with the Google search button at the top of the page the link will take you to.
Or...
Search just this site without using forms,
Or... again to search just this site, use...
The search engine merely looks for the words you type, so....
*! Spell them properly !*
Don't bother with "How do I get rich?" That will merely return pages with "how", "do", "I", "get" and "rich".
I have other sites. My Google custom search button will include things from them....
One of my SheepdogGuides pages.
My site at Arunet.
This page's editor, Tom Boyd, will be pleased if you get in touch by email.
![]() Page qWILL BE tested for compliance with INDUSTRY (not MS-only) standards, using the free, publicly accessible validator at validator.w3.org. Mostly passes. There were two "unknown attributes" in Google+ button code, two further "wrong" things in the Google Translate code, and similar in Flattr code. Sigh.
Page qWILL BE tested for compliance with INDUSTRY (not MS-only) standards, using the free, publicly accessible validator at validator.w3.org. Mostly passes. There were two "unknown attributes" in Google+ button code, two further "wrong" things in the Google Translate code, and similar in Flattr code. Sigh.