 Bookmark this on Delicious
 Recommend to StumbleUpon
The long established Nice People at ModernDevice.com (RI, USA) have a nice little I2C (more on that later... don't be scared!...) pulse sensor. Monitor your heartbeat! Just $20. Just Works! This page is just to flesh out their instructions, make the device accessible to beginners, and encourage you to give it a try. (My only connection with ModernDevice: Long-time happy customer.)
Don't take this essay as an in-depth review, based on hours of having one of the sensors in service, in a "real world" application! I liked the look of it. I bought one. I hooked it up, without hassles, and it worked! That's what I know. This essay just gives you the details of parts of the hookup and early testing.
I know that is easy to set it up to provide a stream of heartrate readings to the Arduino serial monitor. Just using the demo provided (see below) I was getting several readings per second. And the readings produced are fairly steady... I didn't notice any "jitter".
There have been heartrate monitors before, of course... but this one seems more sophisticated, reliable... but still only $20.
Using the demo called "SI114_pulse_PSO2.ino", "hidden" in the "Examples/ Pulse Sensor" folder, I have seen the sensor determing the oxygen saturation of my blood. This time you get about one reading per second. When I held my breath, the number dropped steadily, down to 1.37 before I though "Enough of this... ". It then bounced back, rising to a fluctuating 2.35/ 2.45. I suspect the fluctuation arises as follows...
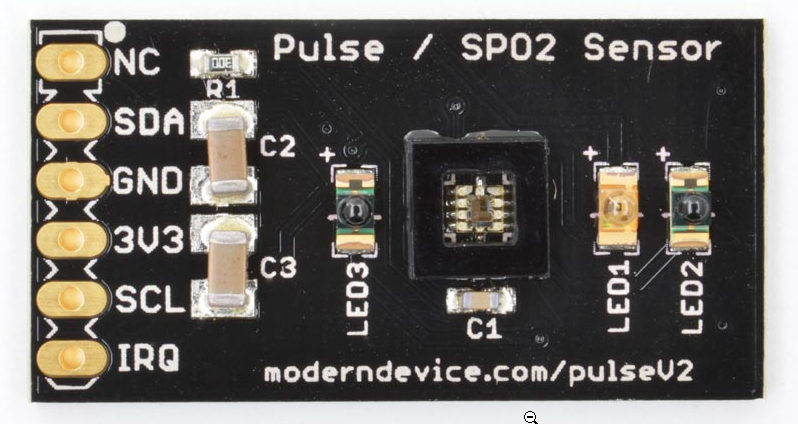
You place your finger on the sensor. There's a tiny "collar", to exclude ambient light. OUTSIDE the collar, there are three LEDs. They shine light into your finger. The tissues inside your finger bounce that light back, and onto the sensor inside the collar.
If you press your finger too tightly onto the collar, you disrupt the blood flow. If you don't press firmly enough, you get leakage of ambient light.
I didn't find it hard to get a "just right" pressure. The acceptable range seemed wide. But, especially in oxygen saturation, I suspect that if you press a bit too hard, the blood being observed may become a little "stagnant", and the oxygen levels won't be typical of your whole body. The pulse signal is stronger, and "gets through" over a wider range of pressures. Just my guesses.
The device can even be used as a proximity sensor, over short distances.
I SWORE this review would NOT take up half my day. But you know how that goes. Jump down to "First the Software", if you don't need the details on the distance sensor!
To run the Examples\ Distance Sensor\ SI1143_proximity_demo.ino program in an Arduino Pro Mini, I had to change the line that says...
const int PORT_FOR_SI114 = 2;
.... to....
const int PORT_FOR_SI114 = 0;
... which is how it comes in the other demos. (It's all to do with telling the software which I2C port to use).
Once I'd done that, I ran the program and got a steady flow of four numbers in my Serial Monitor. (Perhaps the distance as measured by reflection of different wavelengths of light?)
Here are readings at different distances. I was working at a desk with no lights on, apart from "spill" from monitors, and from windows across the room on a darkish rainy day.
I tried three "things" in front of the sensor.
1) My hand, fingers extended and together, held to give sensor best chance of seeing it.
2) An HDPE plastic milk jug
3) The bottom of a metal baking tin. Matt gray finish.
The angle between the "thing" and the line to the sensor made some difference, of course. Not a huge difference.
----
Results when thing to be sensed was at 25cm:
849	301	1163	2313	(hand)
824	294	1200	2318	(hdpe)
872	300	1228	2400	(baking tin)
Results when thing to be sensed was at 20cm:
997	329	1338	2664	(hand)
843	305	1223	2371	(hdpe)
	(forgot!)		(baking tin)
Results when thing to be sensed was at 10cm... slightly suspect, as tiny differences in distance are now a much larger percent of the distance, and affect readings accordingly:
1842	473	2120	4435  (hand)
1227	361	1497	3085  (hdpe)
969	314	1294	2577  (baking tin)
Results when thing to be sensed was at "5"cm... now "tiny" differences in distance have a "huge" effect. Hence several readings for each reflector:
Hand...
2215	529	1939	4683
2705	581	2390	5676
1544	413	1708	3665

HDPE...

4946	1058	4921	10925
5235	1081	4764	11080
3210	720	3197	7127

Baking tin...

3605	704	3369	7678
5433	991	4851	11275
6638	1345	7336	15319
No point in trying to hook up the hardware until I'm sure I can manage the software, I said to myself.
It was no big deal. It does involve I2C, which may be new to you, but you don't have to understand it much to use this sensor. More anon.
And you have to install a library. Never my favorite wrinkle, but that probably just me being recalcitrant. And again, for this sensor, the whole business is relatively painless and unburdened with potential consequences. (The library we need to add to our system is called "SI114", "Ess Eye One One Four"... the chip at the heart of the sensor is the Silicon Labs Si1143.)
You should be using the words "from the horse's mouth", the ModernDevice.com page, as well as this. That may have been updated since I wrote this in March 2017. However, at that time, the library and demos were in a .zip file for the heartrate sensor at Github. (You may need to make your browswer window wider, to get the "Download" button which is at the upper right.)
Downloading, dealing with, installing that took me about 10 minutes. (It will take you less, if you are less paranoid than me, and just download the .zip, and install direct from that. Details of installing libraries at my "Arduino libraries" page, reference already given, above.)
Once that was done, I loaded the SI1143_pulse_demo into my Arduino IDE. Used "Verify" to see if it would compile. It did! (^_^)
Before you connect an Arduino to the PC you have the Arduino IDE running in, use "Tools/ Board", and "Tools/ Processor" to configure the IDE for the Arduino you are going to be connecting. (This "configure first/ connect second" rule is important generally, if you use more than one sort of Arduino on your IDE.)
And when you've connected it, use "Tools / Port" to tell the IDE where to find the Arduino.
As I said... I'd already compiled the software. Now I tried to upload it to the Arduino. (Which did not yet have the sensor connected to it.) It uploaded okay! And when I opened the serial monitor after the upload, and set the baud rate (box at lower right of Serial Monitor screen), I got messages out of the Arduino. Not readings from the (absent!) sensor, yet, of course!... but confirmation that at least some "stuff" was properly in place....
Pulse_demo
No SI114x found on Port 0
PART: 255 REV: 255 SEQ: 255
PS_LED21 = 11111111
CHLIST = 11111111
end init196605
196605
196605
196605
196605
196605....
A detail: In several of the demo programs, you will find "Serial.begin(x);", where "x" is a number. This line often appears TWICE in the demo software. It sets the speed of comms with the serial monitor. 19200 worked fine for me. Higher would probably work, too, up to the limits of your connecting cable. Not, I suspect, a critical parameter... but you do need to tweak both "Serial.begin(x);" lines, if you tweak one of them, and also set the Serial Monitor to communicate at that baud rate. (If you get "sensible gibberish" on the Serial Monitor, it is probably just a baud rate mis-match.)
Now I have to talk a little about "I2C". (A protocol for "Inter-Integrated Circuit" connections. Pronounced "I-squared-C"). It is a Good Thing. But, I have to admit, one that I haven't played with much. But you don't need to be an I2C "expert" to use the heartrate sensor! (I'll tell you what you need, here, but Wikipedia and the official Arduino pages both have articles, of course.) (When the Arduino pages speak of the Wire library (for other I2C work), don't confuse that with the "1-Wire" library (for work with the Maxim 1-Wire family chips, notably their widely used DS18B20 temperature sensors.) And don't worry about needing ANOTHER Library to use the heartrate sensor. The library we've already dealt with is the only library you need to run the basic demo programs.
I2C lets you connect things like the heartrate sensor to microprocessors with just two lines. (Plus power and ground wires.)
It uses "ports", rather like the old days of serial "ports" and USB "ports".
And there's a line in all the demo software which has to be set for what YOUR system has in the way of I2C facilities.
const int portForSI114 = 0;
I was using an Arduino Pro Mini, so the "right" port for me was zero, set as above. (There's help in the sourcecode about what's right for other systems.)
You could use a different port, if your Arduino had more than one. But it would mean connecting to different pins, on the hardware side. But the fact that (maybe) you could is why there's the portForSI114 constant. We're not doing anything "clever" with I2C, so we'll just do the easy thing. Use port 0. N.B.: One of the demos had the port set to "2". Changing that to "0", for my "one I2C port only" Arduino caused no problems.
Forgive a slight diversion to the hardware issues?
Each port, in the software, uses certain pins, in the hardware. In the case of an Arduino Pro Mini, the right pins to use are the two "Analog input" pins, A4 and A5.
You might think that the Pro Mini doesn't have these pins... and it doesn't... along the board edges. They are accessed via the two pads in in a more central part of the board....
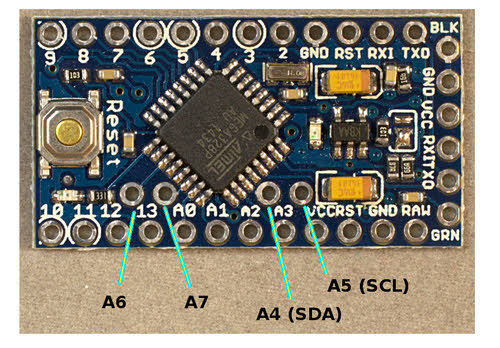
(My thanks to http://www.davidpilling.net/wiki/index.php/Arduino32768 for that image)
See those four "inner" pads? We need the two at the right, in the image above. They connect to where we could read an analog input, but we're going to use them to connect to our I2C heartrate sensor board.
I2C devices use two signal wires: "SDA" and "SCL". You can see from the image where each goes. The sensor board has two pins, labeled SDA and SCL.
Don't make the wires to the senor board very long... they don't need to be 1cm short... but I'd try to keep them under 15cm, just to be on the safe side.
That's all the I2C "stuff" you need to know, to use the sensor board with an Arduino Pro Mini. If you are using a different board, maybe one with several I2C ports, just choose a port, and connect to the relevant pins.
Back to the software. As I said, I uploaded it to the Arduino before connecting the heartbeat sensor.
After I'd dealt with a few "stupids" I'd managed, it ran fine. (Some of my "stupids": I was using a 5v Arduino with a 3V3 interface cable. It also had a different clock than what I'd told the IDE I was using. Despite this, and a number of similar mistakes, things WORKED!... and survived my mistakes. Be careful, though, there ARE things you can do (with any Arduino project) that the system won't be able to forgive you. My mistakes were stupid. The business of installing the software, getting the device measuring my heart rate, was NOT complicated.
That's about it for the software side.
Disconnect the Arduino from its programming cable. (For our initial trials, all of the voltage we need can be drawn from the programming cable.)
Connect just four wires between the Arduino and the Modern Device heartrate sensor:
1) From Arduino's "Vcc" (a SOURCE of 3V3 to "3V3" on sensor.
2) From ardu9ino's ground to sensor's "GND"
The next two assume you are using an Arduino Pro Mini, or another Arduino which puts the port 0 SDA and SCL signals on the same pins as the Pro Mini. See prior I2C discussion.
3) From the pin on the Arduino where you could feed an analog signal in, the one called A4, to the sensor's SDA pad, though a 4K7 resistor. They ask for 5k, and you can use that if you have one. But 4k7 works, too.
4) From the pin on the Arduino where you could feed an analog signal in, the one called A5, to the sensor's SLC pad, though another 4K7 resistor
The pads on the sensor marked "NC" and "IRQ" need NOTHING for our (basic) use of the sensor.
That's it! Two signal wires, a source of voltage, and a wire to connect the two grounds.
Re-connect the Arduino to the cable to the PC with the power, and with the Serial Monitor. Re-run the program. After a brief header, a stream of numbers, more than 1 per second, should appear on the Serial Monitor. If you put the pad of your thumb on the sensor, the numbers should be 5 digits each... (or 6 if you're so excited that your pulse has risen above 99!) The first two tell you your heartrate in beats per minute.
------------
I hope that's sufficed to get you up and running, easily, with one of the heartbeat sensors?
Apart from generic, non- heartbeat sensor related problems, I'd be interested to hear from anyone who used this page, and found a specific bit difficult, or something they needed missing.
Remember that the library comes with at least two other examples... one for measuring your blood's oxygen saturation. The other (no so useful, perhaps... there are better, cheaper proximity sensors?... a proximity sensor.
There are several blog essays at the Modern Device site. In one, the top of the data sheet of the chip at the heart of the sensor is displayed. I found it interesting reading, as was the blog and several others on the sensor board.
(To see the other blogs, search Modern Device's site with this link.)
------------
I hope the above was useful? Or at least interesting? Please spread the word about this essay, if so? There's a Facebook "Like" button at the top of the page. Mentions in relevant forums are always welcome.
Most of all: I hope you get one of these sensors and have fun with it!
The search engine merely looks for the words you type, so....
* Spell them properly.
* Don't bother with "How do I get rich?" That will merely return pages with "how", "do", "I"....
Please also note that I have two other sites, and that this search will not include them. They have their own search buttons.
My site at Arunet.
My Sheepdog Software pages, another of this page's editor's sites.
Here is how you can contact this page's editor. This page, and the software it references, ©TK Boyd, 8/2015.
Page tested for compliance with INDUSTRY (not MS-only) standards, using the free, publicly accessible validator at validator.w3.org