This page follows on from my page about measuring the width of a river, using map making techniques.
This page gives you numbers you can use to make the map you WOULD have made, if you could have gone to Haddam, collected your own field data.
It also gives you the answers I got to "how wide is the river"... two different answers, one for each of the ways you can copy the angles from the plane table records to your map. The best answer is near the bottom of this page.
This page is a little hard to follow on it's own. See the other page first.
And at the moment, it makes less sense that it will do soon! What you need is here... but the explanation needs a lot of work.
Here's the thing that should be the "big reveal" at the end... but until this page is less confused, I'm afraid you won't have the determination to wade through it all.
Remember: We want to figure out the width of a river. We are doing that by using two angles.
Sometimes I talk about all of this as "finding the width" and other times I say "drawing a map". Well... to find the width, we make a "map" with two ends of a dock, and a shed shown. If you used the same technique, but did readings for other points in the landscape, your rather feeble "map" with three points on it could grow into a map showing much more. The places of the two ends of the bridge would obvious things to put on the map, for instance.
There are BETTER ways to do almost everything I am going to take us past with a series of cheats in the next few paragraphs... before the next horizontal separator... and they are explained here and in the related page... but just to show "it works" here's the cheat's answer....
The angles at Haddam are 80 degrees and 90 degrees. That's "Alice's angle" and "Bob's angle". It is just a coincidence... and unlikely coincidence.. that one is 90 degrees, and the other is a multiple of 10. It will be no good in this work if you aren't as accurate as possible. If the angles had been 79 and 91, those tiny differences would MATTER. But they actually, by the crude methods I'm using here, were 80 and 90 degrees.
Armed with those angles, I drew the dock to scale, drew the angles onto my budding "map", and measured things.
It may seem strange to see a mix of metric (mm) and imperial (feet) units in what follows. (Sticking to one or the other certainly often has advantages!) But in this case, all will be well, fear not.
REAL WORLD....
Alice to Bob distance: 138 feet


ON "MAP"....
Alice to Bob distance: 105mm
Bob to sheds (point across river) distance: 593mm
From that, with some arithmetic, you can work out that the river is 779 feet wide. (Well... dock to sheds distance, to be precise... which is what we are trying to do here, after all.)
By another method... can you figure out what I used?... I EASILY, and probably quite accurately, cam up with a measurement of 899 feet. But doing it THAT way meant that I'd let "Mummy" do it. I didn't measure the distance myself. Where's the fun in depending on someone else?
I'll show you the arithmetic someday. If you don't already know how to get the 899 from the 138, 105 and 593, ask someone for help? That trick is something I use very frequently. Do people get through life without knowing how? Of course. But the more "tools" you take the trouble to learn, the more things you can do for yourself.
779 is 87% of 899. Who knows if EITHER is "right"? But a big part of "doing science" is the belief that the world is. There aren't magical things happening that, for instance, make the river different widths on different days. And if we measure the width two different ways, and get (nearly) the same answer, then our measurement probably isn't too far off.
Seeing as I only used a pizza box, a stick, and a cheap "school" protractor, and got that close, on a first attempt, to a number that is probably closer to being right, I'm quite pleased.
As soon as I can, I will do further work on the following, to explain a BETTER way to get an answer from the lines captured with the stick and pizza box. The mess below already has "the numbers" you need to do it the better way, for yourself, if you get there before I do.
Here, just for "fun"(?), is a bit of my "plane table" results... the lines I drew while at one end at the dock. There are so many lines because I was setting out to map not just the sheds, but also several other points on the other side. I also took more than one reading to some of the points that would end up on the map.
For the basic "measure the width of the river" exercise, you'd only need the angle between two of the lines from here, and one other angle... the one from where two lines cross on the piece of paper I used at the other end of the dock.
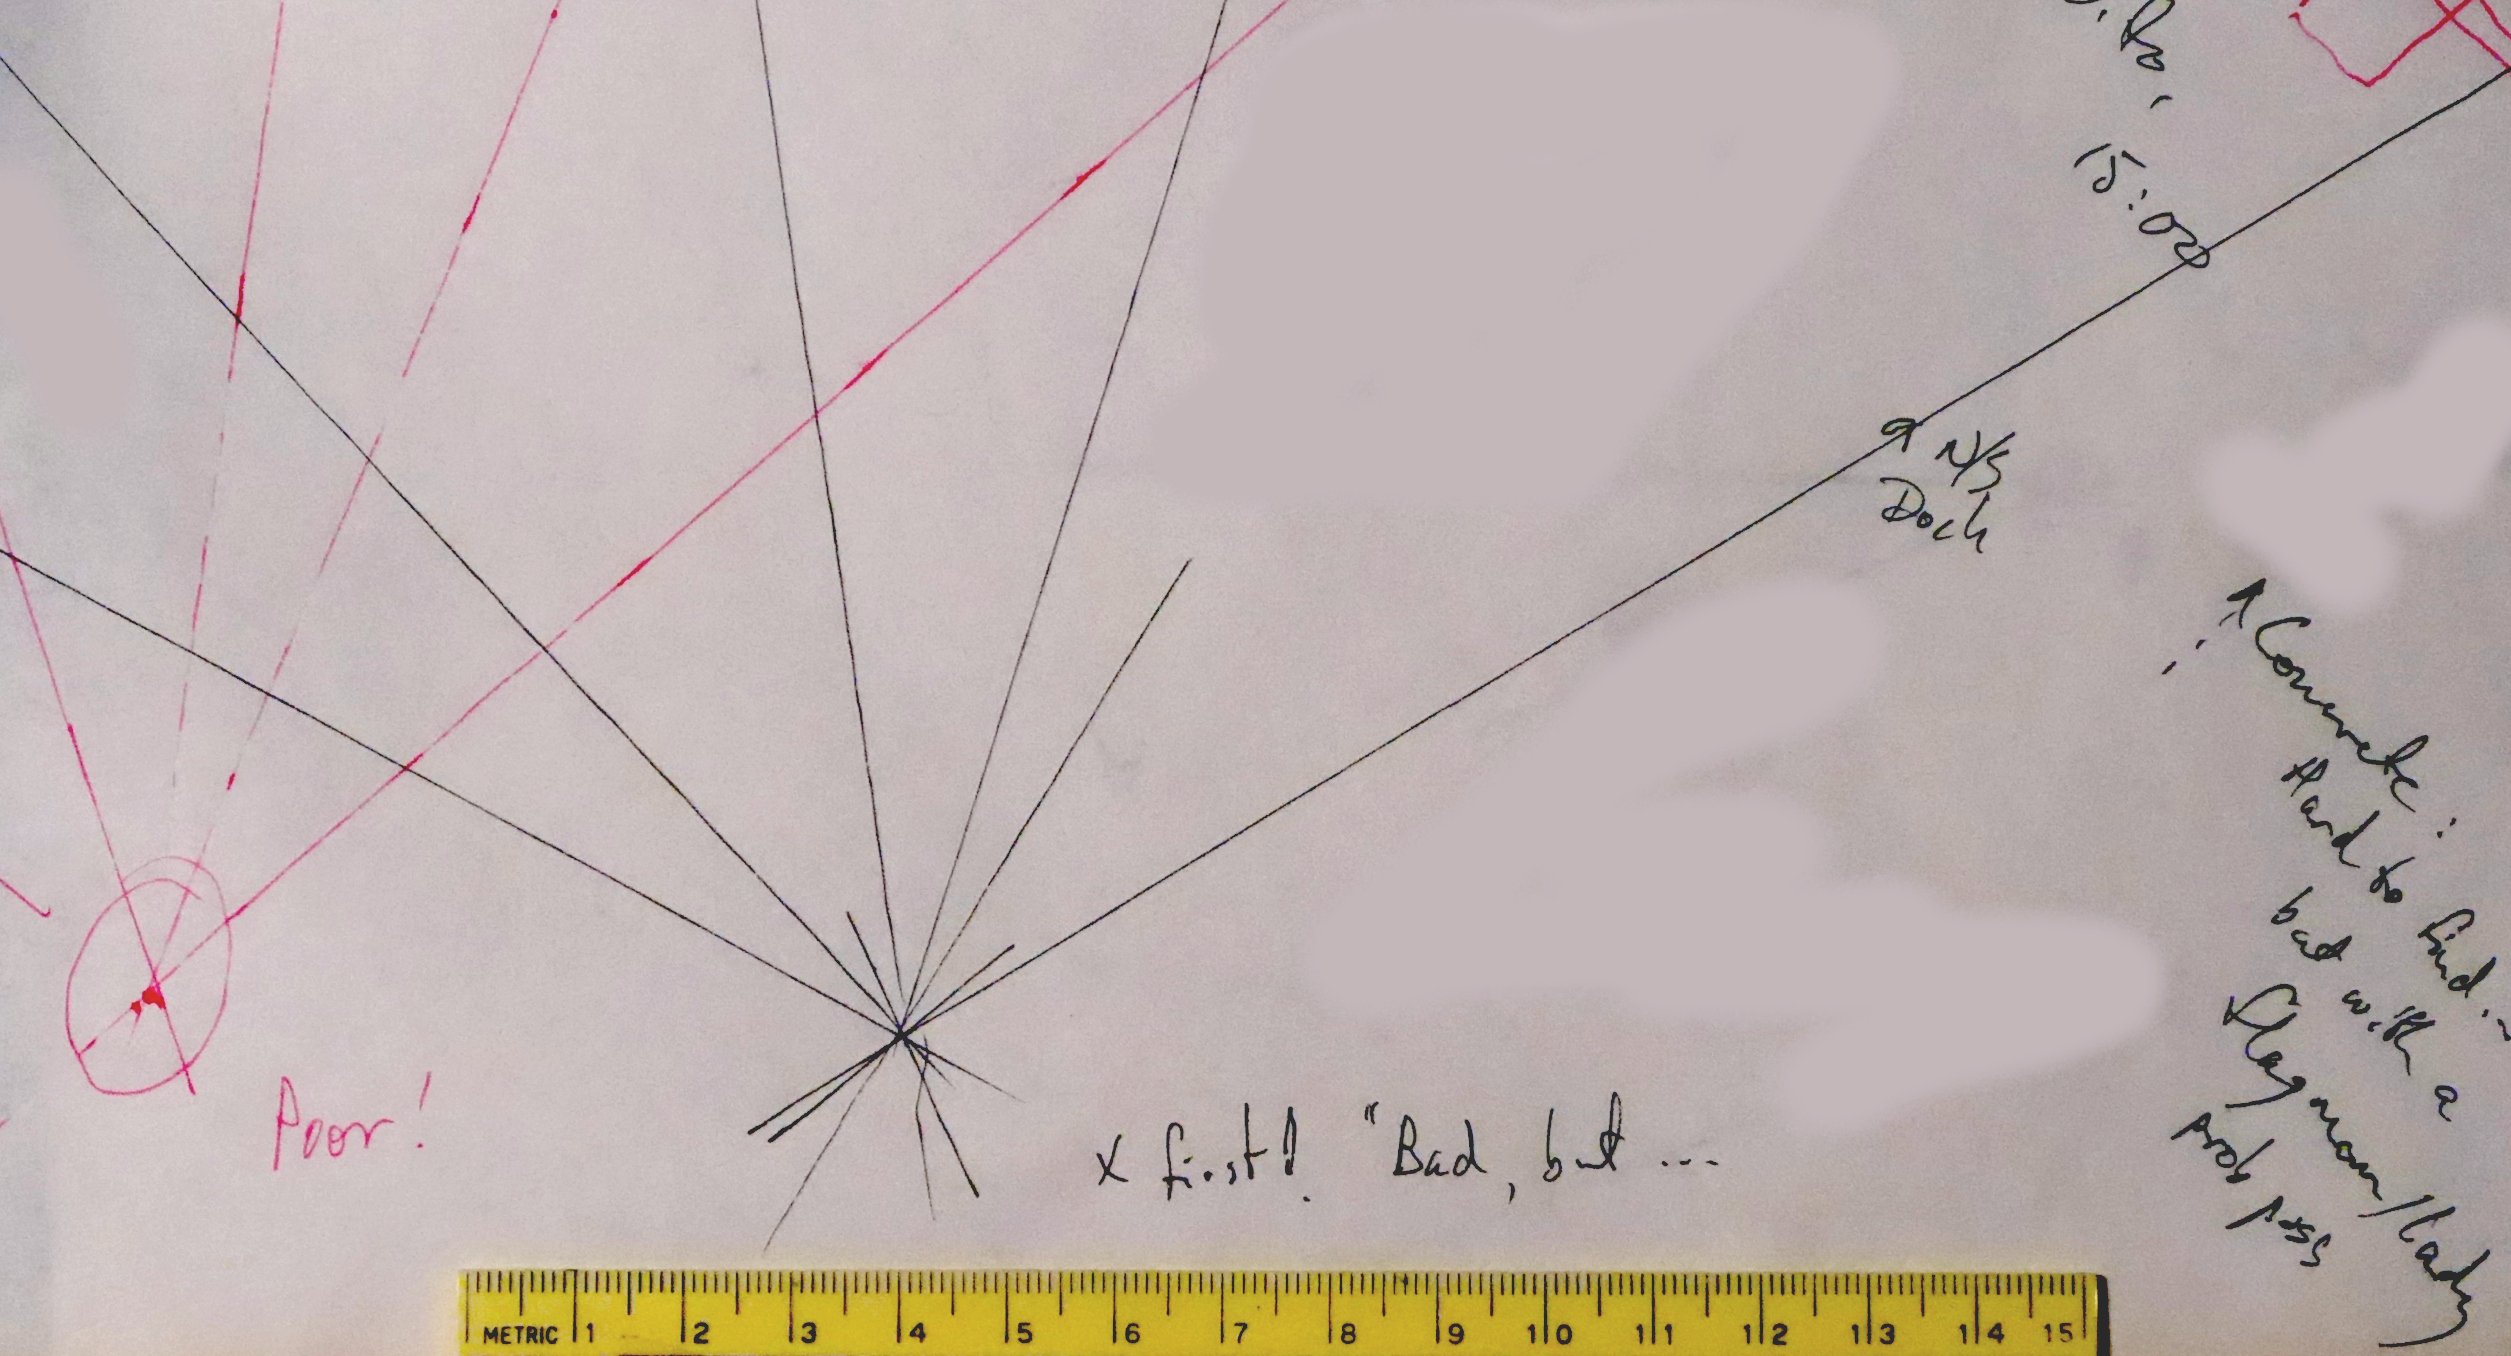
Apologies for the blotchiness, and other weaknesses in other images. I wanted to get this page published quickly. Everything you need IS here... I'm sorry it isn't (yet) explained better, or made prettier.
Please hang in there. Be strong. Work back and forth slowly, until you "get" what follows. You CAN do it!.
If it All Gets To Be Too Much... Revisit the stuff at the top of the page which gives you the "shortcut" route to an answer. Or skip down to what was my first attempt at the shortcut answer.
This page is mainly to give you all you need to draw the map as if you had gone to the dock, measured the two angles.
Cast your mind back to the page explaining HOW to measure the width of the river. I hope that parts of the following will be familiar from what you read on the other page? At the right, we have the dock, with "Alice" and "Bob" at the north and south ends.
For the moment, ignore the two circles with "A"-like "things" in them, at the left side, one above the other.
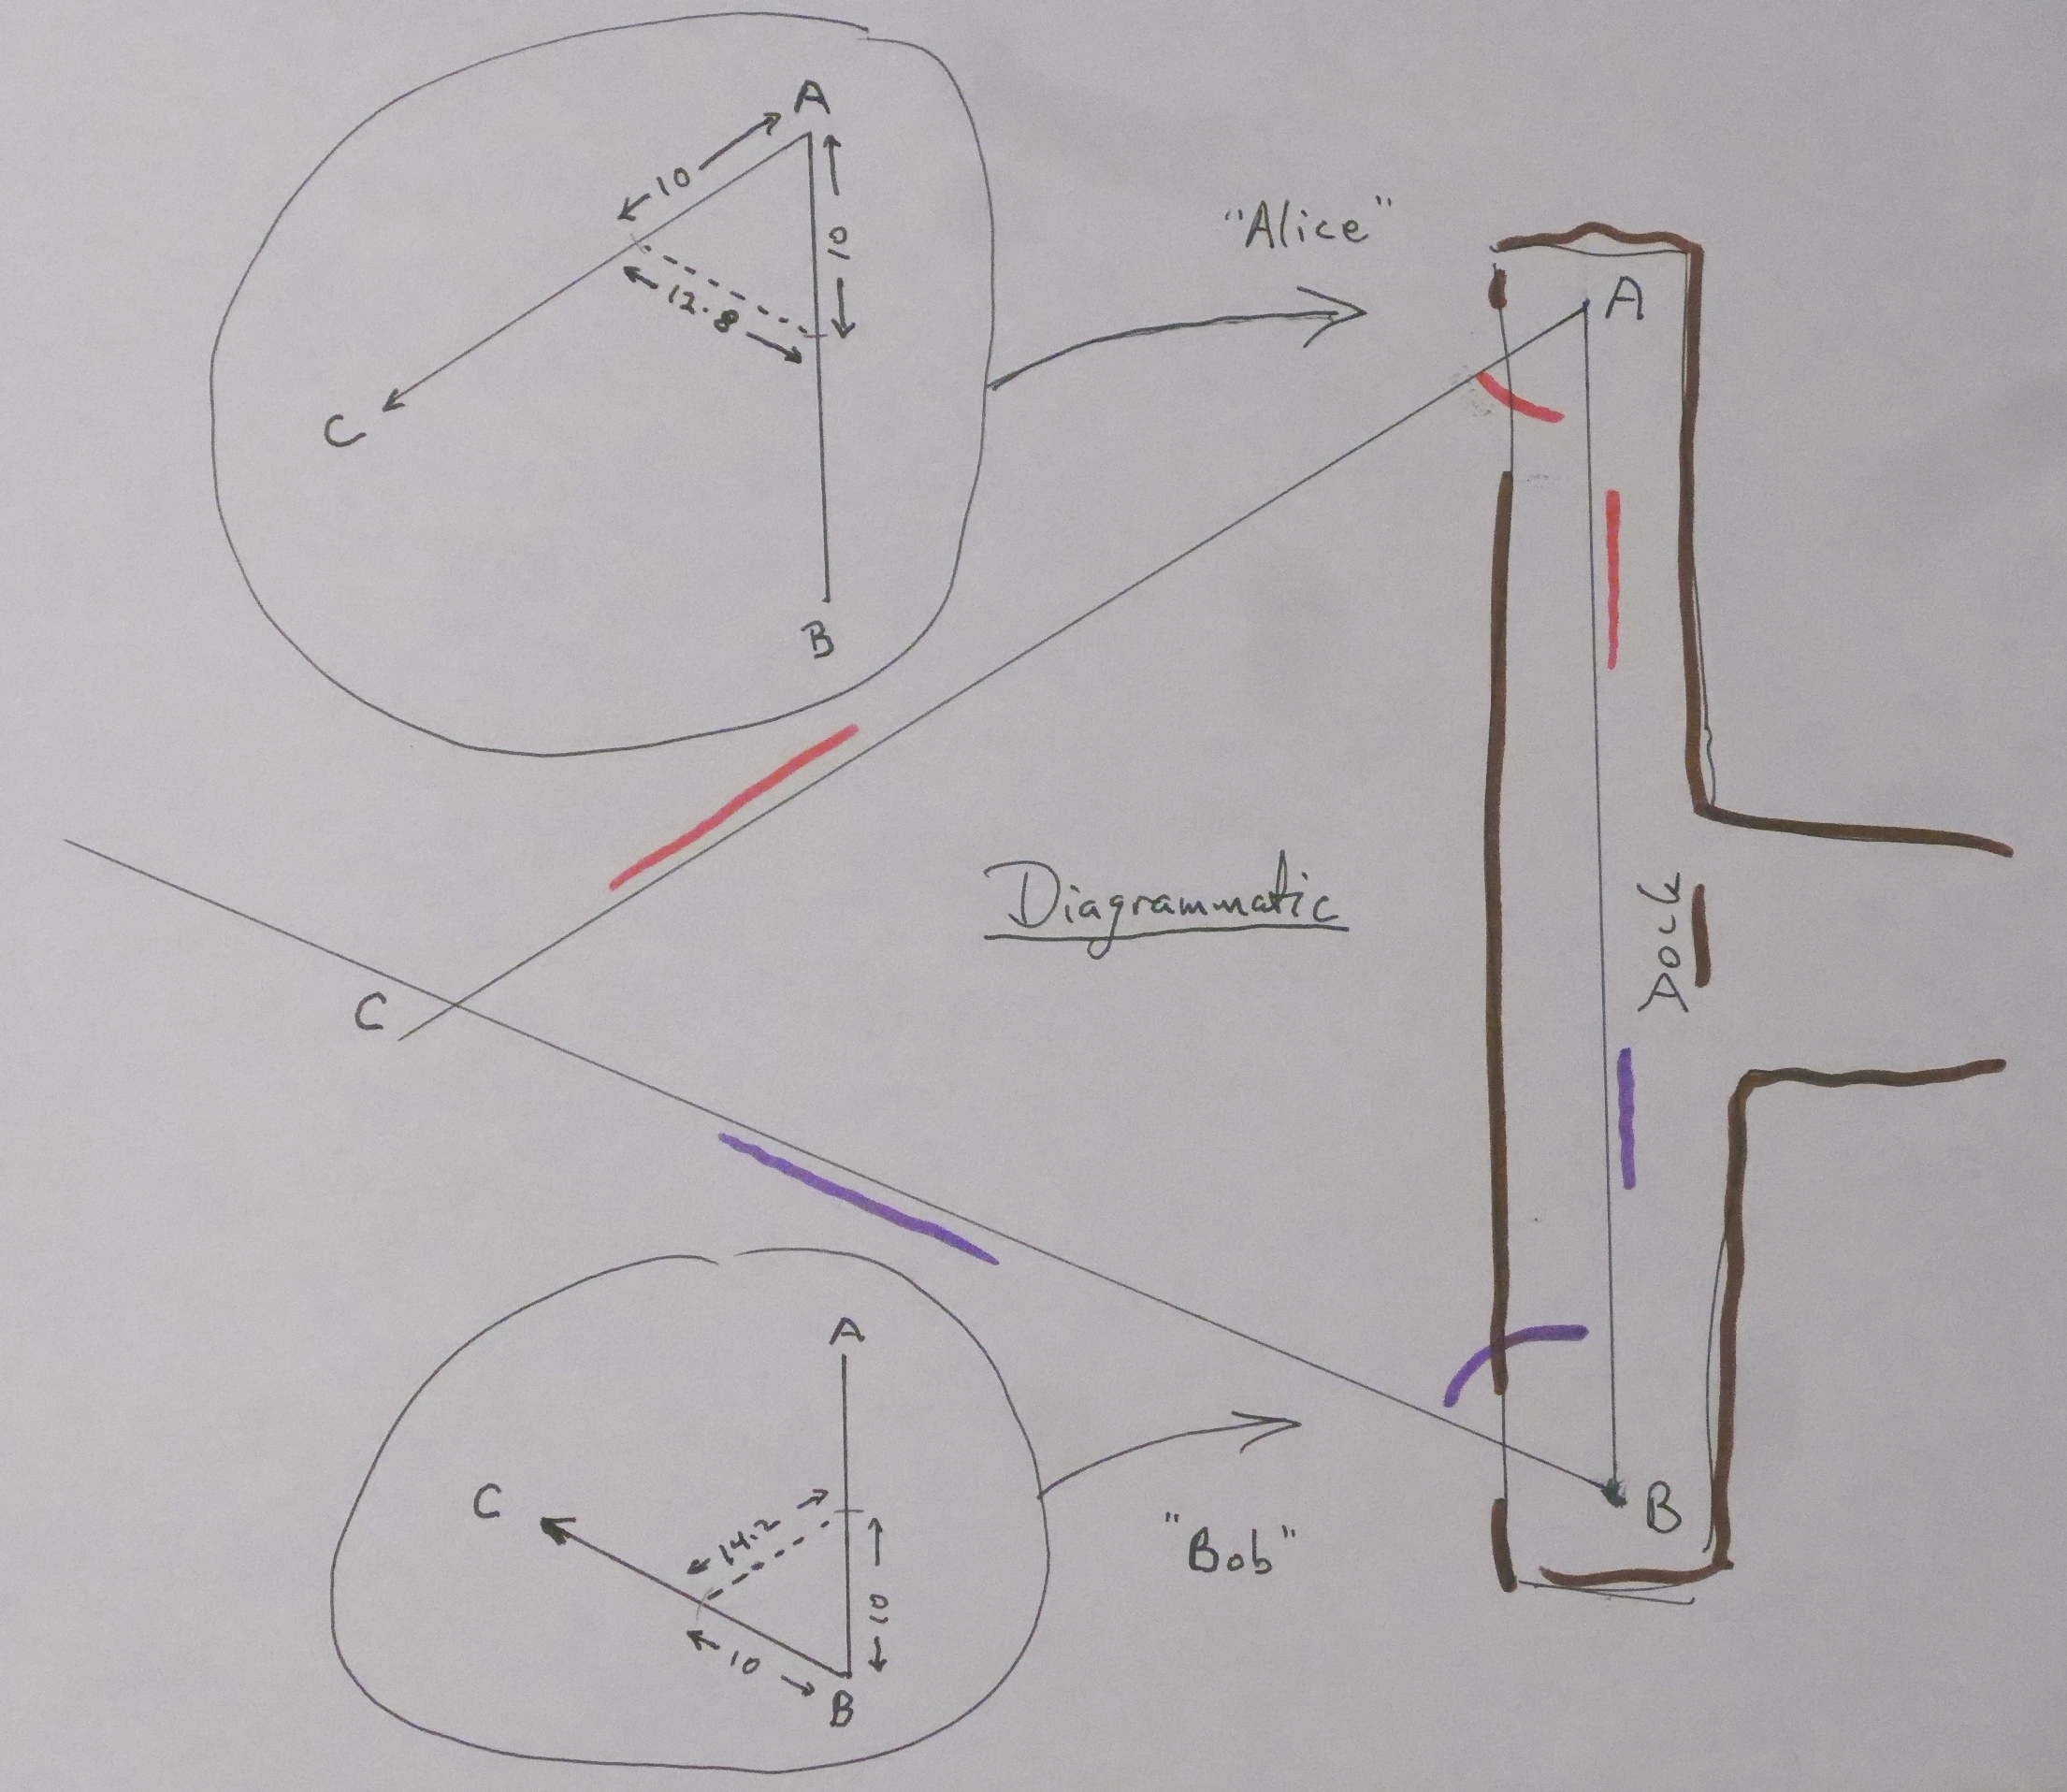
The lines with red marks are Alice's angle between the line to Bob and the line to the shed. ("C" stands for where the shed is.) The lines with purple marks are Bob's angle between Alice and the line to the shed.
The diagram only indicates the general arrangement of everything. The shed (at "C") was much farther from the dock than the diagram would suggest, and it wasn't quite in the direction the diagram would suggest, either. We'll come to a more realistic diagram later. (And while this page still has (had? Please complain if this comment is out of date) "the answer" at the top, you will already know that the angles you see in the diagram aren't the same as the real world angles.)
Now... the "A"s in the circles:
For the moment, don't try to draw the angles using the numbers. We will come to that later.
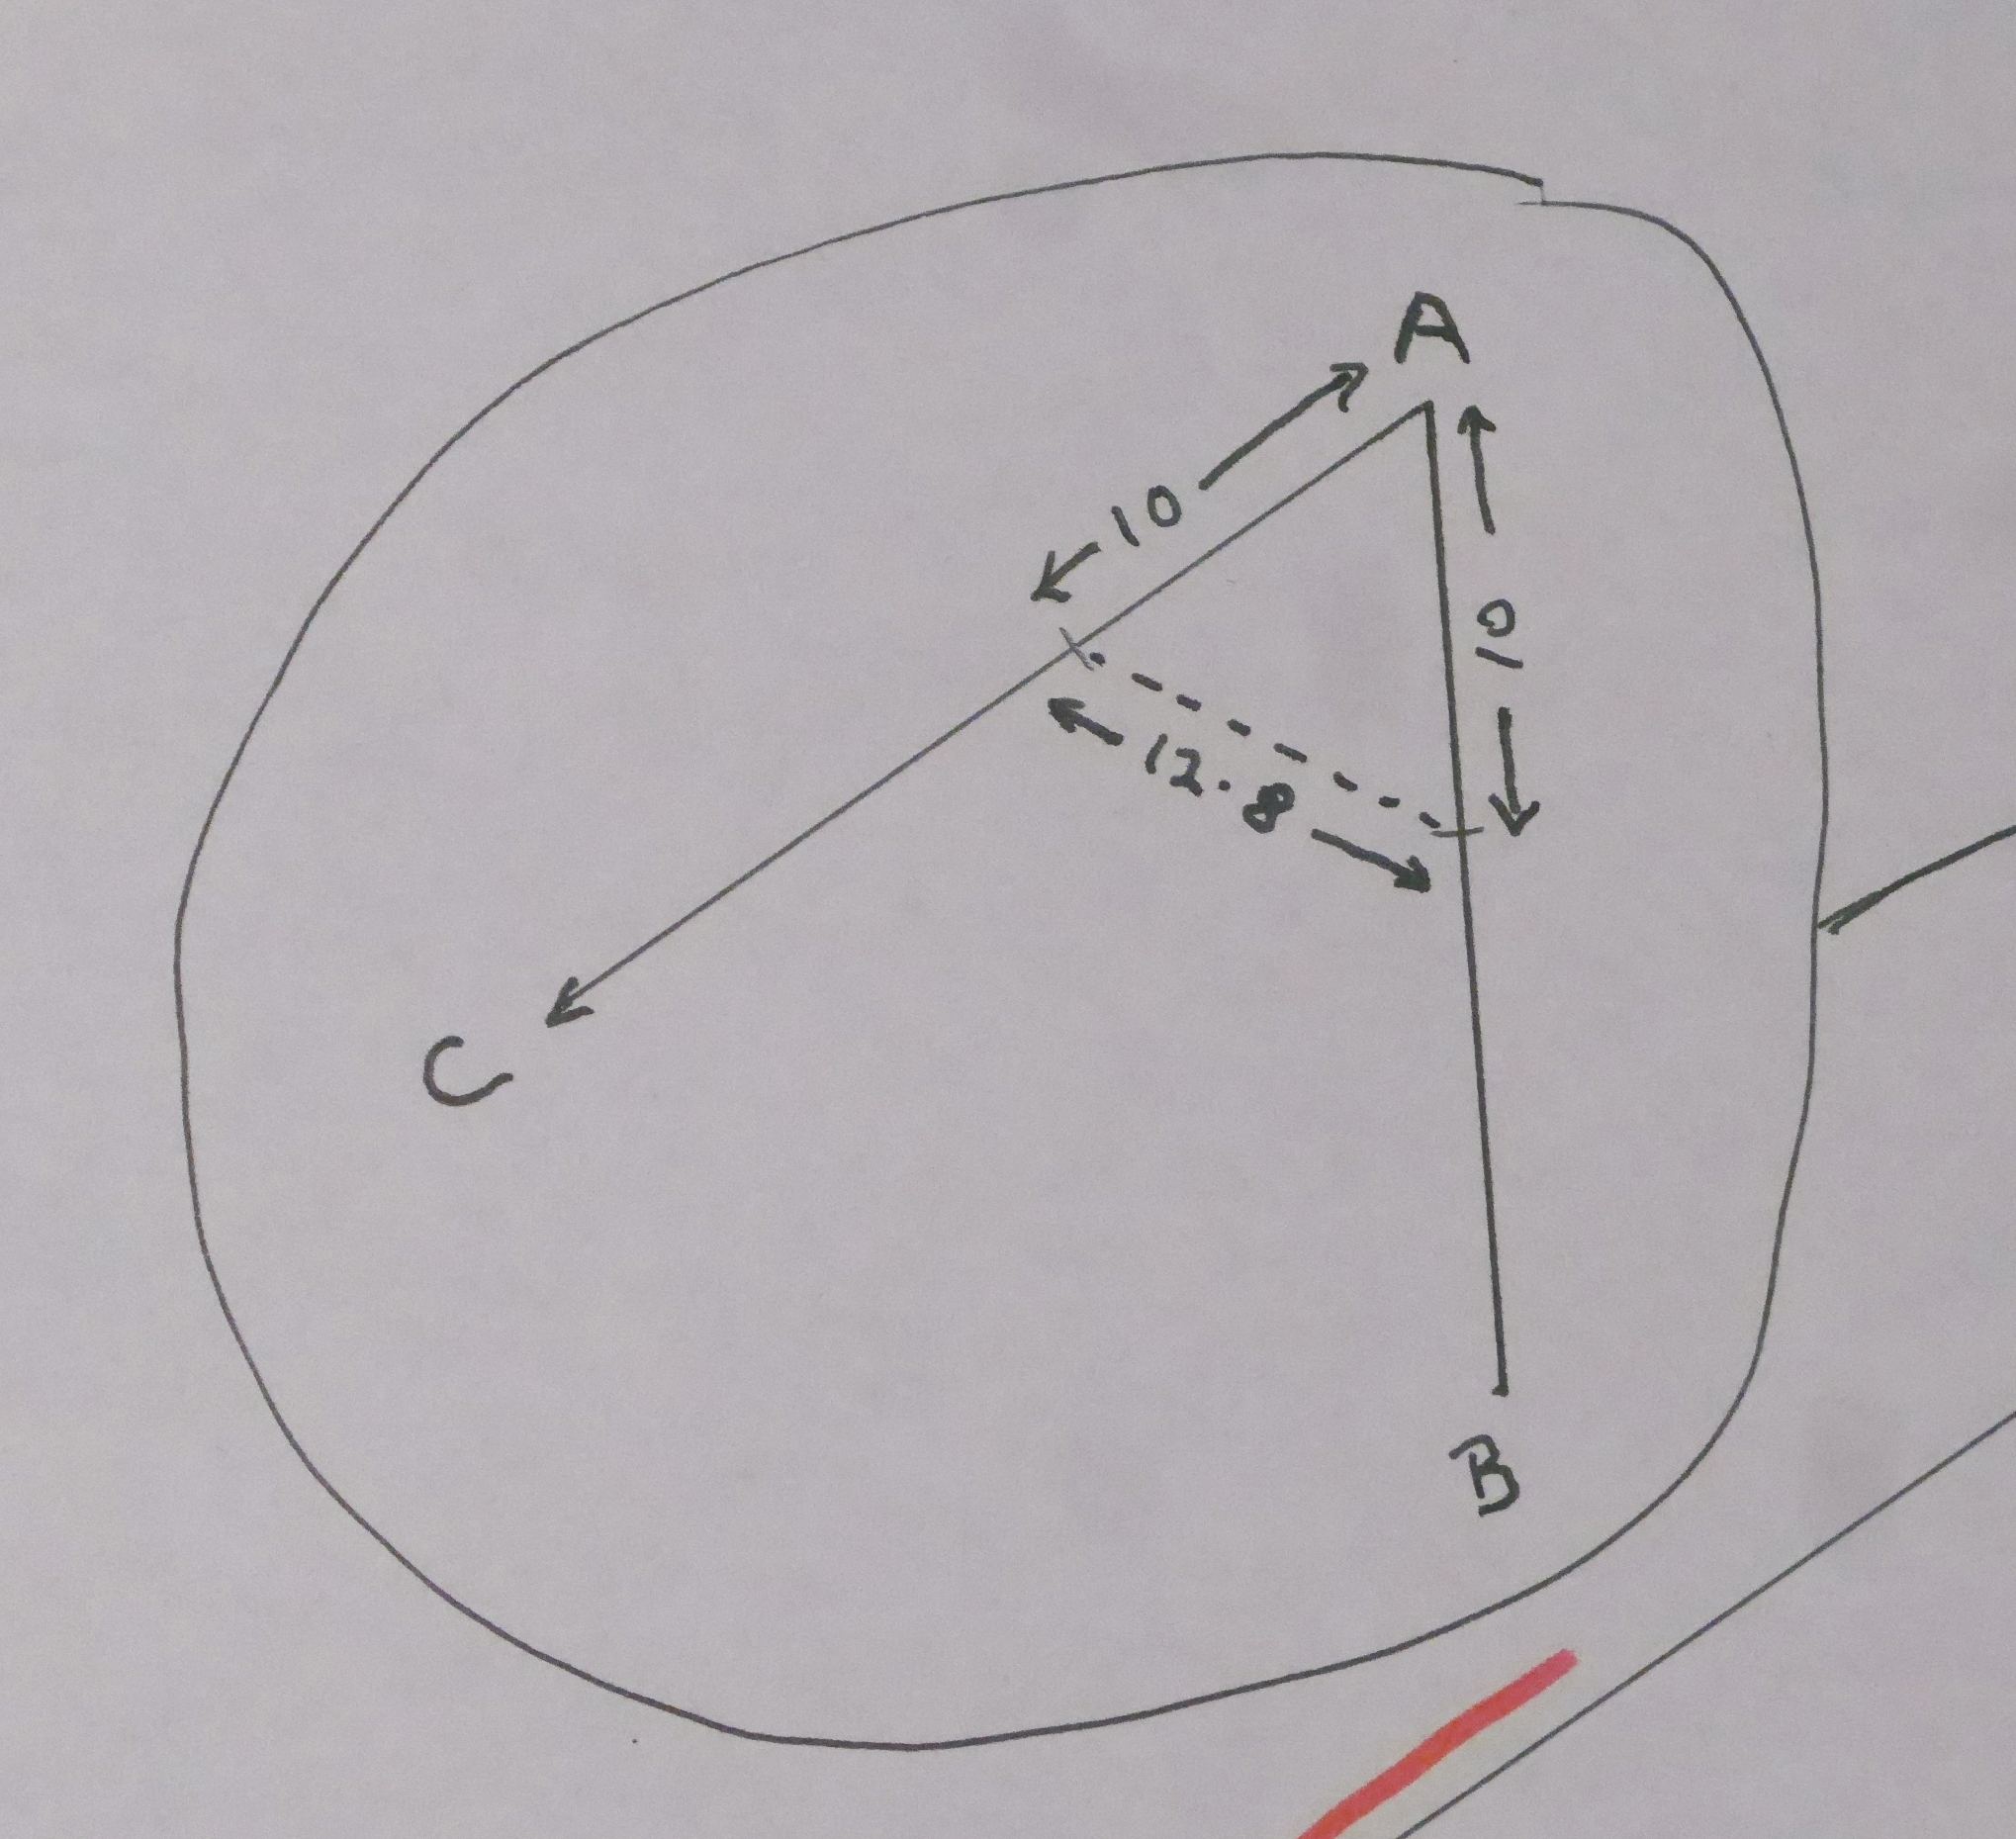
Here (above, or to left) is a magnified version of the upper circle. It shows what Alice would have had, with dimensions which, as we will see, will let you draw the angle... quite accurately. Here it is again, blown up for easier reading...
Start with dots to mark where "A" and "B" are on the map you are building up. When I did the exercise, "A" was 138 feet from "B". It is a minor cheat (it makes some arithmetic easier) if you put A and B 138mm apart. (or half that, if you want to fit everything on less paper.) Why is it a cheat? Chances for error are avoided if you just put two dots down ABOUT 138mm apart, and then separately measure as closely as you can how far apart they actually are. How far apart you tried to make them won't be a part of the arithmetic, so any error there will be part of your final answer.
While we're at it... I will mention that the bigger you do the drawing, the better. (As long as you don't have to pay for the paper.) If you put A and B 100mm apart, and mis-measure by 1mm, that's a 1% error. If you put A and B 1000mm apart, and mismeasure by the same 1mm, it is only a tenth of a percent error. Enough (for now) on errors.
Back to making the map.
Then draw a line towards "B".
Next, set a compass with the spike and the pencil 10cm apart. Use that to make a little mark on the A/B line 10cm from A. And then make quite a wide arc, also 10cm from A, across the part of the page where the line from A to C will run.
And to finish: Reset the compass so it could draw a circle with a 12.8cm radius, put the point on the place 10cm from A along the line to B, and make a new little arc where you can make it cross the arc which is 10cm from A to C!
Where the last two arcs mentioned cross tells you where the line from A to C goes! Use a ruler to connect A to the arc-crossing, and continue onward to the left to the edge of the page. You'd added the line from A towards C!!! We don't yet know exactly where "C" is, but it will be somewhere along that line!
That's the hard-to-follow, but easy-to-do bit DONE!
Well... done for the first time. You just repeat that from B, with the numbers given in the lower circle, to get the line from B to C. Where the AC line and BC lines cross is the right place for the sheds on our map! You will have DONE IT when you get that far!!!
I hope you remembered my advice, and didn't try to draw it yet? If you think you followed the above, then fine, go on with this page. If in doubt, and you are still feeling brave, have a look at my page on drawing angles with a compass which explains the above again in more general terms. (That will open in a new window or tab... If your browser isn't set to switch to that, don't think that the link didn't work!)
If you are feeling close to giving up, there's also the "protractor" shortcut which you could use, for a first, less accurate, stab at doing the map. At least try that??
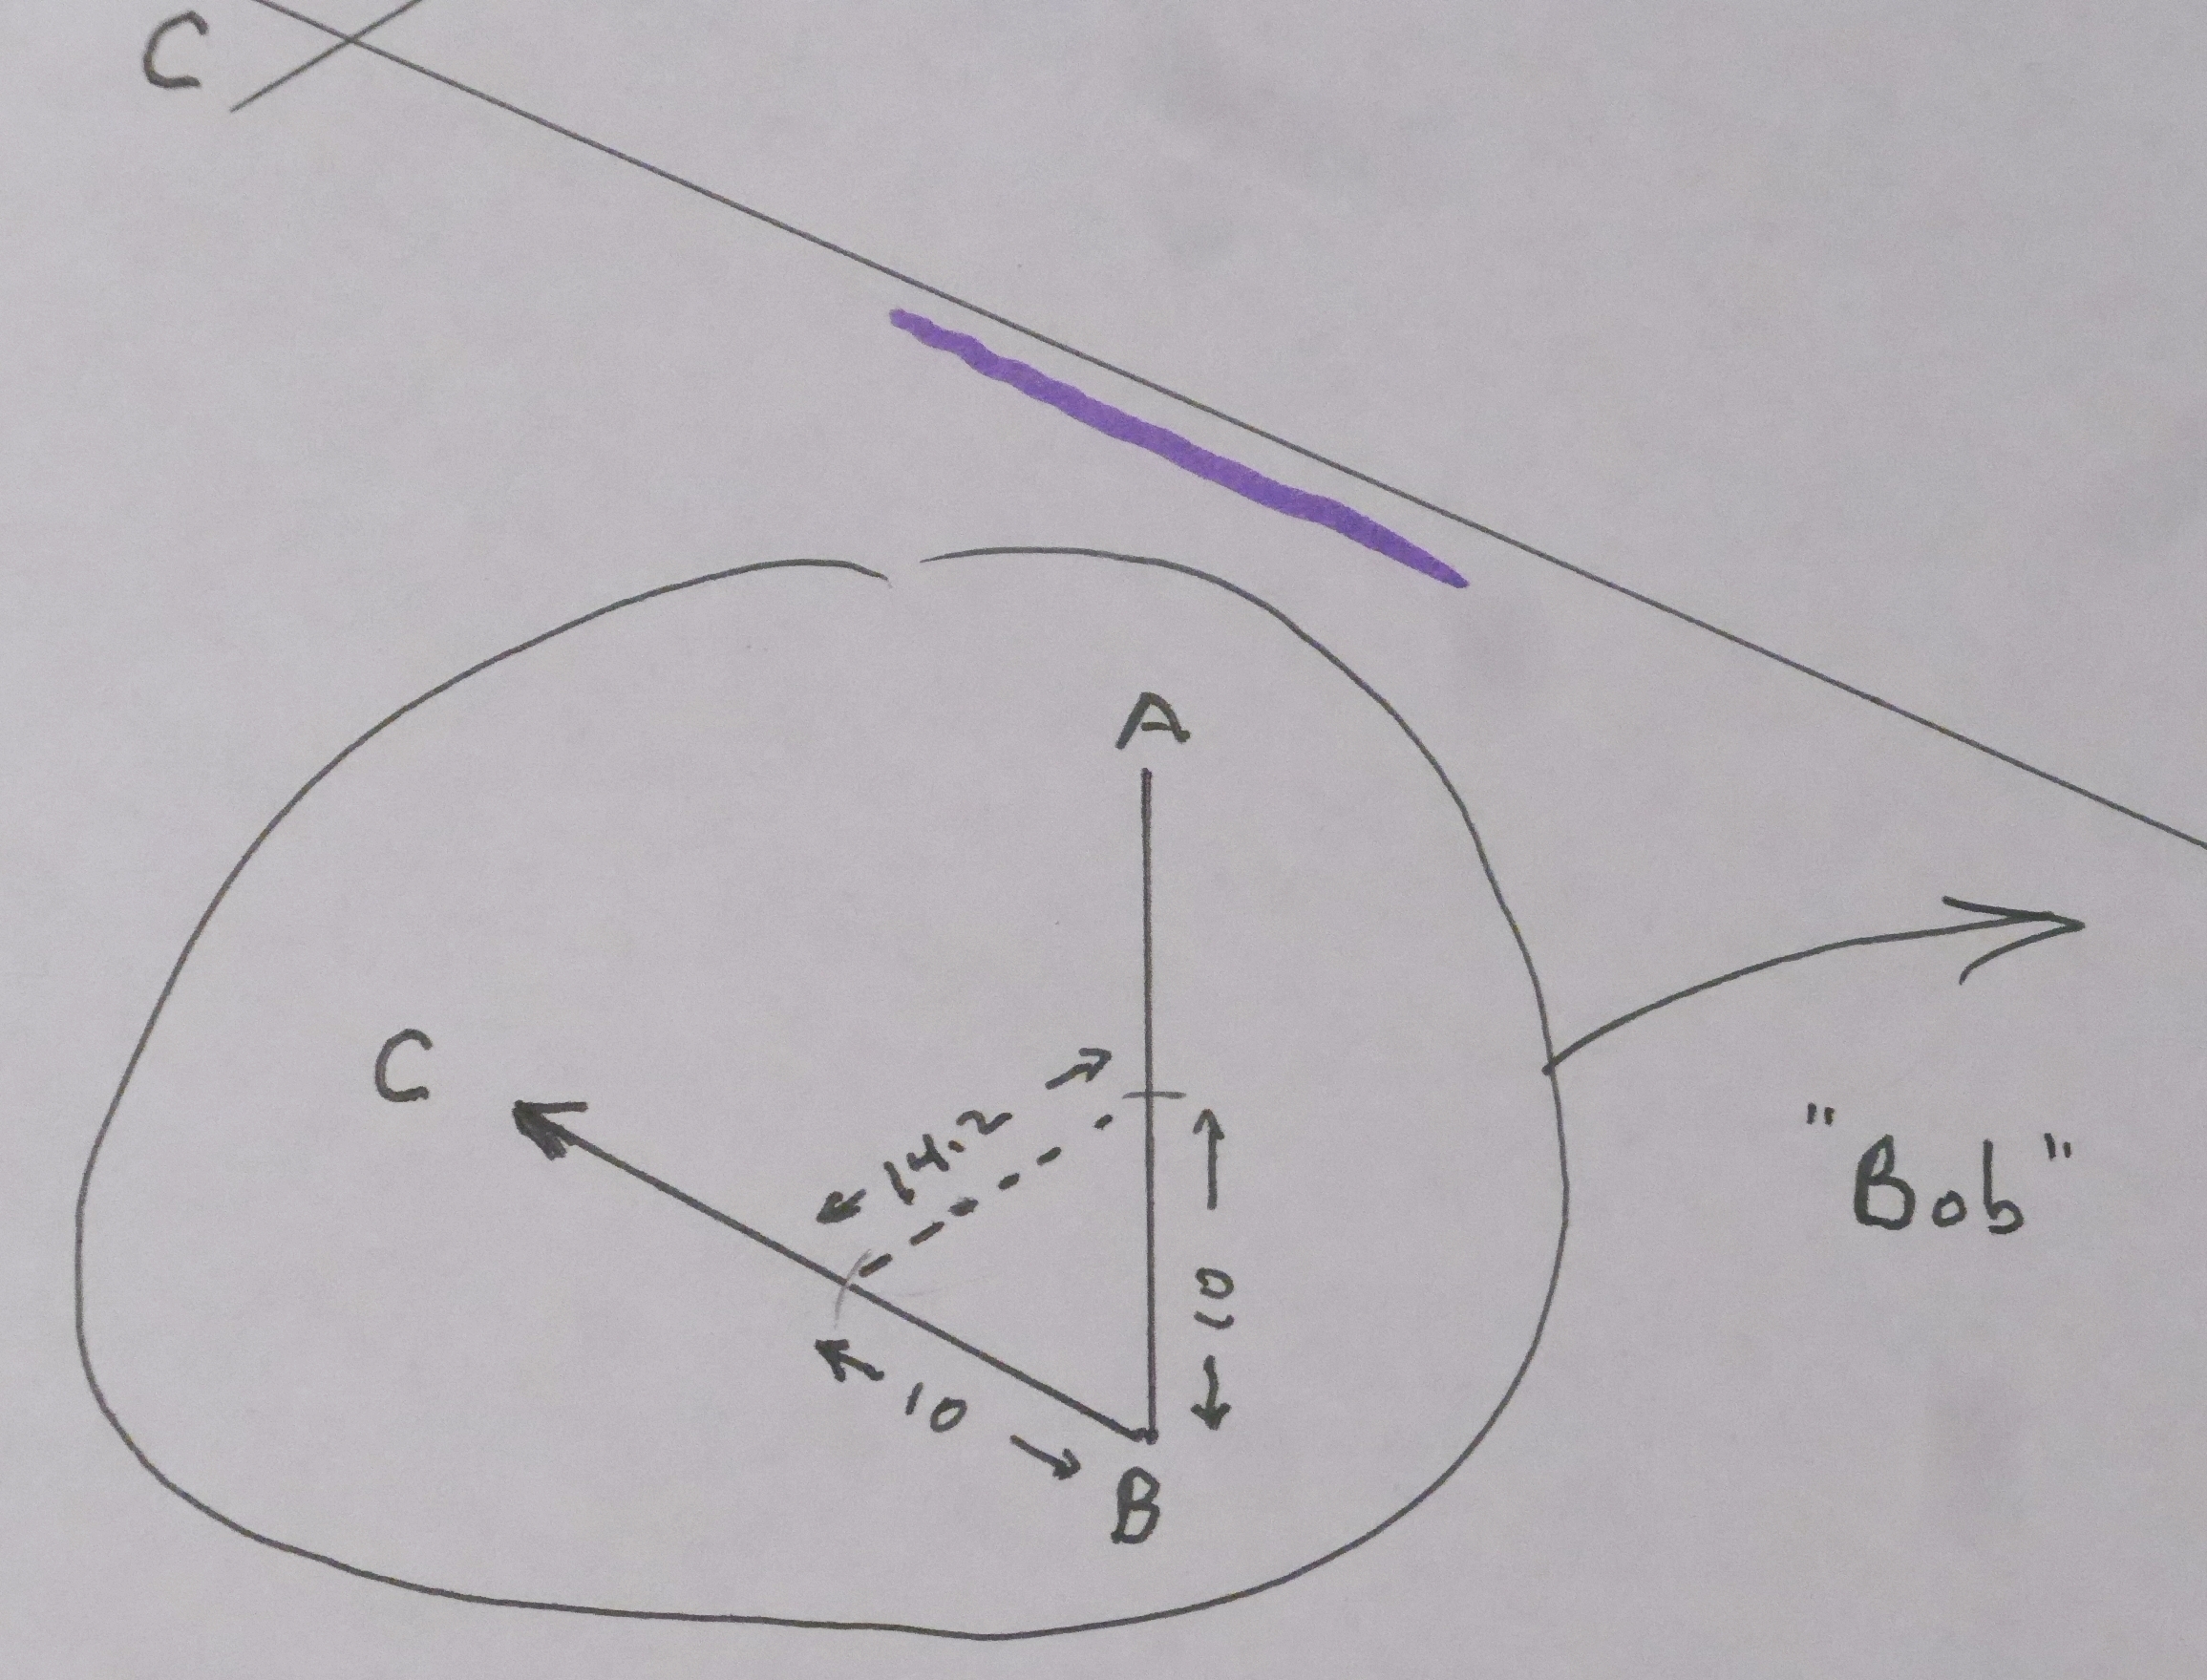
... Here (above, or to right) are the numbers for drawing the line from B to C. You use the same technique as I explained more fully to help you draw the line from A to C.
But it still isn't time to try to do the drawing!
(Scroll down the page a bit, if the text below the image is not yet visible.)
If you didn't take the shortcut... you are a hero! After you skim what comes next, you can set to, and draw the angles we've been talking about the fancy way. Why not just use the "protractor" method? It isn't as likely to be as accurate.
Here is what the diagram of the dock, with Alice at the top ("A") Bob at the bottom, with lines from each of them towards the shed SHOULD look like!
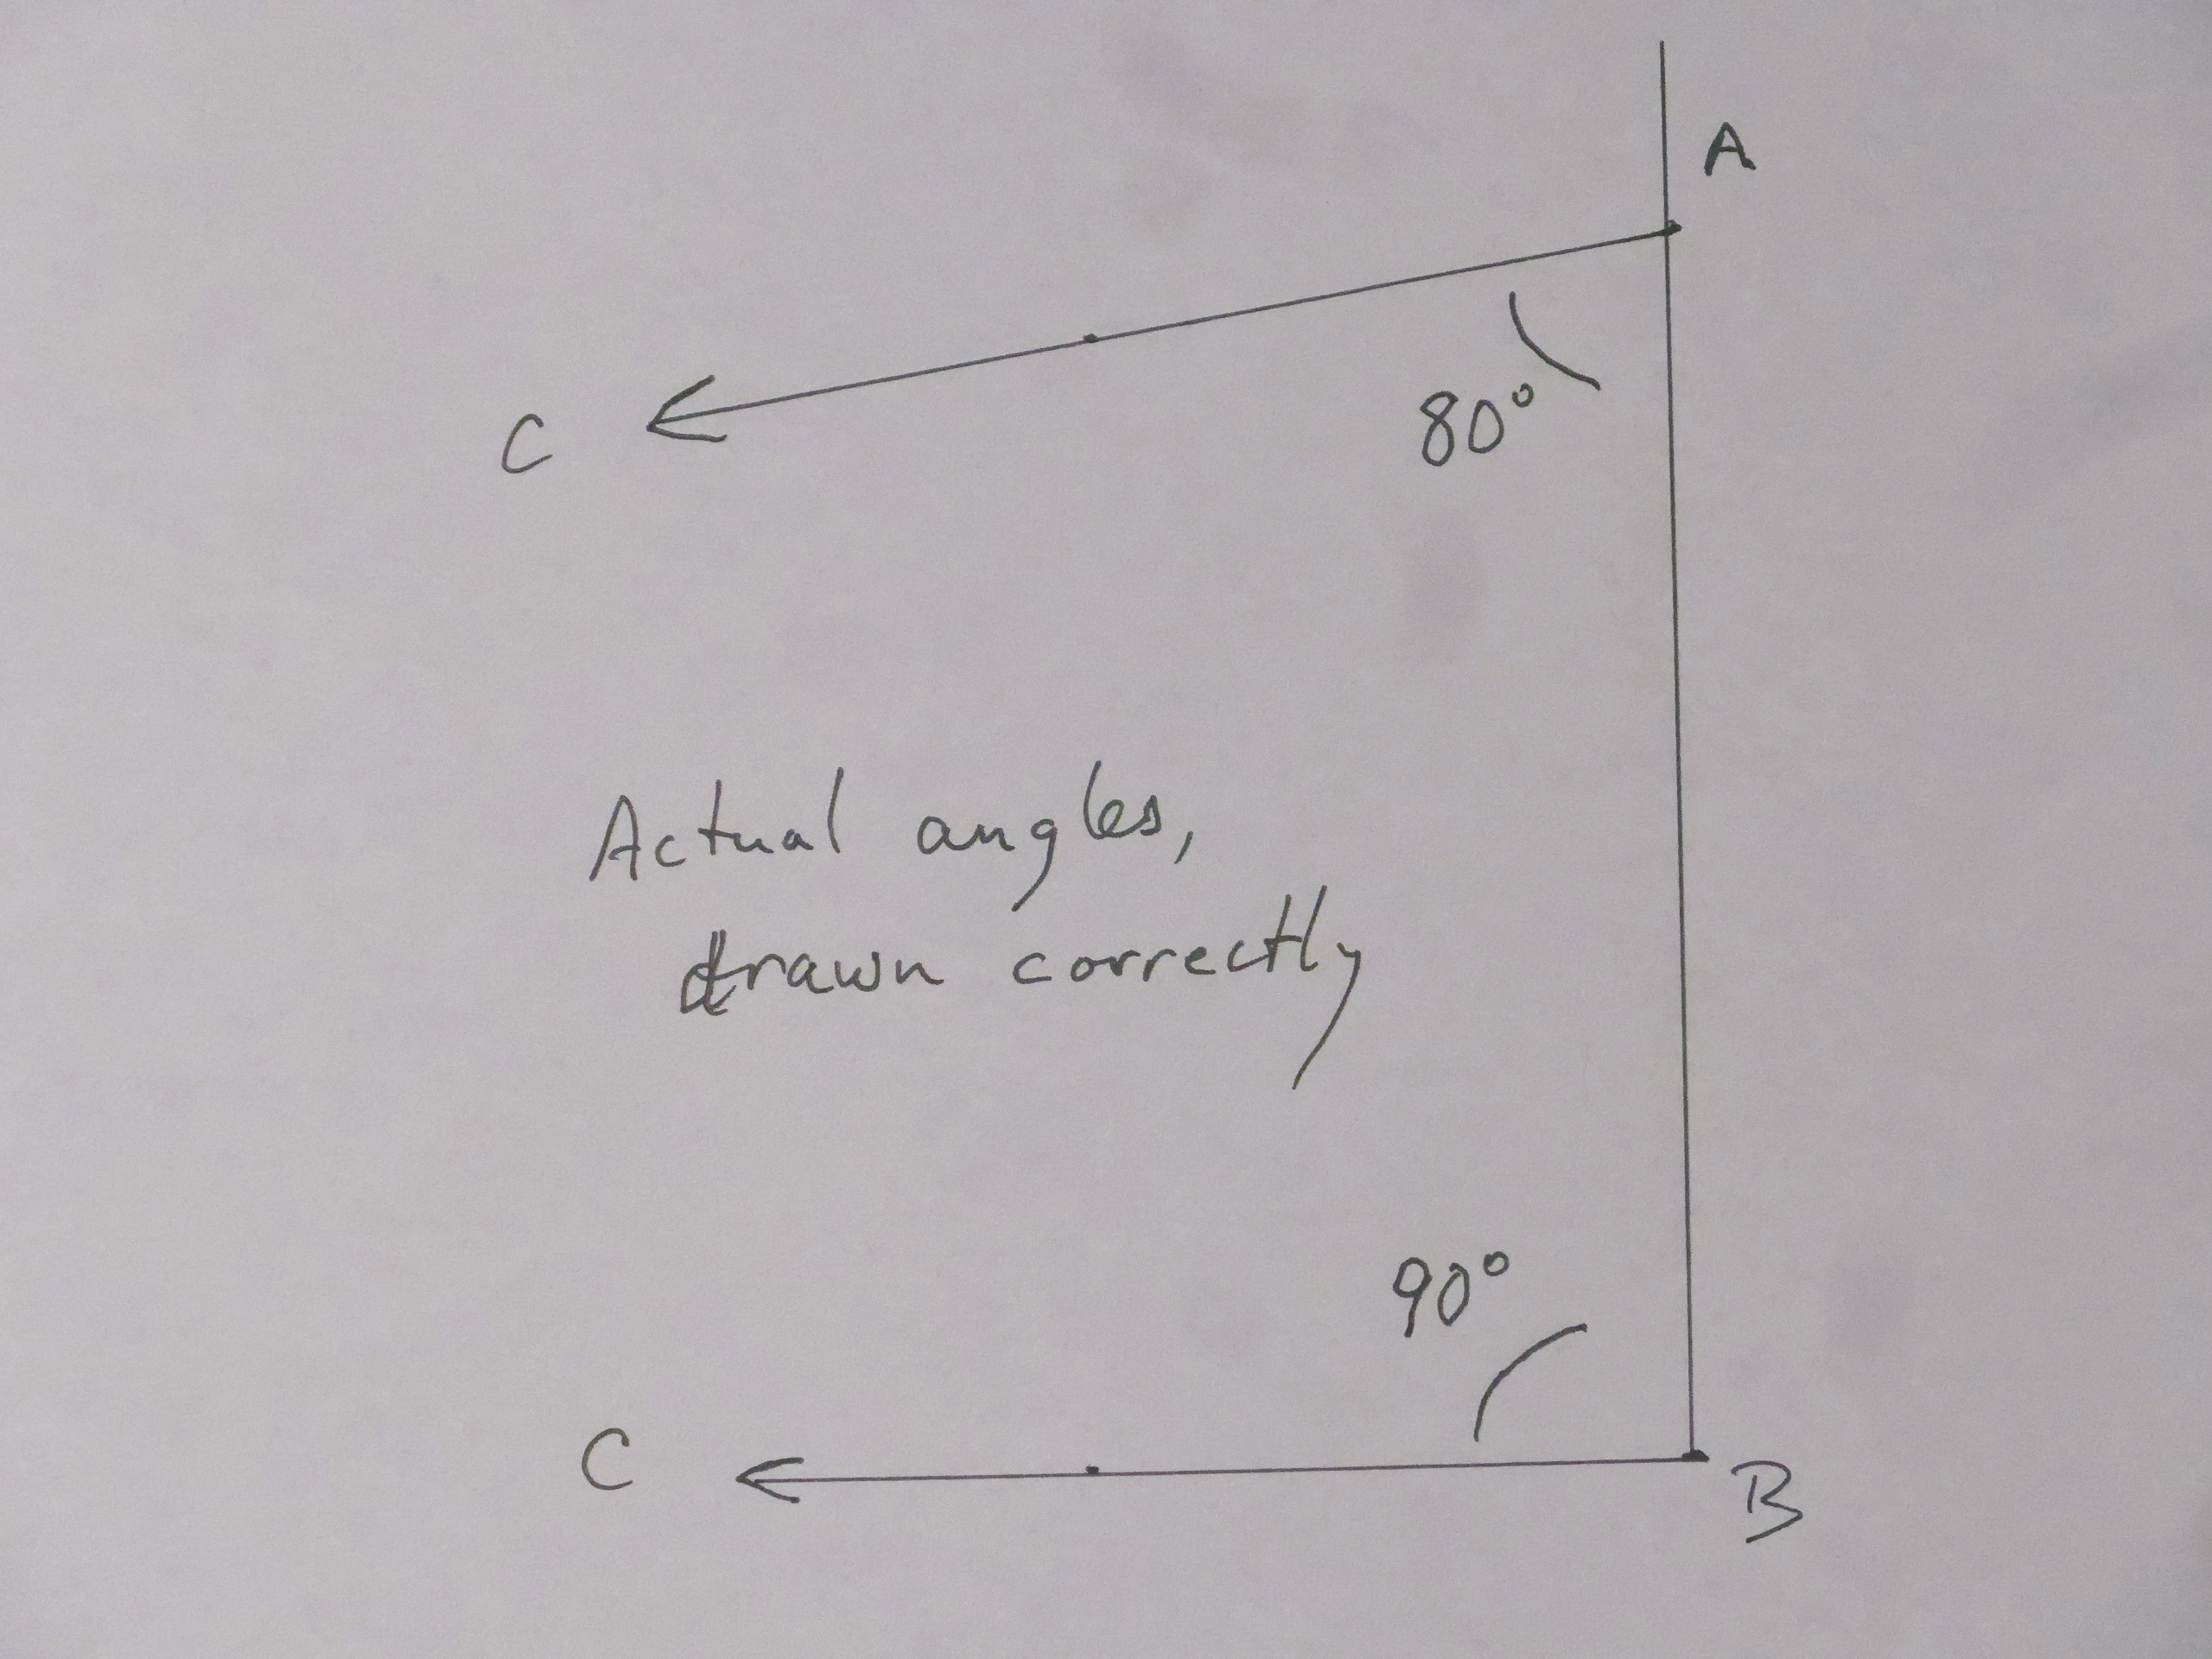
And the angles shown in figures, are, by an extraordinary coincidence the correct angles for the actual situation at Haddam, as measured from the plane table data with an inexpensive protractor.
(I say extraordinary, because the angles could have been anything. The chances of one being 90 degrees, and the other a multiple of 10 are small. It was just a coincidence.)
The two lines towards the shed "C" do not converge as quickly as they have in my earlier diagrams. That's because the shed is a long way from the dock!
Now, you can draw the diagram for yourself, on a large piece of paper, with the dock at the right hand side, using a protractor to make the angles 80 degrees and 90 degrees... and you should get a fair map of the river. If you put A and B 5cm apart, the lines should cross about 30cm from the dock. (Be sure your piece of paper is big enough!)
Try for as close to 5cm as you can manage. If the crossing point is exactly 30 cm from the dock, the you know the river is 6x wider than Alice and Bob's positions were apart, don't you? (And I told you a long time ago that they were 130 feet apart).
If the crossing point is not exactly 30cm from the dock, the arithmetic gets a little messier, but not a great deal.
SO WHY DIDN'T I JUST USE A PROTRACTOR IN THE FIRST PLACE??
Using the fancy means for transferring angles from place to place, if you do it carefully, can give you more accurate results. I measured the lines from my plane table work with my protractor as carefully as I could... but it isn't a very fancy protractor, and the measurements could be up to a degree or so out. And then another degree or so probably arises during using a protractor to draw the angles.
The compass and lengths system can be very accurate indeed, if you have a large-ish compass. And probably better than a protractor, even with an ordinary compass!
I've saved the best for last... thank you for at least skimming down to the end of this.
I actually did all of the things described in these pages, to see that I hadn't forgotten anything.
I have what I confess is unlikely to be found in every home... but you can improvise. I have a "compass" for drawing large circles. (Radius of about 30cm.)
I used that, on a piece of shelf paper, to do a large scale drawing of the angles. (Remember: When you work at a large scale, any tiny errors you make disturb your final answer less. You can never measure something exactly. Don't try. But you can measure things in ways that mean the errors you are bound to make are not "big", compared the number you should get.
I did it by the "compass" technique. I.e. I copied the angles "captured" with the plane table to my "map" with a compass, using the technique I've explained before, the one explained in general on my copying angles with a compass page.
You don't have my plane table "angle captures", but here are the numbers I used: For the four arcs that start the angle-by-compass technique, I used a 159mm radius. At that distance, the distance between the arms of angle "A" is 204mm. The distance between the arms of angle "B" is 225mm.
If you draw the dots for A and B 133mm apart, the lines from A and B towards C cross 85.45mm (to the nearest 1/2mm) from B.
Do the sums... I said I'd explain that, didn't I? Sorry. Pester me.
From those numbers, if A and B in the real world were 138 feet apart, the shed is 886 feet from B. If you recall, the answer I got from elsewhere was 899. 886 is 98.5% of 899. So copying the angles by compass gave us what is probably a much better answer. (We got 879 when we used a protractor.)
I have a little confession to close with: I measured the length of the dock quite carefully. It was within a foot of 150'. However, I didn't set the plane table up at the END of the dock. I was a little way in from the end each time. And I forgot to measure exactly how far in I was. I believe it was pretty close to 6' each time, hence I called the A to B distance 138. But part of the error could lie there.
There is one bit of good news, though. From one end of the dock, I drew the angle with the plane table twice. Two separate measurements. When I copied those angles to the map, I couldn't see that I'd made two lines with the pencil, when I completed the "copy the angle" steps. At least my "angle captures" seem to have been consistent. (^_^)
![]() Page tested for compliance with INDUSTRY (not MS-only) standards, using the free, publicly accessible validator at validator.w3.org. Mostly passes.
Page tested for compliance with INDUSTRY (not MS-only) standards, using the free, publicly accessible validator at validator.w3.org. Mostly passes.
...and passes...

....... P a g e . . . E n d s .....