Love this device... almost.
Great price, very clever, has "descendents"... but.
"Hands up": It doesn't, alas, read my fingerprints very well :-(... but I hope you won't stop reading.
(One paragraph P.S. to the above: I had the same results from a second module, which I purchased in hopes that the first one was somehow faulty. And I've had a number of "issues" with communications with Cool Components, and just didn't feel like giving them another change in respect of this latest hassle. Lots of good stuff in their catalog, easy ordering, prompt dispatch. But a little "take it or leave it", and sending contributions to discussions, product reviews with anything critical, or links to things like this page... has wasted my time in the past. So I put my energies elsewhere now.)
The device has splendid "on-board smarts". It does all the heavy lifting, so print capture and analysis is fast, and not a concern for the developer.

It communicates with the outside world via a simple serial interface.
Note: Besides the reader, you will need a JST SH to Female Jumper Wire or any Qwiic cable to take the four necessary lines off the PCB... Vcc (5v), GND, Rx and Tx.
To "play" with it, via the free SDK_demo.exe Windows program... highly recommended... you'll need a 3v3 serial port on your Windows machine, something easily arranged for with the right FTDI/ USB cable. (Details below.)
As I said, and I will expand on it, I found that it had trouble reading my prints. But if it is a "rubbish" device, would you expect it to give rise to a "new improved" unit, carrying on from the features present in the reader I am discussing here? Would you expect positive responses on feedback pages? Would you expect the price of this "yesterday's model" to be holding up?
Given that even for my fingers it works well enough for "just fun" things, I thought I might get a bargain on this model, given that the "new improved" one is out.
No. When I went looking (31 Dec 2018), though it wasn't widely available, if you wanted one, it would cost you $35.. or more, if you wanted to reward some pirates thinking they might score off of someone desperate. (I hope the desperate people realized there was a newer model which I think is at least mostly backwards compatible.)
You have to "train" the device... more on that later... but once it has been taught some fingerprints, it just sits there waiting to be shown a fingerprint.
(Actually, you might want to "fancy things up" a bit, so that it isn't always scanning to see if a finger is present. But you don't "have to", unless the system is going to be battery powered... probably a bridge too far anyway.)
Anyway... once it is watching for a finger to be on the sensor, it waits until a finger is present.
It then reads the print, and either responds "I don't know that one" or "That's the one you assigned ID x to" (where "x" is a number.)
---
"Training" it is easy... you just say "learn this one". It then waits to see a fingerprint. Tells you "remove finger"/ "processing"/ "put finger on sensor again". It reads the same finger 3 times. If you put it on the sensor the same way three times, it then says "Okay, got that." It will then recognize that finger in the future. Even if the unit's power has not been on all of the time between trials.
That's just the overview. Details further down this page.
I said the device has plenty of on-board smarts.
You don't have to concern yourself with capturing or "reading" an image of a fingerprint. You don't have to concern yourself with converting it to the "number" used for looking to see if the print has been seen before, if it is "known" to the reader. You don't have to concern yourself with the bits to make it okay if the finger isn't placed on exactly the same place on the sensor, with the same pressure, as when the reader was trained to recognize it. You don't have to maintain the database that says "this is the finger you assigned to ID 'x', or is unknown", "x" being a number.
Not only is it nice that you don't have to worry about these things, but it is nice that they are taken care of by a fast, powerful processor, inside the device.
The device you connect the reader to... Pi? Arduino? Whatever... you choose... doesn't have to be programmed for those "details". It merely deals with "the answers" served up after considerable pre-processing by the reader.
And the host system only needs to give up two digital lines to access all of those on-board smarts.
Just to make "official" what I have been doing for a while...
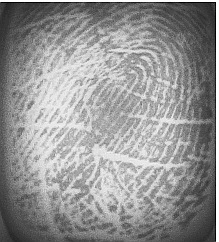
When I say "reader", I will be referring to the small module shown in the photo at the top. It comprises the little camera, under the translucent white panel, the LEDs also under the panel, the ARM Cortex M3 processor, the memory, the serial interface to the "outside world", i.e. the....
When I say "host", I will be referring to the Arduino or Pi or whatever that you are using to "talk with" the reader.
When I say "serial interface", I will be referring to something I haven't said much about before this.
Between the reader and the host, data flows as a serial stream. At the reader, there are two data lines... one for outbound data, one for inbound data.
The host will need to send and receive serial data, too.
Newbie gotcha warning: Rx and Tx stand for "receive" and "transmit". You connect the Rx line of the reader to the ** Tx ** line of the host. Yes. Rx to Tx... because the names are always relative to the device they are on.
Makes sense, really... but many beginners don't see that at first. You take what the reader sends, and wire it to where the host receives.
There's a second wire to connect from the reader to the host. This connects the reader's Tx to the host's Rx.
Nota bene: The serial data lines should be operating at 3v3 (3.3V). In spite of the fact that the whole reader can be powered with 3v3-6volts. 5v is optimal. If you want to power it with 3v3, be sure you have a source of 3v3 that can deliver plenty of current. Often the "3v3" "available" from little support PCBs, or from, say, an Arduino, is only "good" for a few mA. How much do you need? When I tried it on a "not good enough" source of 3v3, 80mA flowed, but not at a full 3v3. More than 80mA! (One suggestion I saw said 130mA should be available.) (Or just use a good 5v, and you don't need to worry!)
I was talking about the serial interface. If you connect the reader directly to a 3v3 Arduino, the hardware part of the "interface" will just be two wires.
If you want to use a 5v Arduino with the reader, be sure to put level shifting circuits between them. Sparkfun sell a suitable level conversion device. $2.95 + p&p, 12/18. (One module will be able to convert all the lines you need to.. 2.)
But I would recommend that you "get to know" the module a bit via a program running in a Windows PC before you try to work with it via an Arduino.
And for reader - Windows PC, the serial interface hardware needs to be fancier.
The "FTDI cable/ interface" once a usual part of programming Arduinos would be one answer. USB at the host's end, 3v3 serial data on two lines (Rx and Tx) at the end originally for the Arduino, but in our use, for the reader. (Note: these things come in 5v and 3v3 versions. For the reader, you need one of the 3v3 FTDIs, or a 5v FTDI and level conversion on each line.) Sparkfun sell a suitable FTDI interface if you don't already have one... as do others. I suspect you can find one for less, if you shop around.
The reader is a very clever little device.
(Digression... I'll mark where it ends...
For instance, under the translucent white platform, behind which the camera sits, there are 9 LEDs. I suspect that each finger is photographed 9 times, once with only one of the LEDs lit. A combination of those images, done inside the reader, brings out the edges of the ridges which make up the fingerprint. Neat, eh?
(End of digression.)
I suggest you "walk" before you try to run.
I.e. here, I suggest you interact with the reader via the free "SDK_Demo.exe" Windows program before you try to write code for, say, an Arduino to interact with it in exactly the manner you want to use.
The nice people at Sparkfun have written excellent notes on hooking the fingerprint reader up to a Windows PC. (And, note, left it available to us, in spite of the fact that Sparkfun now (12/18) sell the newer versions in this product line. (As before, there are two... they work alike, but one can hold more fingerprints in its database than the less expensive "try it" model.)
There's a link from there for fetching the SDK_demo.exe app. (That is supplied as a .zip with the "ready to run" exe in it. There's no "installing" to do... doing who knows what to your system along the way.
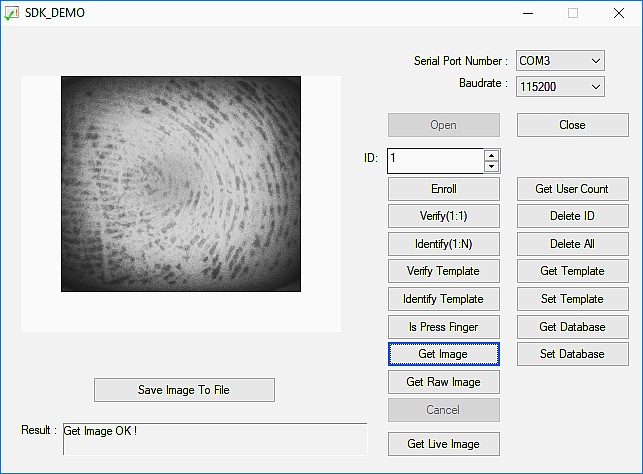
When you have the reader connected to the Windows host, running the free SDK_demo.exe, you should see a screen like the one on the right. (There won't be a fingerprint showing in the large box when the app boots.)
It is well laid out: You specify the virtual COM port that has been set up by the USB adapter, assuming you're going that route.
Start at 9600 baud, just to give it the best chance possible.
Click "Open", to open the connection across the serial lines. You should, within 10 seconds, down in the "Result" box, see "Firmware...." and a serial number. (If the serial number is zero, something is wrong. (Note to self: My serial number, IEC179: 524AD454741554A- 5257553539344C4B)
By the way...Once you've had a few successes, change the baud rate to something higher... 115200?...,. Close the connection (with the app's "close" button"), unplug/ replug the USB, and click "open" again.
But... returning to first steps...
Place a finger or thumb firmly, but not with great force, on the white panel on the reader, and, with digit in place, click "Get Raw Image".
If all is well, almost immediately you will see "downloading image" in the result box. (Once that starts, you can remove your finger... the image capture is finished. for your inner geek: It is a 450dpi scanner, and a 240x216 pixel image.)
(To quibble: If it were me, I would call that UPloading image: It is being sent from reader to the host. The taking of the picture, when things are working, is almost instantaneous. But it takes some time to send it from the reader, display it in the big window of SDK_Demo.)
That merely scratches the surface... but it is a key first element. It the reader isn't capturing an image of the fingerprint, nothing else is going to "work", is it?
Play around with that for a bit. Move on to "Get Image" quite soon.
"Get Image" is just a little more than "Get Raw Image". If you click that, you have a few seconds to put your finger on the reader. The reader waits (a little while), and only reads the finger (i.e. takes the picture) after it (the reader) "sees" a finger on the reader. (If it doesn't see a finger quickly enough, you'll see "Timeout" in the results box. If you see "Input finger!", it means the reader hasn't "seen" your finger yet, if it is on the pad.)
If the reader is having trouble seeing your finger, try soaking your hands a little in warm water to moisten and swell the ridges.
Again... play with that, until you have trained you to SUPPLY fingerprints to the reader the way it needs them.
No. The reader does not save your fingerprints. I mention it because sometimes when people are asked (told!) to participate in a scheme involving one of these readers, they get concerned about that.
If you want to save the result of a "Get Image" or "Get Raw Image", you can, with the "Save Image to File" button. And the image will be saved on the host machine. But the reader does not hold fingerprints inside itself.
So how does it "recognize" prints??
I'll explain that a little later, when we've talked about the "Enroll" function.
Let's say you want to use the reader as part of a system to control access to something. Let's say there is a small storeroom where valuable supplies are kept, and only a few employees are supposed to have access to them.
You could set up a reader, connected to a host, and the host would be set up to be able to open or lock the door. It would normally be locked.
If an authorized person put their finger on the reader, the door would unlock.
All very do-able. But you do see "the problem", don't you?
Before such a system would work, you would have to "tell" the reader/ host WHICH fingerprints would be the fingerprints of people allowed access to the cupboard.
Here is how things are set up with this reader for that job....
The reader can "remember a fingerprint". (That actually slightly oversimplifies things, but will do for now.
The access control system would have a way for "the boss", or some senior supervisor, to "say" to the reader: "Look at this print. Remember it. If you see it again, open the door.".
Obviously, access to this function would need to be carefully controlled, or people could add themselves to the list, legitimately or not. Controlling the access is not difficult.
In the SDK_Demo.exe software, this command to "Look at this/ remember it" is called "Enroll".
To use "Enroll", you must first change "ID" to a number which hasn't been used yet.
(If you want to re-assign an ID that has been used already, change the number in "ID" to that number, and click "Delete ID".)
Once there's an unused ID in the ID box, get ready to put the finger on the panel, and click on "Enroll".
You should see...
"Input finger 1 !"...
and as soon as you put your finger on the reader, you should see...
"Processing finger..."
... and then...
"Take off finger",
... followed by...
"Input finger 2 !"
Now! Here's the first way to be confused.
The reader doesn't want you to show it a different finger ("finger 2"). It wants you to show it the first finger again. Show it a second time.
Of course, you may not have got this far. The message changes from "Input finger" to "Processing finger" almost instantaneously, as soon as the reader "sees" a finger.
If you don't put the finger on the reader "right" fast enough, your attempt to "enroll" the finger (or thumb) will crash and burn, and you will see "Timeout" in the results box. You are not being sent "on" "a timeout"... the time on a timer has run out, you took too long to show the reader a finger.
If you have a lot of trouble getting "processing fingerprint", go back to "Get Image" (not "Get Raw Image"). It uses the same "look for finger, but only until timer runs out" algorithm, AND it shows you what it is "seeing" when it DOES see a finger, so you can fine tune your finger presenting technique.
Do NOT "crush" your finger onto the reader in a misguided belief that there's some sort of insensitive pressure sensor involved in the process by which the device registers the presence of a finger. It is merely looking at what it sees, many times a second, and waiting to see "a fingerprint".
(The "Is Press Finger" button is another way to learn about putting your finger on the sensor properly. The system tells you if it can see a finger or not at the moment you click the "Is Press Finger" button.)
====
Right! How long did it take you to master "Enrolling" a finger? Not too long, I hope? If you got "Processing" for the third attempt to read a finger, you have enrolled a finger. I hope you managed that without too many tears. You get "Enroll OK (ID=x)!" (where X is a number) when you succeed.
Good news!!... the reader will "remember" your hard work "forever". (Well, until you take steps to change what fingerprint gets identified as "x", anyway.) Turning the reader off, and then on again, doesn't wipe the memory. Whew!
Remember I said earlier that the reader does not remember fingerprints?
When it was "processing" each of the three samples of the finger you were enrolling, it was doing a mathematical thing. It sent the image to a subroutine. The subroutine returned a big number.
If the number was "close enough" the same for all three trials, the number was saved inside the reader.
If you click "Identify 1:N", the reader will ask you to show it a finger.
If it reads the finger successfully, it will send THAT image to the same subroutine as was used previously.
The number generated will be compared to all of the stored numbers. If it is close enough to one of them the reader will report that the new fingerprint is like the one it saw earlier, and was told to call ID "y" (where Y is a number.
After you click "Identify 1:N", and present a finger, the reader initially say...
": Input finger !"
... which it will continue to say until it "sees" a finger. If it continues to say "Input finger", you need to try repositioning, pressing harder (never very hard) or less hard, or... SOMETHING.
It will go to "Processing fingerprint" very quickly, as soon as the finger is correctly presented. (And it will go to "Timeout" if you aren't fast enough. In which case you need to do "Identify 1:N" again to try again.)
And, after "Processing...", it will either say...
"NG! Please input finger" means the device doesn't think it "knows" that finger. ("NG"= "no good"?), after which it will go back to "Input Finger", or...
It will say ""ID= x yyy ms Input Finger"... where "x" is the "enrolled", or "ID" number for the recognized finger, "yyy ms" is how long in milliseconds the match took, and the "Input Finger" is an invitation to put another finger on the reader for identification.
("Verify 1:1" is similar, but you set the "ID" number on the app's interface to whatever you wish, click "Verify", show it a finger, and it tells you if that finger matches the finger which was assigned the given ID. The feedback is a little misleading... it always starts "ID= z" (where z is a number) That part is merely saying "This is the fingerprint I am looking for". Just because it says, say, "ID=4", it is NOT saying "THAT WAS fingerprint 4". The rest of the line tells you whether the reader "thought" the fingerprint matched the one it has stored as "4". NG means it does NOT think so.)
Of course, as discussed earlier, when the reader identifies or verifies a fingerprint, it is merely saying "this one results in nearly the same number as the one I saw earlier did."
We've spoken of the reader "remembering fingerprints". And refined that to "remembers numbers".
The "number" is actually a bit more complicated than a mere number. What is generated by the reader when it "processes a fingerprint" is more properly called a "template".
There is a "list" or "dictionary" or whatever you want to call it which says "if you see THIS template (or something sufficiently close), tell the user that you've seen the template that was assigned ID x" (where "x" is a number).
That list or dictionary is (quiet properly) called a database by SDK_demo. You can save a dictionary to any storage device connected to the host. You can fetch previously saved databases from the host, and send them to the reader. (This would be useful for programming several readers to all respond the same way to a set of fingerprints.)
Use "Get Database" to get the database from the reader, after which you will be invited to save it.
Use "Set Database" to load a database from some backing store attached to the host, and send it into the reader. This will, of course, overwrite any database already in it.
"Get User Count" will tell you how many of the IDs available to you have already been assigned to templates. (You can over-write a previous assignment at any time.
"Get Template", if you have, say, 3 in the "ID" box will "get" the template for the fingerprint with ID 3, and let you save just that template to backing store attached to the host.
"Set Template", if you have, say, 6 in the "ID" box, will let you fetch a saved template from the host's backing store, and will then write it into the database as ID 6.
There would be no point in having the same template assigned to multiple IDs... though you could do that, and confirm you'd done it with "Verify". But if you asked the reader to identify the fingerprint, it would only give you one of the IDs that were assigned to the template that fingerprint matches.
So! There you have the life and times of SDK_demo.exe.
A great way to get to grips with your reader before trying to write software for, say, an access control system.
The SDK_demo.exe program basically simply sends the right "do this" command, over the serial link, to the reader for each of the functions that the app can demonstrate. And then it puts "the answer" from the reader in the result box.
Simple enough in principle. But learning to present the finger correctly, etc, etc, takes a little time.
Do "play" with SDK_demo.exe a bit before you try to write software to use the reader??
Walk a little before running?
The task isn't trivial... but it isn't rocket science.
Start with something that will read fingerprints, check them against a database, and then "do things" depending on whether the fingerprint is in the database.
At least to get started, use SDK_demo.exe to enroll the fingerprints you want the reader to respond to?
But if you want to be able to enroll fingerprints, too, that IS possible. But a function you can add later?
There is excellent documentation of the exact details of talking to the reader for yourself, in a program of your own devising available at Sparkfun. That link should fetch the document for you. Let me know if the link becomes dated? Remember: The link triggers a download. Not all browsers throw up a page when a download is done... you may have to go off to your "Downloads" folder, where you should find "GT-511C1R_SDK_20140312.zip".
Remember the excellent Sparkfun Hookup Guide says all of this and more, probably better! This is for people who had questions after they'd read Sparkfun's guide!
I don't know... but it should be fairly easy to set up an access control based on this reader. Pi does serial comms, after all. I don't know if there is a "Pi friendly" equivalent of SDK_Demo.exe.
I did see a suggestion that there is Good (Pi) Stuff, in Python at... https://github.com/QuickGroup/pyGT511C3
... and I visited it; no really bad red flags noticed. But I'm not qualified to tell you how good that material is. That relates specifically to a subsequent version of this reader, but should have lots of relevant material, anyway.
I hope you will have better luck than I did with the fundamental business of getting the device to read your fingerprints. I really like this device. (Enough that I've ordered a second one, just to test the theory that the one I have is faulty.)
And I hope these notes have helped.
Feedback appreciated. This has taken hours to create. It would be pleasant to know someone read it.
The general idea of these pages is it make it easier for you to use some little gizmo that I found fun. I hope this one achieved that? Your thoughts and anecdotes, welcome. What are you using one of the devices discussed here for? Virtues? Problems? (Especially anything not mentioned above that you think the next person reading this would like to be told.)
If you found this of interest, please mention in forums, give it a Facebook "like", or "share"? I've almost given up writing these pages, because it seems they are seldom read, and of course not every reader will use them... so... is there any point? If you want more of this stuff, help!?
Click here to visit my main homepage where you
can explore other areas, such as education, programming, investing.
![]() Page tested for compliance with INDUSTRY (not MS-only) standards, using the free, publicly accessible validator at validator.w3.org. Mostly passes.
Page tested for compliance with INDUSTRY (not MS-only) standards, using the free, publicly accessible validator at validator.w3.org. Mostly passes.
....... P a g e . . . E n d s .....