Cycle the world without leaving home. Your magic carpet to world travel. It doesn't have to be expensive.
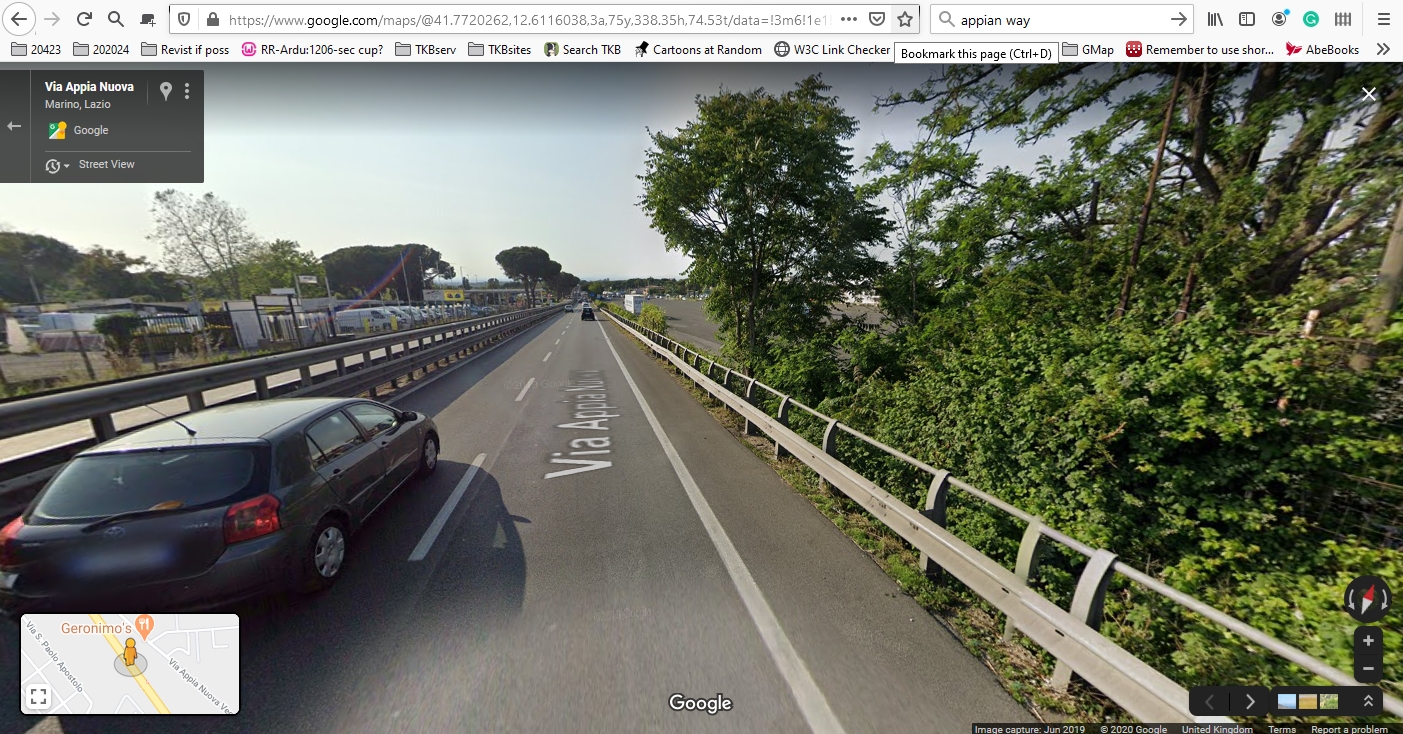
In this world, you can cycle down the Appian Way... or someplace else. Almost anywhere a car might go... in the world! Or go jogging.
Someone watching you will think you're on your exercise bike or your treadmill. But, with a little willingness to "get with the program, you can think of yourself as being in Italy!
The "big ask" is that you have a computer connected to the interent. A fast-ish internet connection and computer would be good, too.
Have you played with Google Maps Streetview? If not, there are many guides online. You only need a very basic grasp. It is also pretty intuitive.
Right click on "Streetview" in latter part of this sentence and open the link in a new window, or, if you (wisely) are careful about links, go to a Streetview image somewhere. But do it in a new window, and pull things around until you can see them both, side by side. As it happens, the link I provided will take you to Frattocchie on the Appian Way, headed NW towards Rome. If you were being independent, get yourself turned to face down the road.
Humor me? Forget about the bike for a moment. Just "travel" along the road a little bit.
I be you used your mouse, didn't you? Did you know you can also use the keyboard?
You've discovered the first secret of how you can make your exercise bike a virtual world-tourer!
"Play" with Streetview a little bit more... using the keys.
Did the keys fail to work for you?
You must, to use the computer person's words, "give the window focus". Click somewhere on the Streetview scene. Now you should find that the keys work.
- - - - - - - - - - - - - -
Given that Streetview can be controlled by keystrokes, the rest is easy.
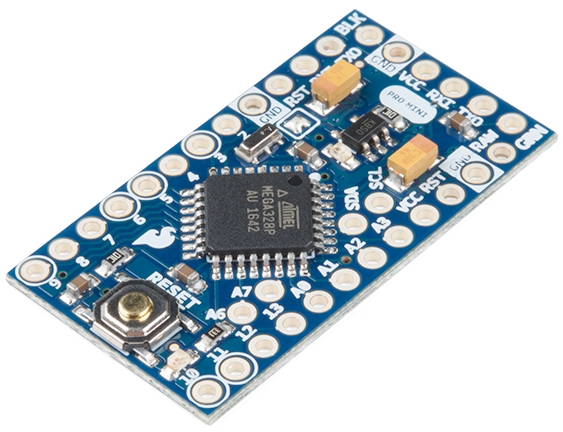
You program a microprocessor to emulate a keyboard. You connect it to the computer as you would a keybard. A $10 Sparkfun Arduino Pro is quite sufficient.
You fit the bike with two buttons, one on each handlebar. press left button to turn left, right button to turn right.
Connect the switches to the Arduino. Connect the Arduino to the computer. Program it so that it sends an "a" to the computer running Streetview when the left button is pressed. And a "w" when... you know.
Fit something to whatever goes 'round and 'round on bike or treadmill. Program computer to count revolutions, and after the right number, send an "up arrow pressed" signal to Streetview.
How to make a keyboard emulator with an Arduino is explained at https://www.sparkfun.com/tutorials/337. (I'll try to expand this note one day.
Of course, once you can get the big computer to "see" the Arduino as a keyboard, a host of projects become possible. How about, for instance, a special keyboard for your favorite game? No longer do you have to remember that "w" puts your flaps down a notch, "ctrl-w" puts them up... have a proper control panel with a realistic two-way momentary switch monitored by the Arduino which sends "w" or "ctrl-w" as appropriate. Or, use the same sort of external special hardware interface to give you easy access to all the features you'd like to use in your wordprocessor! (I use them enough that I know the "right" way to get them... but my photo manipulation software still overwhelms me with its vast array of tools and modes.) Your "special keyboard" could, of course, have a "selector switch" to cycle it through different configurations.
The original story which prompted what you are reading suggested using a more modern, more expensive Arduino. It would, however, I'm 95% sure, be VERY easy to extract the heart of the design: Send "up arrow", "w", or "a" to the big computer is. Though I haven't yet DONE it, I'm pretty sure that the Sparkfun tutorial will tell you all you need to know, and that it wouldn't be rocket science.
The code for one of the (slightly!) more expensive Arduinos, and the whole inspiration for this essay is at https://www.instructables.com/id/Riding-Through-Walls-Google-Street-View-Stationary/
Perfect? Of course not. Fun? Probably.
Features I would add, to what's in the article...
A "gear selector"... As presented, there's a constant inside the code that sets how many revolutions of the pedals must be done before the Arduino will issue another "go forward" command to Streetview. If that number is too high, you will feel cheated- pedaling furiously you appear, on the screen to be moving forward at a crawl. If the number is too low, the Streetview system won't be able to finish presenting the view you've asked for before you request the next.
So! It would be very simple to add a variable resistor to the hardware and a tiny bit of code to the software to give you a "gear selector" to permit changing the number of pedal revolutions required at any given time to trigger a "go forward" command.
Data logging... Okay... I'm a data junkie. But even the most casual exerciser keeps some sort of log, doesn't he/she? If you've got an Arduino counting your wheel turns, you might as well record turns made, timings. Easy enough to add heart-rate tracking and more.
My great quest: It must be 25 years I've thought about building a smart exercise bike. What (besides an aversion to.. shudder... "exercise") has stopped me? I've never solved the riddle of "how do you track how HARD it is to turn the pedals? Alex and Rory have both done 20 minutes on the bike. Both did 2500 pedal revolutions. Did they get the same workout? Not unless the control setting the resistance from the bike was at the same setting. Sigh.
The best answer I've heard is as follows. I can do electronics. I can do software. Building thing slike this... beyond me.
First tweak your bike so that the pedals go around really easily.
Connect them to an electrical generator. You know, a "motor" used "backwards": You put rotations in and electricity comes out.
I suspect an alternator from a car junkyard might fit the bill... I like sourcing things from automotive engineering... they operate at 12 volts DC instead of nasty dangerous high voltage household AC. (An alternator MIGHT not be satisfactory... but I'd certainly give one a try.)
I'd then connect the generator to a high-wattage variable resistor.
Believe me, even if you don't understand: If you set the resistor low, and pedal at, say, 60rpm, it will be hard to turn the pedals. Set it high, and you can turn the wheels more easily. Besides a convenient way to vary how hard you must work, this would give you a voltage and current to measure... and with those, you have a very good indication of the work you are doing. (I say "very good", not "perfect" because there would be other energy losses apart from the heat you were putting into the atmosphere.)
Remember the little demonstrators science teachers used to have? The hand-cranked generator connected through a switch to a bulb? And the excellent educational experience, very "hands-on" when you felt the effect of opening, closing the switch?
There is a flaw.
Without doing anything clever, just sitting there now, go to Streetview, and press "up arrow" repeatedly. See the problem with the approach taken in the design we are discussing? Google does not arrange things sow3 link check that each press if the "w" will take you forward by a constant distance.
But, over a five minute cycle, I think you will find that the average distance is pretty steady. Good enough for me to have fun. You'll just have to device for yourself.
There you have it! The path to making an exercise bike or treadmill with a dynamic Streetview scene to at least give a sense of moving about in "the real world".
Or at least a "project" to have a little inexpensive fun with.
While they weren't as fancy as a Streetview bike, they might have been more fun. (If you think so, make a pair! Easier to do, today.)
In the exercise room on the Titanic, there were two exercise bikes, both facing the same wall. On the wall was something that looked like a clock... but the hands were the same size. One of them red, the other green. Pedal the bike on the port side of the ship, and the red hand went forward. Pedal the other bike, and the other hand went forward. Two people could race, and "watch" their progress to the finish line, and see who was ahead, and by how much, at any time!
At a certain age, kids would find the following fun, while you are getting the electronic version done. One of them gets on the bike, and pedals, counting rotations out loud. A laptop is placed on a stand in front of the bike, where the pedaller can see it. The other child "plays the Arduino. He/ she presses the "up arrow" key every time the pedaller has done an agreed number of pedal rotations... at which time, the count goes back to zero, of course.
And the pedaller can say "Left", or "Right", and the human Arduino presses the appropriate key. Beat that, Alexa!
I seriously mean that some kids could have fun thus. Do a clip, put it on YouTube (not Facebook or similar), tell me where it is and I will be very grateful to have it to add to this essay.
This is the code from https://www.instructables.com/id/Riding-Through-Walls-Google-Street-View-Stationary/ as it stood 25 Apr 20. There may have been tweaks to the original author's coce since then. Don' let the following scare you... it is much simpler than it may seem!
/*Exercise Bike Interface to Google Maps Street View
Based on Keyboard.Message Example Program.
 Sends a text string when a button is pressed.
 Adapted to include more manipulation for 'Riding Trough Walls': a X-Canada Bike ride througuh Google Streetview, performed by Megan Smith.

 The circuit:
 * Magnetic reed switch attached from pin 2 to ground
 * Right pushbutton attached from pin 3 to ground
 * Left pushbutton attached from pin 4 to ground
 * Internal pullup resistors used for all three pins

 created 24 Oct 2011, modified 27 Mar 2012
 by Tom Igoe
 modified 24 June 2012
 by Jeff Adkins
 modified 13 May 2015
 by Megan Smith
 modified 15 October 2015
 by John Campbell

This example code is in the public domain.

 <a href="http://www.arduino.cc/en/Tutorial/KeyboardButton">http://www.arduino.cc/en/Tutorial/KeyboardButton</a>
 */

 //initialization of constants
#define NUMBER_OF_BUTTONS  3

#define BUTTON_FORWARD 2
#define BUTTON_LEFT 4
#define BUTTON_RIGHT 3

 // number of pedals that invokes a single "up arrow"
#define CRANK_RATIO 5

 #define KEYPRESS_DELAY_ON  100
#define KEYPRESS_DELAY_OFF 100

 int buttonPin[NUMBER_OF_BUTTONS] = {BUTTON_FORWARD, BUTTON_LEFT, BUTTON_RIGHT};          // input pin for pushbutton
int previousButtonState[NUMBER_OF_BUTTONS] = {HIGH,HIGH,HIGH};   // for checking the state of a pushButton
int counter = 0;                  // button push counter
int debounceFlag1[NUMBER_OF_BUTTONS] = {0,0,0};            // debounce flag
int debounceFlag2[NUMBER_OF_BUTTONS] = {0,0,0};            // debounce flag
// The debounce flags are two separate magnetic field inputs taken one after the other.
// if they match, then the switch is assumed to have actually triggered.

 void setup() {
  // make the pushButton pin an input:
  for(int i=0;i<number_of_buttons;i++) {=""  ="" pinmode(buttonpin[i],="" input_pullup);="" }="" initialize="" control="" over="" the="" keyboard:="" keyboard.begin();="" }<="" p=""></number_of_buttons;i++)>

 // Main Loop
void loop() {
  int buttonState[NUMBER_OF_BUTTONS]={HIGH,HIGH,HIGH};
  for (int i=0; i<number_of_buttons; i++)="" {=""  ="" buttonstate[i]="digitalRead(buttonPin[i]);" switch(buttonpin[i])="" case="" button_forward:="" if="" (="" (buttonstate[i]="" !="previousButtonState[i])" &&="" low))="" debounceflag1[i]="buttonState[i];" delay="" (3);="" debounceflag2[i]="digitalRead(buttonPin[i]);" (debounceflag1[i]="=" debounceflag2[i])="" counter++;="" (counter="">=CRANK_RATIO){
                  counter = 0;
                  Keyboard.press(218);
                  delay(KEYPRESS_DELAY_ON);
                  Keyboard.releaseAll();
                  delay(KEYPRESS_DELAY_OFF);
                }
              }
              debounceFlag1[i] = 0;
              debounceFlag2[i] = 0;
          }
          break;
        case BUTTON_LEFT:
          if(buttonState[i] == LOW) { Keyboard.press(216); }
          else { Keyboard.release(216); }
          break;
        case BUTTON_RIGHT:
          if(buttonState[i] == LOW) {Keyboard.press(215); }
          else { Keyboard.release(215); }
          break;
        default:
          break;
    }
    // save the current button state for comparison next time:
    previousButtonState[i] = buttonState[i];
  }
}
/*
        if ((buttonState[i]!= previousButtonState[i]) && (buttonState[i] == LOW)) {
          debounceFlag1[i] = buttonState[i];
          delay (2);
          debounceFlag2[i] = digitalRead(buttonPin[i]);
          if (debounceFlag1[i] == debounceFlag2[i]) {
            counter++;
            if (counter>=CRANK_RATIO){
              counter = 0;
              Keyboard.press(218);
              delay(KEYPRESS_DELAY_ON);
              Keyboard.release(218);
            }
          }
          debounceFlag1[i] = 0;
          debounceFlag2[i] = 0;
</number_of_buttons;>
*/
Search across all my sites with the Google search button at the top of the page the link will take you to.
Or...
To search *some parts* of THIS site....
To search THIS site.... (Go to my other sites, below, and use their search buttons if you want to search them.)
|
|||
| search engine by freefind |
The search engine merely looks for the words you type, so....
* Spell them properly.
* Don't bother with "How do I get rich?" That will merely return pages with "how", "do", "I"....
Please also note that I have two other sites, and that this search will not include them. They have their own search buttons.
My SheepdogSoftware.co.uk site.
And, within them...
Sequenced set of tutorials on Arduino programming and electronics interfacing.
Tutorials about the free database supplied with Libre Office / Open Office.
Some pages for programmers.
Click here
to visit editor's pages about using computers in Sensing and Control, e.g. weather logging.
My website is hosted by Ionos.com. I would commend them to you, if you want web hosting, or email.
Click here to visit editor's Sheepdog Software freeware, shareware pages.
How to email or write this page's editor, Tom Boyd. Please cite "aht8f-streetview-bike.htm". ...qNO under_score in filename here.
![]() Page has been tested for compliance with INDUSTRY (not MS-only) standards, using the free, publicly accessible validator at validator.w3.org. Mostly passes.
Page has been tested for compliance with INDUSTRY (not MS-only) standards, using the free, publicly accessible validator at validator.w3.org. Mostly passes.
AND passes...

....... P a g e . . . E n d s .....