This is one of a collection of pages which, together, attempt to show you "everything" about the Arduino's programming language.
There is a page for you with more information about the project in general, and the way these pages are organized, if you want that.
Please visit my page about power browsing notes sometime.
This page, and the software it references, ©TK Boyd, 1/2010.
A wise person once said that computing is just....
Users or sensors put information into a computer. The programs in it process that information, and "stuff"... be it ink-on-paper, light on a monitor, or electronic things like motors, etc, switching on comes out.
Have you noticed that our Arduino work so far has not involved that simplest of all input devices, the humble switch? We've done a lot of processing, we've done quite a bit with output. but precious little with input!
Time to put that right.
This isn't the place to go into a deep theoretical discussion of the electronics of inputs. (There are discussions elsewhere, if you want them!)
For now, we're going to see how a doorbell type switch could be attached to an Arduino in a way that allowed the Arduino to "know" if the switch is pressed or not.
(Such a switch is called a "momentary" switch. The other great class of simple switches is the "toggle" switches. The "on/off" switch for your desk lamp is a toggle switch. It connects to the Arduino the same way a momentary switch does. Which you use will depend on the sort of information the switch is supposed to supply to the program.)
One last digression before we get to connecting the momentary switch: Many, many sensors are, in effect, switches. Take the common components of burglar alarms called "PIR"s, or motion detectors. They are essentially switches. When their clever innards detect a person in front of them, they act as if a night watchman was putting his thumb on a momentary switch to ring the "intruder" bell. Some wind speed sensors are just switches: Every time the little windmill goes around, a switch closes briefly. The system reports windspeed based on how many switch closures occur per minute. Etc.
Back to connecting a switch!.....
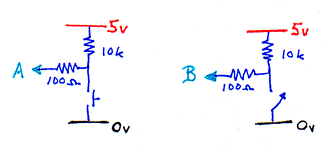
The following is by no means the only way to connect a switch to an Arduino, but I commend it to you, especially if you are still a beginner. One drawing shows a momentary switch, the other shows a toggle switch.
In either case, you need to make three connections to the Arduino... one to its 5v supply, one to its ground (zero volts) and one to one of the Arduino's pins. I have labeled this last connection with a letter.
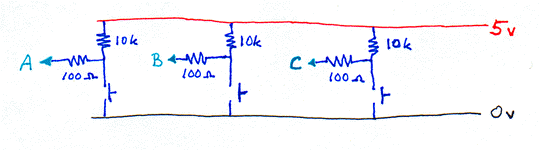
If you want to connect several switches, they can share their connection to 5v and ground as follows....
BE CAREFUL: There are two parts to setting up some Arduino projects. There is the hardware... the things you can touch, including the switches and the wires. And there is the software. The two have to "match".
The 100 ohm resistor in the diagrams above, which may puzzle readers with some experience are there to give you some protection in the case of the following possible Bad Situation.
Suppose you have wired a switch up to pin 5 of your Arduino, as shown above. And suppose you have become confused, and imagine that you were going to put an LED on pin 5.
In your program you are going to put....
pinMode(5,OUTPUT);
And things get really messy if you later have a line saying....
digitalWrite(5,HIGH);
Remember what we said about outputs? They set things up so that, in effect, inside the Arduino the output pins get connected to the Arduino's 5v or 0 volts, depending on the last digitalWrite.
What happens if you have pin 5 configured (pinMode) for output, and set so that it is "connected" to 5v, AND you have the switch wired to pin 5... so far no disaster... AND THEN YOU PRESS DOWN ON THE SWITCH'S BUTTON????
See the problem?
Yes! You have a short circuit!! Five volts, from inside the Arduino, flows out through pin 5, through the 100 ohm resistor, through the switch, and down to ground, zero volts. Without the 100 ohm resistor, you would have a very high current... much more current that should flow through those parts of the Arduino. You could fry that channel, or even the whole Arduino.
With the 100 ohm resistor, you MAY get away with this, as the current will be somewhat limited. Best to avoid such circumstances!
My thanks to the LadyAda tutorials, where I met the 100 ohm safety resistor idea.
BE CAREFUL.
Any pin that is configured as an output must never be connected directly to an external 5 volts or ground.
Happily, pins are configured as inputs until a pinMode command changes them over to being outputs. When a pin is an input, it can be connected to pretty well anything (as long as the voltage "above" it is only 5 volts) and no harm will result. Will your project do what you intended? That's a MUCH bigger question, but at least you won't burn anything out!
So! How do we use inputs?
Hook up two switches... momentary would be best, but toggles will do. Connect the 5v and ground wires, and connect the "outputs" (the lettered wire) of the switches to pins 4 and 5 of your Arduino. Put LEDs, with their usual resistors, on pins 12 and 13.
Then enter (or load) the following program and run it....
/*FEAa1InputsSimple
28 Dec 09

Expects inputs on pins 4 and 5,
LEDs on pins 12 and 13*/

const byte bIn0=4;
const byte bIn1=5;

const byte LED0=12;
const byte LED1=13;

void setup()
{
  pinMode(bIn0,INPUT);
  pinMode(bIn1,INPUT);
  pinMode(LED0,OUTPUT);
  pinMode(LED1,OUTPUT);
}

void loop()
{
  if (digitalRead(bIn0)==LOW)
        {digitalWrite(LED0,HIGH);}
          else {digitalWrite(LED0,LOW);};

  if (digitalRead(bIn1)==LOW)
        {digitalWrite(LED1,HIGH);}
          else {digitalWrite(LED1,LOW);};

          //Add second channel when 1st working

  delay(200);//To slow things down
}
Wow! With two switches, two LEDs, four resistors AND A COMPUTER you have just created something that you could have made.... with two switches, two LEDs, two resistors.. and NO computer! (I actually used 150 ohm resistors in place of the suggested 100 ohm resistors... because it was what I had. They worked okay! And my "switches"? The bared ends of two wires which, nearby were twisted together to hold the ends near one another. To "close the switch", I pinched the bare ends together with my finger and thumb.)
But you are well on the way to more exciting things that DO need the computer!!
Look closely at the circuit and the code. It may not be intuitively obvious that we make the LED driving pin high, thus turning on the LED, when the input pin is LOW. But when your momentary switch is open, it "sees" the 5v that is "available", admittedly through the 10k resistor. But the input "doesn't care" (You DON'T NEED TO KNOW THIS, but, in technical terms: very little current flows through the circuit, and thus the voltage drop across the 10k is small. However, when the switch is closed, the input "sees" the zero volts, "because there is little between it and the zero volts". (And, again, in technical terms, the current flowing through the 10k to ground causes a large voltage drop across the resistor, and the voltage at the input is very low.)
That makes a good place to break this off. We will do more with switches in the next tutorial.
Just one little "aside" arises.... The semi-colons in something like....
  if (digitalRead(bIn1)==LOW)
        {digitalWrite(LED1,HIGH);}
          else {digitalWrite(LED1,LOW);};
... can drive you crazy. Just remember the underlying syntax, and apply the rules.
The search engine is not intelligent. It merely seeks the words you specify. It will not do anything sensible with "What does the 'could not compile' error mean?" It will just return references to pages with "what", "does", "could", "not".... etc.
SPELL your search term properly. When I review search logs, it is amazing how many people ask the engine to search for something meaningless.
![]() Why does this site cause a script to run? I have my web-traffic monitored for me by eXTReMe tracker. They offer a free tracker. If you want to try it, check out their site. And if there are Google ads on the page, they are run with scripts, too.
Why does this site cause a script to run? I have my web-traffic monitored for me by eXTReMe tracker. They offer a free tracker. If you want to try it, check out their site. And if there are Google ads on the page, they are run with scripts, too.
Here is how you can contact this page's editor. This page, and the software it references, ©TK Boyd, 1/2010.
Page WILL BE tested for compliance with INDUSTRY (not MS-only) standards, using the free, publicly accessible validator at validator.w3.org